Pages

27 Apr 2016

Paper Tassels - FREE Cutting File

Tassels are quite the craft accessory of the moment. They are a little more contemporary than a bow and they look great crafted in paper.  Not only are they a great embellishment for many different paper crafting projects, they also look fabulous as a decorative element on gift packages.


I couldn't find a ready-made tassel file that was quite right for what I needed so I designed my own from scratch using the Designer Edition of the Silhouette Studio Software. The tassel file is available for you to download in Studio format for FREE over on the Silhouette UK Blog! Not only that, there is a step-by-step tutorial on how to put a tassel together, enhance your own tassel file and add some nifty finishing touches.


#silhouette #silhouettecameo #freefile #file #studiofile #tassel #paper tassel #silhouetteuk

Design Used: FREE Tassel File

#silhouette #silhouettecameo #freefile #file #studiofile #tassel #paper tassel #silhouetteuk #giftwrapping


I'm so please to have the opportunity to share this file with you. It's a little thank you to you, to the Silhouette crafting community, for giving me so much support and inspiration.

I added this make to the Silhouette Challenges blog - you could add your Silhouette makes too.


22 Apr 2016

Flamingo Card - vellum printed and coloured with alcohol markers

Hello!
Today I have a feel good card made with the latest SVG release from Sanqunetti Design. This single image is available as an SVG (to use with the Designer Edition of the Silhouette Studio software), a DXF (which can be used with the basic version) and a JPG (for printing).  


The colours of Judy's design are some of my favourites, so I wanted to make my version as close to hers as I could and as the sweet flamingo was wearing a tutu, it shouted VELLUM at me! 


Now, I was feeling a little lazy and the coloured vellum I have doesn't come in shades of the same colour - so I cheated! The skirt and bow are printed onto plain frosted vellum in 3 shades with my regular inkjet printer. 


I wanted to use the Print and Cut feature on my Silhouette for my vellum pieces, but the sensors wouldn't pick up the registration marks from the vellum's shiney surface. To combat this I used a paper mask with the registration marks printed on it, with the centre cut away and placed on top of the vellum. It did register successfully, but because I didn't secure it sufficiently, it did skid around on my mat a little and consequently the cuts were a fraction off. 


I used a Copic alcohol marker to disguise the slight flaws and it was so successful that I used only alcohol marker to colour the ellipse and the little circles. Although I used the same colour of marker for both, they happily ended up with two very different shades and patterns. I'm definitely using markers on vellum again!


The sentiment is cut from my new coral vinyl and is just a shade or two darker than the flamingo's body cut from American Crafts card. Just perfect for this job!


I do hope you like my flamingo card. I'm thrilled that my laziness lead to me discovering a new technique to use. Do let me know in the comments if you've used alcohol markers on vellum and what you made. I'd love more ideas on how to use this winning combination.


The Flamingo Ballerina cutting file is available to purchase now from Sanqunetti Design website and at Judy's Etsy store.


17 Apr 2016

Dinosaur Card with Peel-Off Glow-in-the-Dark Sticker

Hello,  Today I've posted a tutorial on the Silhouette UK Blog on how to incorporate a fun peel-off sticker into your card design. 

As well as a great card, your recipient has a sticker that can be removed and stuck onto a smooth surface, a fun addition to a card for a child, or even a young-at-heart adult! For the sticker itself I've used the Silhouette Glow-in-the-Dark Sticker Paper and, almost as importantly, its backing paper!


#dinosaur card #sticker #card #silhouette #silhouetteUk #craftingquine


Its a great way to get more use from your cards and the glow in the dark element both on the card and as a sticker provide even more fun for a young recipient.

#dinosaur card #dinosaur #kidscard  #silhouette #silhouetteuk #silhouettecameo


Do pop over to Silhouette UK Blog to read the full tutorial, its such a fun way to enhance your cards!

SILHOUETTE FILES USED:
Dinosaurs Set 1 by Studio Estrado #77106
Intricate Leaves Background by Jamie Koay #30041
HoHoHo [speech bubble] by  Silhouette #52684


15 Apr 2016

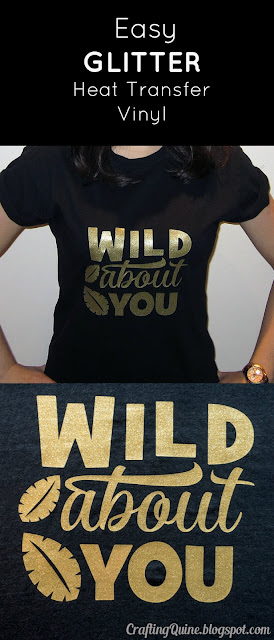
Wild about Gold HTV


Today I'd like to share an easy heat transfer vinyl (HTV) project with you using the Wild About You cutting file from Sanqunetti Design. This would make a great first project if you haven't tried HTV before or a quick, easy project if you are an old hand.


#GlitterHTV #HTV #Silhouette  #SilhouetteCameo #wildaboutyou #vinyl


Glitter heat transfer vinyl (HTV) is thicker that regular HTV and the cut setting needs to be closer to the Flock HTV setting in the Silhouette Studio software than to smooth. However, the brands vary enormously, so do remember to use the test cut feature until you find the correct setting for the vinyl you are using and for your machine.


***  TIPS   ***


Don't forget to flip your design in the software BEFORE you cut it! This is because you turn the design to iron or press it on to your garment. If you don't flip it, the lettering will be backward - potentially an expensive and time-consuming mistake.

Object > Mirror > Flip Horizontal

Then remember to place the vinyl on the cutting mat correctly.

Shiny side DOWN, backing side UP

Seems obvious, but I guarantee EVERY vinyl-er has forgotten more than once!


When it comes to pressing or ironing, the time required to press and allow to cool (or not) varies, so check your supplier's or manufacturer's instructions to get it right.


Gold HTV on a black T-shirt


SVG Cutting File


How many times have YOU cut htv the wrong way round? If I could have a pound for every time I've done it ... !


12 Apr 2016

FREE Weekly File - Triangle Background into Icelandic-inspired Crow Canvas

The FREE design at the Silhouette Store today is a background, or Printable Pattern, as they are called in the Store.  They are a category of file type that I've under-utilised in the past, but having played around with this one, I'm hooked and I can't wait to download more! 


I actually made loads of wall art files to make up later, but they included this one that I really liked as a reminder of my recent trip to Iceland. 


I was thrilled that while we were in Reykyavik, DesignMarchIceland's annual design festival, was in full swing, showcasing the work of local designers as well as some international names. There were many of examples of decorative items depicting members of the crow family (don't ask me which one, Iceland has four).


DESIGNING THE CANVAS

I opened the background in the Silhouette Studio software and re-sized it to fit my printable cotton sheet and a small square gesso-coated blank canvas. 

It was fun to spend some time experimenting with the Fill set of design Windows; Fill Colour, Fill Gradient and Fill Pattern. I settled on a semi-transparent cream colour fill layered over the background. This had the effect of changing the background colour to better match my decor and toned down the stark black/white contrast of the background.


Then I experimented with some of the various crow/raven images available in the design store and finally settled on one shown with its wings spread as I liked the way it created a strong diagonal across the canvas. I added one tiny tweak to the bird, and that was to give him an eye. To do this I drew a circle, created an internal offset, centred them and made a compound path. Then I selected the new eye and the bird and made them all a compound path. 


Finally I changed the fill colour of the raven to one from the background using the Colour Picker and then adjusted the shade slightly using the slider in the Advanced Options. 

I do encourage you to  play with the fill windows. If you enjoy that, move on to the Shader Effects Window. There are days of entertainment right there!


COMPLETING THE CANVAS


I printed the design onto printable cotton media, and in this case just manually trimmed it - making it the largest size image my media could accommodate. It was then simply a case of adhering it to the canvas - job done!


I do hope I've inspired you to make something with the free file. You can share it over on the Silhouette UK Blog using the Linky (no blog required). I'd love to see what you do!


SILHOUETTE DESIGNS USED:

7 Apr 2016

Foil and Vellum Lanterns

Translucent vellum paper can create a magical effect, especially when combined with other reflective surfaces and candlelight!


I have a tutorial on how to make these lovely lanterns over on the Silhouette UK Blog today. The tutorial uses the feathers design lantern by Nic Squirrell, but a similar process could be applied to any of her lovely lantern designs. Using the same feathers design I also made a variation using alcohol inks to add a splash of colour to the vellum. Pop on over to the Silhouette UK Blog for a tutorial on how to make both.


Silver Foil and Vellum Lantern with straight top


Shaped Silver Foil & Vellum Lantern with inks

Shaped Mask, inks and ink applicator


The blue ink is more apparent in day light, but then almost becomes invisible when the candle is lit, battery operated of course.


I hope you enjoy making these too. If do you make the feather lantern, or another lantern design from the Silhouette Design Store, you can share it with the UK Silhouette community by posting a picture on the Silhouette UK Community Facebook page. 
Looking forward to seeing your finished projects. 


SILHOUETTE DESIGNS USED:


5 Apr 2016

FREE Weekly File - Party Hat Garlands

The FREE design at the Silhouette Design Store today is perfect for parties. You can make hats in any size, using any paper you choose. 


I cut very tiny ones from silver glitter paper and attached them to a silver thread to make Party Hat Garlands!


I'm afraid that the picture doesn't do them justice as they do look so lovely here at home. 


What are you going to make with the free file (only free until 11th April 2016)? Check out all the other ideas on the challenge page at the Silhouette UK Blog. You can even upload a picture of your make using the embedded Linkz App. As you can upload a picture directly from your device you don't even need a blog to participate!

I'd love to see what you do.


Personalised Magnetic Paper Dolls

Hello,  today I've shared a tutorial for a fun holiday project over on the Silhouette UK Blog


Did you ever play with paper dolls as a child? Now you can make a magnetic version with Silhouette Printable Magnetic sheets and your Silhouette. Not only that; because you can manipulate photos in the software, you can PERSONALISE your magnetic dolls too!  I'm sure children or grandchildren will have a grand time choosing clothes and customising accessories!


Oh, and did I say that the set is made from a photo of my lovely, generous, understanding daughter! (She did give me permission to use it, after all)!


The  pieces are printed onto the Silhouette magnetic paper on an ink jet printer and cut out on a Silhouette cutting machine. There is a full tutorial on how make this from Samantha Walker's files, download-able from the Silhouette Design Store. 


No real assembly is required and the pieces can be placed on the metal or magnetic surface right away. I thought my board looked a little plain so I added the chalkboard frame. seen in the first photo. 


SILHOUETTE FILES USED:
Samantha Walker BASIC TABBED PAPER DOLL  #10163
Megan Hardy Designs LADIES' ACCESSORIES #41455
Loni Harris CHALKBOARD FRAME #15703


I hope you and your kiddos enjoy this one. Have fun!


I decided to enter this into the Silhouette Challenges Blog #36 as I had such fun with this project and think their followers would too! Why don't you post your make this month too - Anything Goes!