Pages
▼
8 Nov 2017
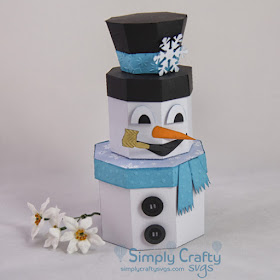
Snow Lady using Simply Crafty SVGs Snowman Stacking Box Set
Hello, Janet here with my first 3D Christmas project of the year using the Snowman Stacking Box Set from Simply Crafty SVGs. I've turned the snowman into a glamorous 'snowLADY' using the Silhouette Cameo's Print & Cut function with digital papers and elements to make new accessories. I used a Silhouette Cameo® 3, but of course these SVG files can be used with other desktop die cutting machines (details here).
My finished Snowlady ended up just under 12" tall, with the largest box at 6.5" across and 4" tall, and the smaller one at 4.5" by 3.75". The original sizes can be found with the Snowman's listing in the Simply Crafty SVGs shop.
MATERIALS:
White Pearl Card (large sheets)
Black Pearl Card
Red & White Baker's Twine
Down the Road Snow Flurries Digital Elements
Down the Road Snow Flurries Digital Papers
Versafine Embossing Ink
Judikins Iridescent Sparkle embossing powder
Sizzix Embossing Folder & Stamp - Fun Stripes Set by Hero Arts
Small gems
Beacon 3-in-1 Glue
Inkjet Printer
Silhouette Cameo
The Snowman Body
I made the whole snowman a little larger to fit some bigger gifts inside. To do this it is necessary merge all the files that make up the snowman onto one tab, selecting all the pieces and enlarging the biggest piece to fit the largest piece of card. Of course, you also need to check that the largest piece to be cut from smaller card fits too.
The Body Box
The two boxes are cut from white pearl card and constructed using the instructions in the PDF included with the Snowman Stacking Box Set files. The top of the lid of the larger box is 'filled' with a snowflake design from the set of digital papers and then print and cut with printer and Cameo. The scarf lid edging was filled a plain paper from the same set.
Scarf
The scarf tails come from the digital set, substituting them for the original scarf tails, but using them to gauge the sizing. All the scarf pieces were stamped with embossing ink and then heat embossed with the iridescent powder to give sparkling stripes.
Buttons
The buttons were cut from coated black card with just the top piece embossed using the striped embossing folder. Once constructed they were mounted to the base using dimensional foam pads.
Mittens
The mittens were a new element taken from the digital elements set and sized to match the project. I print and cut three copies of each glove (one set was a mirror image of another), cutting a slit in one of each. Three copies of the mittens were layered with the slit copy in the middle of the sandwich and with baker's twine trapped inside. The bakers' twine was placed close to the position that the head box will sit on the body lid and then stitched in place using embroidery thread.
Head
I attempted to substitute some more feminine facial elements, using a berry from the digital elements as a nose. I can't pretend that I didn't have several attempts at this, and I'm not entirely sure I achieved it. Maybe you can do better?
Hat
This is my favourite part. The hat parts were cut straight from the file and decorated with print and cut digital elements from the elements set. These were enhanced with the addition of some Glossy Accents, extra small shapes, sequins and adhesive gems.
... And that completes the snowlady.
It was such fun to combine the SVG file with digital elements to make something unique. I hope you'll try it.
Bye for now,
Janet, DT Member Simply Crafty SVGS
Blog: https://CraftingQuine.blogspot.co.uk
Instagram: https://www.instagram.com/craftingquine
Simply Crafty SVG Files:
Snowman Stacking Box Set
Additional Digital Files:
Down the Road Flurries of Fun Digital Elements
Down the Road Flurries of Fun Digital Papers


This is terrific Janet, just fab! Creative Blessings, Tracy x
ReplyDeleteThank you Tracy. Thankfully w3 have no real snow yet!
DeleteFabulous card. What a great creation x
ReplyDeleteTOO cute, that is just so adorable!
ReplyDelete