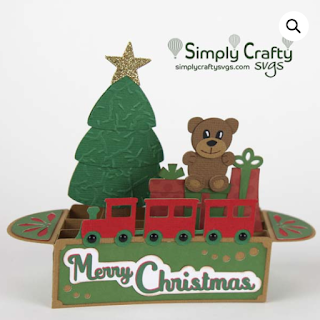
As a new Grandmother I so enjoyed making this special card for my Grandson's first Christmas. It is the
Simply Crafty SVGs Christmas Tree with Train Box Card, and by changing out the sentiment could be used for a baby or child of any age for Christmas, or even for a winter birthday. The paper-piecing on this card was such fun to do, and so effective - well worth the effort.
There is a comprehensive and easy-to-follw video on how to assemble the card linked from the SVG file page in the Simply Crafty SVG shop. SVG cutting files can be used with any electronic cutting machine that will cut SVG files (the Silhouette Cameo requires the Designer Edition of the Silhouette Software to do so).
Materials Used:
Various Colours Medium weight Textured Cardstock
A4/Letter White Medium weight Cardstock (for Print & Cut)
Patterned Paper (I used various plaid papers from Lawn Fawn)
Brown and Bronze Metallic cardstock
Beacon 3-in-1 Adhesive
Dimensional Adhesive Tape
Tim Holtz Distress Oxide Ink in Peacock Feathers
Ink Blending Tool/Brush
Gel/Glaze pens in White and Black
Brown and Bronze Metallic cardstock
Beacon 3-in-1 Adhesive
Dimensional Adhesive Tape
Tim Holtz Distress Oxide Ink in Peacock Feathers
Ink Blending Tool/Brush
Gel/Glaze pens in White and Black
White Decco Foil Flock Transfer Sheets
Silhouette Cameo
Silhouette Cameo
Inkjet Printer (for Print & Cut)
Files Used:
Simply Crafty SVGs Christmas Tree with Train Box Card
Other Digital Files:
Sweet Tea font by Lori Whitlock (Studio Store or LW Store)
I made no changes to the card design, but have outlined a few of the techniques that I used to make this cute card.
Files Used:
Simply Crafty SVGs Christmas Tree with Train Box Card
Other Digital Files:
Sweet Tea font by Lori Whitlock (Studio Store or LW Store)
I made no changes to the card design, but have outlined a few of the techniques that I used to make this cute card.
Cut more than one of each of the piecing elements and have fun mixing up the shades. Use gel or glaze pens to enhance the features like the one on the left.
Adding Dimension
Add dimension by blending onto the edges of the gift boxes, and to the edges of the decorative panels.
Print & Cut Sentiment
Use the pattern piece provided with the file to design your own sentiment, or use the sentiments provided. I always make them in a variety of colours to see which I prefer once they are printed.
Constructing the Layers
Add pieced elements onto the layers. There are full instructions in the designer's construction video.
Attaching the Layers
Attach the back piece to the front at one side, and then attach all the other layers, one by one, on that side only. Ensure that the pieces are all aligned with each other on the bottom edge (marked in red). Then attach the back and the other side of the layers, ensuring that they will lay flat. For this stage I add adhesive to all of them at once. Using wet glue allows for some wiggling to get them all aligned correctly.
This is the file I used. Just click on the photo to visit the page in Simply Crafty SVGs online store.
Janet, DT Member Simply Crafty SVGs
Blog: Crafting Quine
Instagram: @CraftingQuine
Simply Crafty SVG Files:
Christmas Tree with Train Box Card
Adding Snow
Add some optional 'snow' to the top of the tree. I cut the shape freehand from the flocked transfer sheets (if you can work out a way to cut them with a digital cutter, do let me know)!
Making a Matching Envelope
A matching envelope completes the card (the pattern is included with the card file). I used one of my duplicate bears to make a closure for my envelope, adding a dimensional foam square to the body of the bear, positioning it so that the ears overlapped a little to hold the envelope closed (I don't advise this if you intend to post the card).
This was such a fun card to make. Let me know if you try it for yourself, or join and post a picture in the Simply Crafty SVGs Creators Facebook Group - we love to see your makes!
 |
Janet, DT Member Simply Crafty SVGs
Blog: Crafting Quine
Instagram: @CraftingQuine
Simply Crafty SVG Files:
Christmas Tree with Train Box Card


Oh wow Janet this is just amazing. It is simply stunning. I love it. Take care. Hugs Jackie
ReplyDeleteAmazing Janet, what a wonderful treasure for your new Grandson, Congratulations by the way. Love the colours you used, wonderful details as always.
ReplyDeleteFaith x