20 Feb 2019

Turn a box into a card - Bunny Butt Box from Simply Crafty SVGs

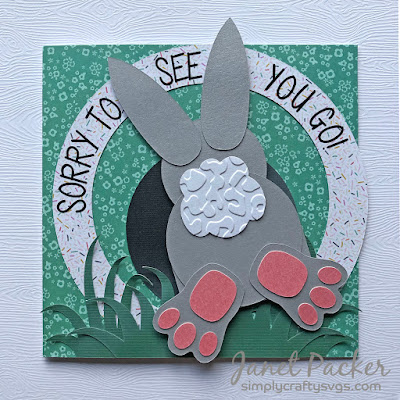
Sorry to See You Go - Bunny Butt Card. Designed by Janet Packer https://craftingquine.blogspot.co.uk for Simply Crafty SVGs using the Bunny Butt Box SVG file. Turning a gift box into a card. Leaving Card.


Hiya, When I saw this fun gift box (the Bunny Butt Box SVG File by Simply Crafty SVGs) I thought it was an ideal gift box for a leaving gift. Then it hit me that the bunny part would be the perfect topper on a leaving card too!

Sorry to See You Go - Bunny Butt Card. Designed by Janet Packer https://craftingquine.blogspot.co.uk for Simply Crafty SVGs using the Bunny Butt Box SVG file. Turning a gift box into a card. Leaving Card.


The designer Sandy, has made a fabulous video on how to put the simple box together (so easy, it would feasible to make them in quantity). In this post I'll show how I transformed it into a card. The bunny was easily turned into a topper in the Silhouette software. I used my Silhouette Cameo and the Silhouette Studio software, but any changes I made could no doubt be replicated in other cutting software and with other machines. The excess parts could even be trimmed off with scissors if you wanted to cut the pieces as they are.


Materials Used:
6" Square Card Blank
Pearl Cardstock in Grey, Pink & White
Patterned Papers
Black and Green Textured Cardstock
Dark Grey Sign Vinyl
Embossing Folder
Manual Die Cutting Machine (for embossing)
Transfer Tape
Beacon 3-in-1 Adhesive
Adhesive foam pads
Silhouette Cameo


Files Used:
Simply Crafty SVGs Bunny Butt Box

Other Digital Files:
Grass file font by Sophie Gallo
LW Skinny Minnie font by Lori Whitlock


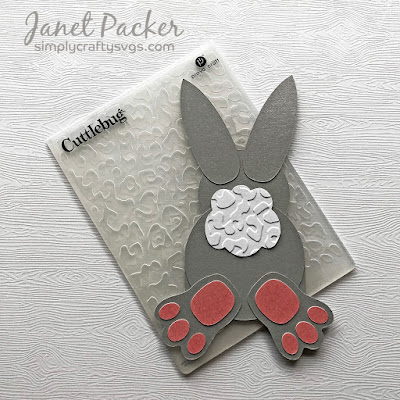
Bunny Topper
In the Silhouette Studio software I used the knife tool to cut along the box base as shown by the red lines below.

Sorry to See You Go - Bunny Butt Card. Designed by Janet Packer https://craftingquine.blogspot.co.uk for Simply Crafty SVGs using the Bunny Butt Box SVG file. Turning a gift box into a card. Leaving Card.


To position the lines in exactly the right place, I find it easiest to turn off the automatic cut option by unticking the auto apply check box. I then draw my lines, keeping them horizontal by holding down the shift key as I draw them. I use the directional arrows on the keyboard to move them to the best position, and then click on 'Apply'. This can save a lot of drawing and undoing!


The Bunny
I cut the basic shapes from grey pearl cardstock and attached the panels as layers in the same colour with liquid adhesive. The paw detail was cut from pink pearl and the tail from white pearl. Prior to attaching the tail I embossed it using the embossing folder shown. I'm afraid that I don't know what this folder is called, and suspect that it may be discontinued, as I've had it for many years.

Sorry to See You Go - Bunny Butt Card. Designed by Janet Packer https://craftingquine.blogspot.co.uk for Simply Crafty SVGs using the Bunny Butt Box SVG file. Turning a gift box into a card. Leaving Card.


The Card 
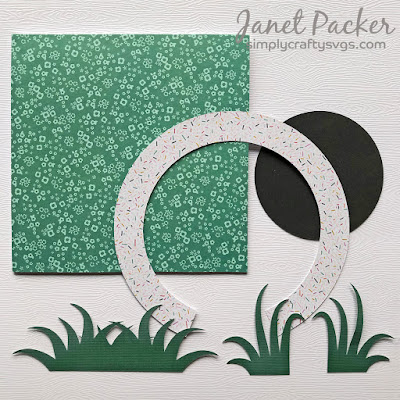
A 6" square card blank was covered with patterned paper. The grass file was opened in the software and the pieces resized and mirrored (using right mouse click, flip horizontal). The other pieces shown were drawn in the software.

Sorry to See You Go - Bunny Butt Card. Designed by Janet Packer https://craftingquine.blogspot.co.uk for Simply Crafty SVGs using the Bunny Butt Box SVG file. Turning a gift box into a card. Leaving Card.


The halo piece was drawn using the one of the new Flexishapes available in the new v4.2 of the Silhouette Studio software in Designer Edition Plus and the Business Edition.


The sentiment
I used the LW Skinny Minnie font to write the sentiment and dragged it to a copy of the shape to make the letters follow the curve of the shape. When the letters were ungrouped it was possible to space the letters out to fit either side of the bunny's ears.


Sorry to See You Go - Bunny Butt Card. Designed by Janet Packer https://craftingquine.blogspot.co.uk for Simply Crafty SVGs using the Bunny Butt Box SVG file. Turning a gift box into a card. Leaving Card.


The letters were then cut from dark grey vinyl.

Sorry to See You Go - Bunny Butt Card. Designed by Janet Packer https://craftingquine.blogspot.co.uk for Simply Crafty SVGs using the Bunny Butt Box SVG file. Turning a gift box into a card. Leaving Card.


Card assembly
Once the halo and circular pieces were attached to the card, the completed bunny was laid in position (not attached) and the letters transferred on transfer tape.

Sorry to See You Go - Bunny Butt Card. Designed by Janet Packer https://craftingquine.blogspot.co.uk for Simply Crafty SVGs using the Bunny Butt Box SVG file. Turning a gift box into a card. Leaving Card.

Next the grass pieces were attached, and then the bunny was raised on foam pads, then attached to the card.

Sorry to See You Go - Bunny Butt Card. Designed by Janet Packer https://craftingquine.blogspot.co.uk for Simply Crafty SVGs using the Bunny Butt Box SVG file. Turning a gift box into a card. Leaving Card.


Finally, the ends of the grass pieces were curled for added texture and the card was complete. I hope you think it's a fun leaving card too!

Sorry to See You Go - Bunny Butt Card. Designed by Janet Packer https://craftingquine.blogspot.co.uk for Simply Crafty SVGs using the Bunny Butt Box SVG file. Turning a gift box into a card. Leaving Card.


This is the Simply crafty SVG file I used. Just click on one of the photo to visit the page in Simply Crafty SVGs online store.


Simply Crafty SVG Files:
Bunny Butt Box

If you previously followed this blog using Google+, you'll see that Google+ has disappeared. Please consider using one of the other follow methods to keep up with my inspiration projects and tutorials. I always post pics and information about my latest posts on my crafting Facebook Page too - Janet Packer Crafting Quine.

9 Feb 2019

Using Glitter Vinyl on Paper - Gift Tags and Birthday Pop Ups


Using Silhouette Glitter Vinyl for giftware accessories and tags. Janet Packer, https://craftingquine.blogspot.co.uk for Graphtecgb aka Silhouette UK


Hello,  Today I have a new 'how-to' on the Silhouette UK Blog with some glittery gorgeousness. February is heavy on birthdays in our household so I love to assemble a stock of tags and gift wrap pretties to use throughout the month and beyond. I've used the Silhouette Glitter Vinyl to add that extra bit of sparkle - it works great on paper as well as on the more usual non-porous surfaces.

Using Silhouette Glitter Vinyl for giftware accessories and tags. Janet Packer, https://craftingquine.blogspot.co.uk for Graphtecgb aka Silhouette UK


Happy Birthday Pop Ups
I've used the glitter vinyl to enhance a few of these fun happy birthday popups using the file by Sweet Afton (#73618) from the Silhouette Design Store. This file can be used as it is, or, as I've done, added letters in glitter vinyl on top.

In the file, the letters aren't separate from the pop up strip. Over on the Silhouette UK blog I show how to cut them separately.

It includes my custom settings too.


Customisable Layered Gift Tags
I've also used the glitter vinyl to enhance some happy birthday gift tags. The file of pretty Cherry Blossom  tags by Nic Squirrell (#79029) from the Silhouette Design Store has three variations. By layering, and alternating the positives and negatives of the pieces cut from lavender textured cardstock and the glitter vinyl, I made even more. I added "Happy B'day" too using the CG Silent Night font by Carine Gardner (#236542).


I'm sold on the glitter vinyl. It very glittery, cuts beautifully and doesn't shed - perfect to use for special occasions of all types. I hope you'll try it.


2 Feb 2019

Textured Translucent Vinyl


This week on the Silhouette UK Blog I've decorated a hanging glass bulb to make a unique tea light holder. I used Silhouette's Textured Translucent Vinyl which has a strong permanent adhesive and is suitable for indoor and outdoor use. The textured translucent finish looks particularly effective on transparent surfaces such as glass.


The post covers:

  • Selecting a Suitable Design
  • Preparing the Design (knife tool)
  • Cutting and applying the Textured Vinyl


The glass bulb was easy to decorate and very effective (although very difficult to photograph). I hope you'll try it.