17 Dec 2017

Decorated Christmas Crackers with Silhouette Glitter Sticker Sheets


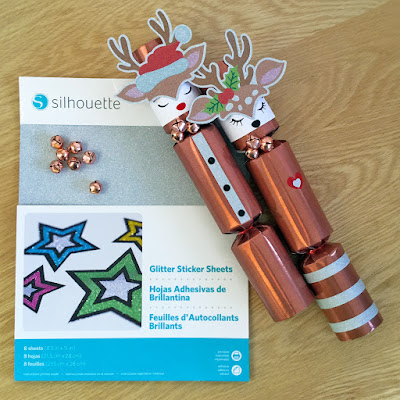
Hiya, today I have a post on the Silhouette UK Blog on the NEW Silhouette® Glitter Sticker Sheets.  It includes a festive project using glitter stickers to decorate some home-made Christmas crackers. I used the Oh Deer heads by Lettering Delights from the Silhouette Store. They are also available as a bundle from Lettering Delights.

Custom Christmas Crackers designed by Janet Packer (CraftingQuine) for the Silhouette UK Blog using Silhouette Adhesive Glitter Sticker Sheets.


The Glitter sticker sheets are new to the UK. There are 8 sheets in a pack, each sheet being 8.5in. x 11in., or 215 mm x 280 mm. The sheets are glittery with a slightly silvery colouration.  They can be printed with any pattern on a home printer. The sheets are adhesive-backed, so no additional adhesive is needed.

My post over on the Silhouette UK blog covers the cut settings for the Silhouette Cameo 3.  I didn't have immediate success with them so I've included lots of tips on using this media specifically.  These tips are useful for using Print & Cut media generally, especially useful for those who haven't let got to grips with this extremely useful function of the Silhouette family of machines.


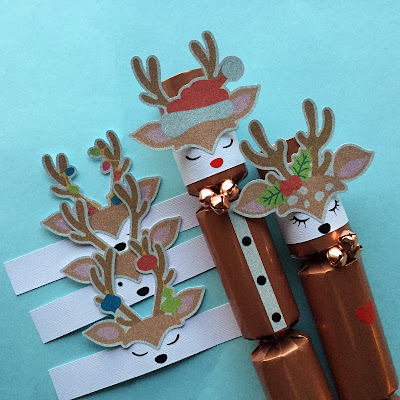
Custom Christmas Crackers designed by Janet Packer (CraftingQuine) for the Silhouette UK Blog using Silhouette Adhesive Glitter Sticker Sheets.


There are also brief instructions on how to use the Oh Deer heads to make wrappers to decorate homemade Christmas crackers. They could be used for many other projects too; toppers, picks and even napkin holders.


13 Dec 2017

Santa Express Box Card with Eclipse Lettering from the Train Box Card by Simply Crafty SVGs


Hello, Janet here with a new folding 3D Christmas card. I've used the SVG file for the Train Box Card from Simply Crafty SVGs to make a fun Santa Express card.


My inspiration came from the Santa Special at our local stretch of the restored Royal Deeside Railway (I live in the northeast of Scotland).  I was drawn towards the plaid (tartan) patterns in the Echo Park 'A Perfect Christmas' digital paper pack, and as the Santa in the matching elements pack reminded me of the one on the train, I used them to decorate a Santa Express Box card.

I've also been massively impressed by the lovely examples of eclipse lettering around at present, and so set out to use some eclipse lettering on the side of the box card.


These instructions are for the Silhouette Studio Designer Edition software, but can no doubt be replicated in other cutting software.


Materials Used:
American Crafts textured card in White, Black, Ladybird, and Grass
Pearl cardstock in Silver and Dark Grey
Silver glitter paper
Beacon Zip Dry Adhesive
Black adhesive foam pads
Silhouette Cameo
Colour printer
Black adhesive gems

Files Used:
Simply Crafty SVGs Train Box Card

Other Digital Files:
A Perfect Christmas Paper Pack #2 by Lori Whitlock for Echo Park
A Perfect Christmas Element Pack #2 by Lori Whitlock for Echo Park
LW Bubble Letter Font by Lori Whitlock


Preparing the Patterned Parts

Load the plaid pattern and chalkboard labels papers into the Silhouette Studio software (with the Designer edition the papers can simply be dragged into the patterns folder in the library). Fill the side and back panels with the plaid pattern.


Create a panel by subtracting small circles from the corners of a rectangle. Type the word 'Santa' in LW Bubble Font and centre it in the panel (a clear fill and a line thickness of zero ensures it will cut, but not print). The word 'express' was typed below and filled with cream and green to print, but not cut.


Trace the Tree Panel from the labels paper, and the Santa PNG from the elements pack.

Place all the patterned pieces onto a Print & Cut virtual mat and send to the printer, then cut with the Silhouette.


(Optional) Use markers to carefully add colour to the edges of the cut pieces.


Cutting the Other Pieces

Cut the remainder of the file pieces from coloured cardstock, with copies of the Santa word and a slightly enlarged copy of the new panel from green cardstock.


Card Assembly

Both written (PDF) and video instructions are available for this file and it is very straightforward to put together. Assemble the card base and then decorate the panels, leaving the wheels, lights and Santa eclipse panel until the other panels have been applied to the card base.


The Eclipse Santa Panel


Adhere the plaid Santa panel to the plain green panel together with the centre pieces from the letter 'A's. Stack the letters and adhere each layer using liquid glue. Adhere the stacked letters into the holes in the Santa panel and your eclipse lettering is complete!


Adding Santa

Stick the two Santas back-to-back. Trim off the upright post from all the window pieces. Trim off the lower part of Santa's body and push his head and arm through the window from the back and adhere him behind the window. Trim off the parts of the body which show on the left-hand side.


Bend the Santa's face, hat, and arm gently forward.


Finishing Touches

Add the lights and wheels, giving extra dimension using adhesive foam pads.


There are so many options for decorating this Train Box card, maybe I'll try out Thomas and friends for boy's birthday cards next year!


Bye for now,
Janet, DT Member Simply Crafty SVGS


Blog: Crafting Quine 
Instagram: @CraftingQuine


Simply Crafty SVG Files:
Train Box Card

10 Dec 2017

Sketching Christmas Cards with the Silhouette Cameo and Silhouette Portrait


Hello Janet here again with ideas for quick, sketch cards drawn onto Kraft card blanks with a Silhouette Cameo or Portrait.


A quick method, for making a batch of cards, is to sketch from the Silhouette software onto pre-made card blanks. I purchased a Winter Birds set of clipart images by Le Petite Market on Etsy and quickly turned them into a set of Christmas cards with the Business Edition of the Silhouette Studio software.  The bird outlines were resized in the Silhouette software and sketch sentiments from the Silhouette Design Store were added. I made six variations and simply sketched them in Uniball Signo white gel pen.


What You'll Need

Kraft Card Blanks with matching Envelopes

Clipart

White Gel Pen

Silhouette Pen Holder

White coloured pencil


STEP 1: Import Images

Open all the winter birds file in the Silhouette software (simply File > Open, locate file and Open). The Business edition of the Silhouette Studio will open the EPS files which are ready to sketch. If you don't have the Business edition you'll need to open either JPG or PNG images and use the trace function to make your own sketch lines.


STEP 2: Add Sentiments

Open the sentiment files in the same tab, or type your own using the Text tool and a sketch font. I used a couple of sentiments from the Silhouette Design Store.  Add some small circles for full stops (periods) for the snow flakes.


STEP 3: Prepare Card Layout

Measure a card blank and make the page size the same as the open blank.

Draw a rectangle/square equal to the size of the card front and place it in the top left of the virtual mat. Position and resize the sentiments and the bird images.


STEP 4: Sketch Cards


You made need to reorientate the page size and card front to match the physical position of the card blank on the mat.


Remove or hide the square and the card is now ready to sketch.

Sketch several of one card and then change out the bird and sentiment to print variations and you'll have a stack of cards in no time.

I added some simple shading with a white coloured pencil.


Just fold the card blanks and they are ready to write and send.


9 Dec 2017

Pyjama Bags - layering HTV


Hello,

Today I have a tutorial on how to make these fun, Christmas-themed, pyjama bags over on the Silhouette UK Blog. I took some blank drawer-string bags and transformed them by decorating them with wine and Christmas phrases from the Silhouette Design Store in jewel-like glitter heat transfer material.

This is a great project if you haven't used heat transfer material (aka HTV) before, or if you'd like to try out multi-colour designs and some layering.  A domestic iron is perfectly adequate for this type of decorative project.


Last year I hit on the idea of gifting Christmas Eve PJs in reusable drawer-string bags, with initial letter tags to indicate the recipient's name. The details for making the reusable tags are here.

I used Silhouette Glitter Heat Transfer Material in Mint, Hot Pink and Silver, with some Black Flock Heat Transfer for contrast.


My blog post on the Silhouette UK Blog includes directions on how to prepare the designs, prepare and cut the media, and apply the media using a heat press, or domestic iron.

I used these designs from the Silhouette Design Store:
Ho, Ho, Ho and a bottle of Merlot
Dear Santa, Define Good
Get Mistletoed
Top of the Nice List
Both Naughty & Nice

Can you guess which one is mine?


1 Dec 2017

Gingerbread Ornaments made with Silhouette Cork Sheets


Hiya. On the Silhouette UK blog this week I've been making faux gingerbread tree ornaments.  I used the Silhouette Cork Sheets; perfect in colour and texture for faux gingerbread.


I used the Snowy House files (1) and (2) by Hero Arts from the Silhouette Design Store, there is also a church in the same series.  The materials and techniques detailed in the post would work for any snow-sprinkled design, so browse your files and see what would fit your decorating scheme and taste.


What I Used

Silhouette Smooth Heat Transfer Material - White,

Silhouette Glitter Heat Transfer Material - White,

Silhouette Cork Sheets,

Ribbon,

Mini Bells,

Liquid Glue,

Iron or Heat Press


I shall hang mine on my Christmas tree, but as they are flat, they could also be attached to a card for  a lovely card/present combination. Of course, family names, house names, or personal greetings can be added to the reverse, for a personalised gift for friends and family.