Showing posts with label Beacon 3-in-1 Craft Glue. Show all posts

20 May 2020

BBQ Master Gift Box


Hiya, I've just completed this fun BBQ gift box using the Chef Hat Gift Box from Simply Crafty SVGs. It's a great little gift box for Dad on Father's Day or for any other BBQ Master in your life. The box is the perfect size for jar of spicy BBQ rub, or small bottle of your favorite BBQ sauce.

The gift box is decorated with elements from the BBQ Box Card Set. This set has two fabulous box cards that would be great to give along with the chef hat box.


Materials Used:
American Crafts Medium Weight Textured Cardstock
Silver Metallic Cardstock
Brown Wood-Effect Cardstock
Black and white Patterned Paper
Beacon 3-in-1 Adhesive
Silhouette Cameo + Designer Edition Software (or other digital cutting machine such as Cricut, Pazzles, Scan-n-Cut etc.)

Files Used:
Simply Crafty SVGs Chef Hat Gift Box
Simply Crafty SVGs BBQ Box Card Set


ADAPTATIONS

BBQ Tools
The tools came from the Box Card set. They are SO DINKY - I love them!


BBQ Master Sign
The 'BBQ Master' sign was also from the Box Card set. I cut two and adhered them together for extra strength. I also made a little reinforcement bar by scoring and folding a small scrap a few times, and adhering that behind the words. You could skip this, but I think it gave the letters a little more rigidity.


Chef Hat Box
I followed the instructions for the box from the linked Simply Crafty SVG's YouTube video. I just adding some extra dimension to the 'button' on the top by making it a little more domed with a ball-ended flower-shaping tool. Using a foam adhesive pad to adhere it supports the button in the centre making the shape more permanent.


Base 
I used a black and white paper with a diamond checkered pattern to cover the base, resembling the pattern on chef's pants/trousers.


Now I'm hoping for some more BBQ-ing weather - it can't always be relied upon in North east Scotland!

Janet, DT Member Simply Crafty SVGs

Blog: Crafting Quine
Instagram: @CraftingQuine


These are the files I used. Just click on the photo to visit the page in Simply Crafty SVGs online store.


22 Apr 2020

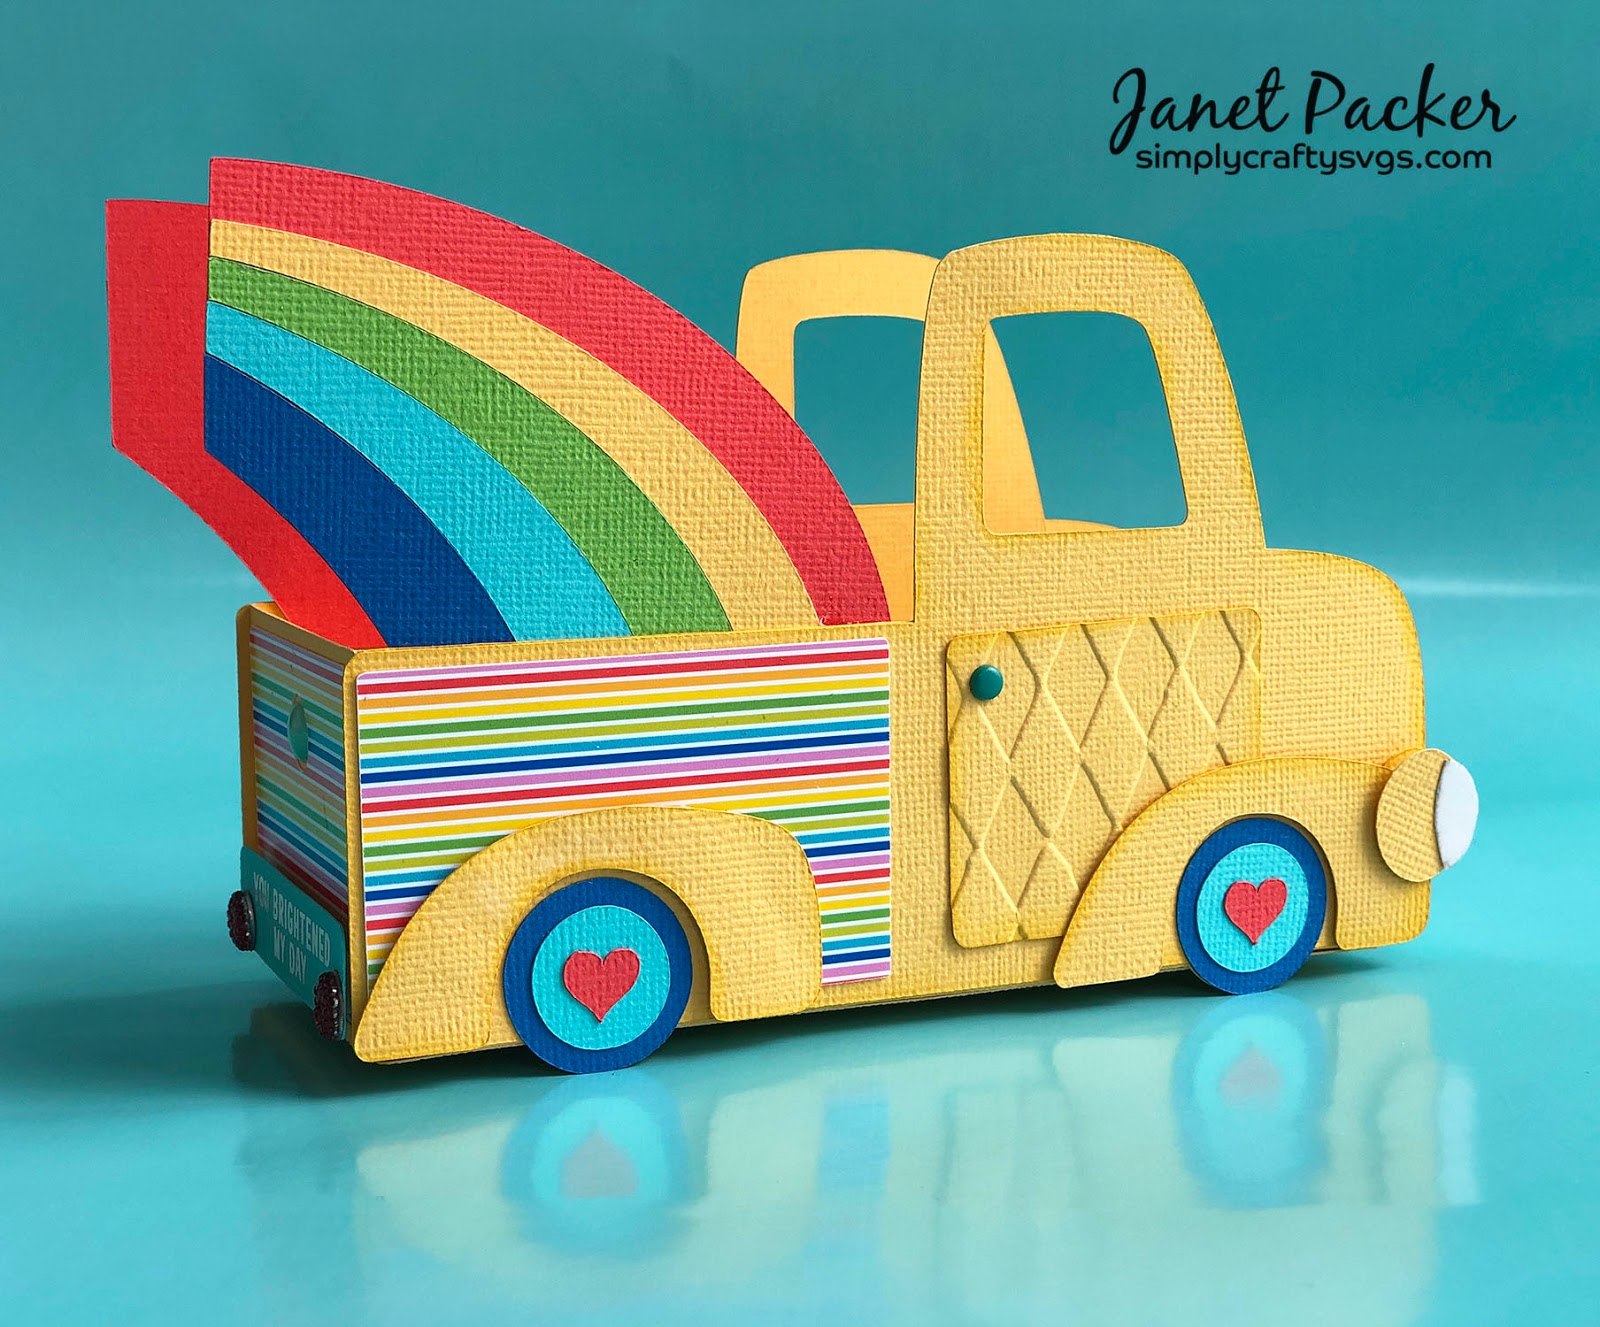
Delivering Sunshine and Rainbows using Simply Crafty SVG's Easter Truck Box


Hiya, Up and down the country, and in many different parts of the world, pictures of rainbows have begun appearing in windows as families and households have worked to stay positive during the lockdown. Rainbows are being seen as a sign of hope, and make a great decoration for gift boxes to give to those who are still working hard, allowing many more of us to socially isolate.

It was simple job to transform the  Easter Truck Box from Simply Crafty SVGs to make a cheerful gift box with a rainbow theme.


I made up the Easter Truck Box in sunshine yellow cardstock, decorated and it with rainbow-printed digital paper panels. I also used the rainbow from the Pot O Gold Treat Box file to show it delivering a rainbow!


Materials Used:
American Crafts Medium Weight Textured Cardstock
White Printable Cardstock/Photo Paper
Manual Embossing Machine & Diamond Embossing Folder
Beacon 3-in-1 Adhesive
White Sign Vinyl
Silhouette Cameo + Designer Edition Software
Colour Printer

Files Used:
Simply Crafty SVGs Easter Truck Box
Simply Crafty SVGs Pot O Gold Treat Box

Other Files Used:
Digital Paper Baptism Day Rainbow by Pebbles in my Pocket


ADAPTATIONS

Panels
I used the Silhouette's Print & Cut function to cut out panels filled with rainbow digital paper.


Wheels
I substituted small hearts instead of bunnies on the wheels.

Doors
The doors were dry embossed with a diamond-pattern embossing folder.

Rainbow
I used the rainbow from the Pot of Gold Treat Box. As the rainbow pieces were individual 'stripes' in the original file, I made a single backing piece by welding the stripes together on a copy of the overlaid stripes. I then flipped a copy the backing and stripes to make a reverse copy, and attached both to opposite sides of the truck. I cut two sets, one being for another project (shown later).


Sentiment
I typed, and sized my sentiments to fit the truck bumpers/fenders and cut them from white sign vinyl - easier to cut than cardstock for these tiny letters.


BONUS PROJECT

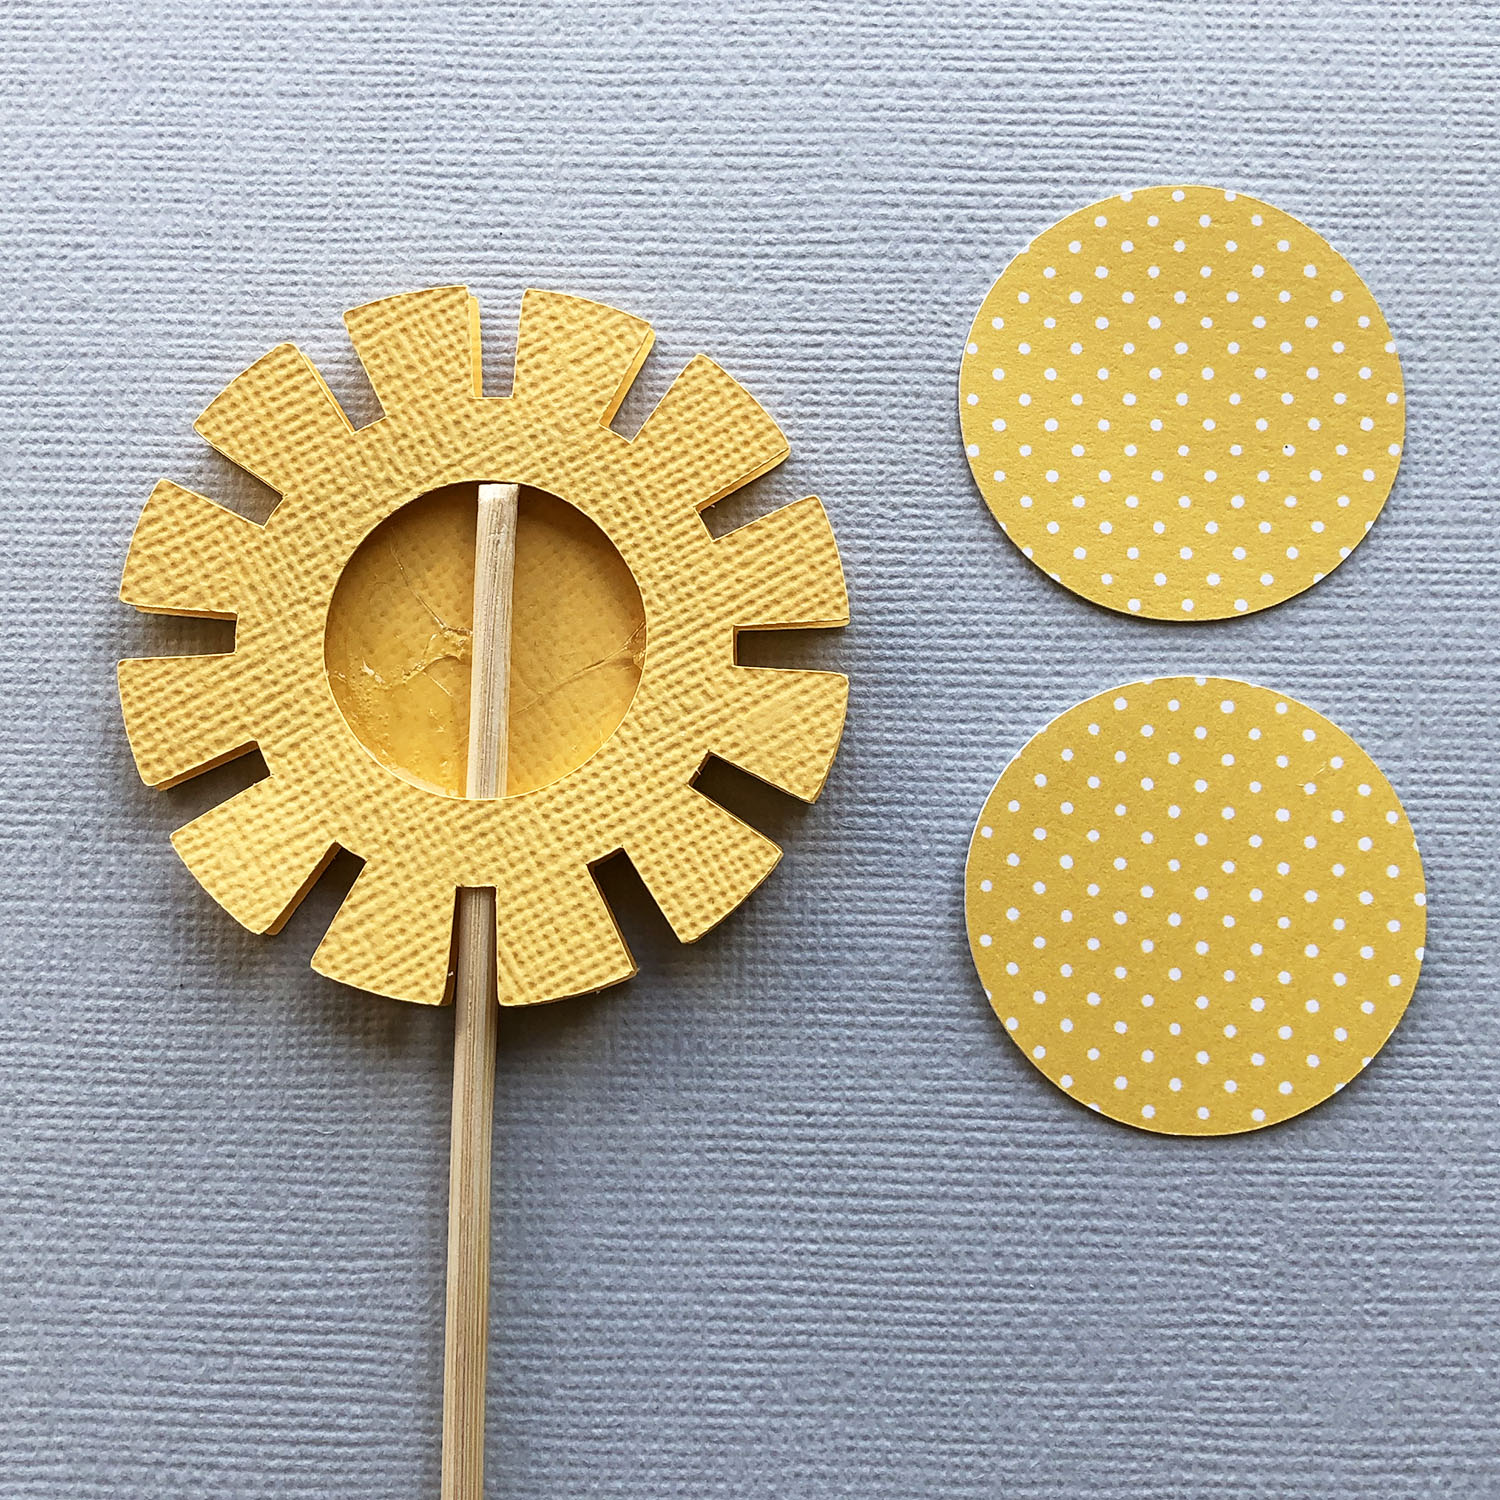
My locality also started a teddy bear hunt, where folks were putting teddy bears in their windows to entertain passing children. I couldn't resist making a hat for my daughter's teddy bear using the same cardstock colour palette. The Simply Crafty SVG Propeller Baseball Hat was perfect. I just added a 3D sun instead of the propeller. The bear also has a rainbow attached to his wrist, with a rubber band adhered to the back, to hold it in place.


The propeller hat doubles up as a gift box.


The sun was made using an adapted Sun Shaker element by Lori Whitlock.


The hat and truck make a fun and cheerful window display and the boxes will later be used for gifting. The truck is perfect for small gifts, chocolates, or even packets of seeds.

It's lovely to work on these cheerful projects in such dismal times - delivering sunshine and rainbows!

These are the files I used. Just click on the photo to visit the page in Simply Crafty SVGs online store.


Janet, DT Member Simply Crafty SVGs

Blog: Crafting Quine 
Instagram: @CraftingQuine


18 Mar 2020

Victorian Top Hat and Stand Gift Box by Simply Crafty SVGs


Hiya, Wow, wow, WOW! I just love this new file from Simply Crafty SVGs! I've been hoping that designer Sandy would be adding to her existing line of SVG hat cutting files, and she has, and this one - the Victorian Top Hat and Stand Gift Box, is my very favourite.

The file includes the stand, and the top of the stand doubles up as a gift box. How fab is that?


Materials Used:
American Crafts Medium weight Textured Cardstock
Heavy-Weight Kraft Cardstock
Texture Fades Embossing Folder By Tim Holtz - Lumber 662718 & Embossing Machine
Distress Ink (Walnut) and Blending Tool
Crafters Companion Speciality Patterned Paper
Metallic Sign Vinyl or Heat Transfer Vinyl, or WRMK Foil Quill Pen & Foil
Beacon 3-in-1 Adhesive
Silhouette Cameo

Files Used:
Simply Crafty SVGs Victorian Top Hat

Other Digital Files: 
Tribal Feathers (Studio/SVG)


CONSTRUCTION

The Top Hat
The hat was made up in black textured cardstock and a band of specialty lace-look paper was added over a wider dark grey cardstock band. The underside of the brim was lined with the lace-look paper too from cutting an extra brim and removing the glue tabs. I did this by changing the elliptical fold line to a cut line in my cut settings, but they could be trimmed off with scissors.

The Feathers
The feathers were cut from the dark grey textured cardstock with the smooth side facing up. Then the feather pattern cut from metallic HTV was added. My original intention had been to use my WRMK Foil Quill, but HTV turned out to be so much quicker. The heat activated HTV was adhered to the cardstock feather base with a medium iron, protected with a heat-resistant sheet. My "how to" on adding HTV cardstock is linked toward the bottom of this post. For the matching button I applied HTV to a circle embellishment made from layers of regular cardstock.

The Stand and Box
The wood-look stand was made using kraft cardstock. The decorative pieces were embossed using a manual die cutting machine and a wood-effect embossing folder. They were then darkened using some brown ink on a blending tool. The box part was left plain and would be a great place to stash a special gift.

I can't wait to use this file again - I can think of SO many ways to use it, and I'm sure can too. Thank you Sandy!


Janet, DT Member Simply Crafty SVGs

Blog: Crafting Quine 
Instagram: @CraftingQuine


28 Oct 2019

Making Cards Interactive - Using the Boat Step Card from simply Crafty SVGs


I love transforming regular card files into interactive cards. This week I've taken the Boat Step Card from Simply Crafty SVGs and added a swing feature, so that the boat rocks on the card. I've also 'winter-ised' it, adding a wintry sky, snowflakes and tiny polar bear. With other small changes this card could be customised for many occasions, and any season. How dramatic would it looks with a star-lit night sky, or a dramatic sunset? Of course, it could also be used as a Christmas or New Year's Card.


Materials Used:
Grey Heavyweight Smooth Cardstock
Duck Egg, Aqua, Teal, Grey, White & Red Medium weight Textured Cardstock
Silver Pearl Cardstock (optional)
Scrap of White Pearl Paper
Beacon 3-in-1 Adhesive
Foam Adhesive Tape and/or Pads
Flat-topped Brad
Small Coin
Silver & White Acrylic Paints & Brush
Silver Sketch Pen
Star and Snowflake Embellishments (Lawn Fawn Mini Snowflakes die set)
Silhouette Cameo

Files Used:
Simply Crafty SVGs Boat Step Card
Simply Crafty SVGs FREE Box Envelope for A2 Card

Other Digital Files: 
Polar Bear by Silhouette (Studio or SVG)

Adapting the File Pieces
Piece 1. The boat will have more room to rock mounted on a flat background, rather than a step, so a new card base was made by welding two shapes the same size as the card back.
Piece 2. Without the step a full length background panel is needed. This was made as an internal offset of the one half of the card back (prior to welding).
Piece 3. An additional back wave layer is needed for mounting the mechanism. It is an elongated version of the biggest wave, made by point editing the two bottom corners and moving them away from the wave edges as a group (holding down shift when the four edit points are selected).
The other pieces were cut as per the file.


Making the Boat
Follow the designer's instructions on the video for assembling the boat, but not the lifesaver/lifebuoy. The video is available from the file's page in the store, or on the designer's YouTube channel. Once the boat is complete, cut away most of the base part, leaving a long tab in the centre.


Make the swing/rock mechanism
Decide where you want the boat to pivot from and punch a hole. This should be placed somewhere close to the vertical centre line. This boat has a convenient lifesaver/lifebuoy. If it did not, the pivot point would have been lower, as it otherwise needs to be covered by the front wave layer.


Attach the coin/weight high enough that it doesn't swing below the front wave layer. Make a mark on the new back (biggest) wave layer where the boat will be attached, then punch a hole.


Attach the boat to the large wave with a flat-topped brad, leaving it loose enough to still swing. (Not shown) To help the boat rock smoothly, place two sticky pads either side of the brad on the reverse of the boat, leaving the liner on top surface (without exposing the sticky top).  To limit the amount of swing/rock, place similar pads either side of the coin. Check that all tape will be hidden by the front wave.


Place adhesive foam tape on the rear of the large wave, leaving the protective layer on for the time being.


Place more adhesive tape to sit behind the front wave. Here I added an extension to the tab, so that I could rock the boat on a video clip without having to tip the card. If you decided to do this, I'd recommend that a semi circle is cut from the base of the front wave so that the tab can be shorter (otherwise it won't stand well).


Attach the front wave, and then attach the complete boat/wave set to the prepared card background. Mine is splattered with silver and white acrylic paint, dry embosssing would be an alternative.


To disguise the brad, the waste circle from the lifesaver was stuck to the top and then the assembled lifesaver/lifebuoy stuck on top of that.


Other finishing touches included some tiny die-cut silver stars, a die-cut snowflake, a greeting in silver sketch pen, and a tiny, tiny, polar bear. The bear is cut from glimmer paper, and the edges coloured with a blue marker.


I hope you'll have a go at making your cards interactive. It takes a little trial and error, but so worth it for such a fun result.

These are the files I used (including the free envelope file). Just click on the photo to visit the page in Simply Crafty SVGs online store.


Janet, DT Member Simply Crafty SVGs

Blog: Crafting Quine 
Instagram: @CraftingQuine


19 Sept 2019

Beer Crate Big Rig Box Card re-using Packaging


Hiya! Inspiration can come from some weird and wonderful places, and this week's card inspiration was no exception.  I had a card to make for a beer-loving friend, and wondered how I could incorporate the gorgeous impressionistic landscape design from the packaging of one of our favourite beers. A quick browse around the Simply Crafty SVG shop, and I found the perfect SVG cutting file - the Big Rig Box Card.


I made up the card with a few little changes, and I've detailed these below in case you'd like to make one too. The instructions here refer to the Silhouette Studio Designer Edition software, but could easily be adapted for other die cutting software and machines such as the Cricut.

Materials Used:
Cardboard Packaging
Black, Grey, Yellow, Brown & Light Green Medium weight Textured Cardstock
Yellow Pearl Cardstock
Red Paper Scrap
Double-sided Decorative Card/Paper (for the envelope)
Beacon 3-in-1 Craft Adhesive
Tonic Nuvo Crystal Drops in English Mustard
Plaid Embossing Folder & Embossing Machine (Cuttlebug)
Bronze Metallic Sketch Pen (Silhouette)
Bronze Metallic Marker Pen (Sharpie)
Silhouette Cameo or other Digital DieCutting Machine

Files Used:
Simply Crafty SVGs Big Rig Box Card
Simply Crafty SVGs Beer Bottle Card

Other Font Files: 
Ariel Bold font (pre-installed)
Lettering Delights Simple Italic sketch font


Colors
I picked out some matching colours of cardstock from my stash. Most of these are American Crafts medium-weight textured cardstock. I also added some pale yellow pearl card stock (not pictured).


Assembly
I cut the pieces from the various cardstocks, using the yellow pearl in place of the metallic cardstock recommended by the designer. The designer has provided a YouTube video with instructions, and I followed these changing out the decorative panels. The pieces fit together perfectly, so it was a fun and easy assembly process.


Decorative Panels
One long and one short panel were cut from a trimmed piece of the packaging, which I secured to the cutting mat with additional washi tape, as it was somewhat thicker than regular cardstock. I placed it upside down because I wanted to cut a piece from the lower part of the picture, and it was easier to align that way.


Additional Decorations
I cut out the word 'beer' in Ariel font from the front fender/bumper then backed it with a second one in a contrasting colour. I cut the brewery's emblem out of the packaging too. I didn't have the embossing folder suggested in the assembly video, but made do by using the striped parts of a plaid embossing folder.


Bottles
I used a bottle and the simple cap piece from the Beer Bottle Card. I copied them into the rig file, then reduced it in size, replicated it several times, then overlapped them slightly. Then I welded them together and cut two identical strips of bottles.


The bottle tops were drawn on with a bronze metallic marker pen, and then the bottle strips were adhered to the insides of the rig.


Sentiment
The final decorative panel was cut from the smooth side of a piece of textured cardstock and I used a Silhouette sketch pen to write a sentiment on it. The headlights were made more dimensional with the addition of some yellow crystal drops and allowed to dry completely (overnight). As an afterthought I added plain black circles of cardstock on the reverse of the wheels.


Envelope
The more eagle-eyed amongst you may have noticed my big faux-pas. I first cut the envelope at the original size, and once the bottles were added to the rig it was too small to fit the card in. I simply cut another one (the polka-dotted one), but stretched it length-wise prior to cutting to be tall enough hold the rig and its load!


Here is the finished card with an uncut box. I think the recipient will like this one and I hope you do too!


These are the files I used. Just click on the photo to visit the page in Simply Crafty SVGs online store.


Blog: Crafting Quine 
Instagram: @CraftingQuine

Simply Crafty SVG Files:
Big Rig Box Card
Beer Bottle Card