Showing posts with label box cards. Show all posts

18 Nov 2020

Special Paper-Pieced Christmas Card for a Child using the Christmas Tree with Train Box Card


As a new Grandmother I so enjoyed making this special card for my Grandson's first Christmas. It is the 
Simply Crafty SVGs Christmas Tree with Train Box Card, and by changing out the sentiment could be used for a baby or child of any age for Christmas, or even for a winter birthday. The paper-piecing on this card was such fun to do, and so effective - well worth the effort. 

There is a comprehensive and easy-to-follw video on how to assemble the card linked from the SVG file page in the Simply Crafty SVG shop. SVG cutting files can be used with any electronic cutting machine that will cut SVG files (the Silhouette Cameo requires the Designer Edition of the Silhouette Software to do so).


Materials Used:
Various Colours Medium weight Textured Cardstock
A4/Letter White Medium weight Cardstock (for Print & Cut)
Patterned Paper (I used various plaid papers from Lawn Fawn)
Brown and Bronze Metallic cardstock
Beacon 3-in-1 Adhesive
Dimensional Adhesive Tape
Tim Holtz Distress Oxide Ink in Peacock Feathers
Ink Blending Tool/Brush
Gel/Glaze pens in White and Black
White Decco Foil Flock Transfer Sheets
Silhouette Cameo
Inkjet Printer (for Print & Cut)

Files Used:
Simply Crafty SVGs Christmas Tree with Train Box Card

Other Digital Files: 
Sweet Tea font by Lori Whitlock (Studio Store or LW Store)

I made no changes to the card design, but have outlined a few of the techniques that I used to make this cute card.

Paper Piecing
Cut more than one of each of the piecing elements and have fun mixing up the shades. Use gel or glaze pens to enhance the features like the one on the left.


Adding Dimension
Add dimension by blending onto the edges of the gift boxes, and to the edges of the decorative panels.


Print & Cut Sentiment

Use the pattern piece provided with the file to design your own sentiment, or use the sentiments provided. I always make them in a variety of colours to see which I prefer once they are printed.


Constructing the Layers


Add pieced elements onto the layers. There are full instructions in the designer's construction video.


Attaching the Layers


Attach the back piece to the front at one side, and then attach all the other layers, one by one, on that side only. Ensure that the pieces are all aligned with each other on the bottom edge (marked in red). Then attach the back and the other side of the layers, ensuring that they will lay flat. For this stage I add adhesive to all of them at once. Using wet glue allows for some wiggling to get them all aligned correctly.


Adding Snow

Add some optional 'snow' to the top of the tree. I cut the shape freehand from the flocked transfer sheets (if you can work out a way to cut them with a digital cutter, do let me know)! 


Making a Matching Envelope


A matching envelope completes the card (the pattern is included with the card file). I used one of my duplicate bears to make a closure for my envelope, adding a dimensional foam square to the body of the bear, positioning it so that the ears overlapped a little to hold the envelope closed (I don't advise this if you intend to post the card).


This was such a fun card to make. Let me know if you try it for yourself, or join and post a picture in the Simply Crafty SVGs Creators Facebook Group - we love to see your makes!
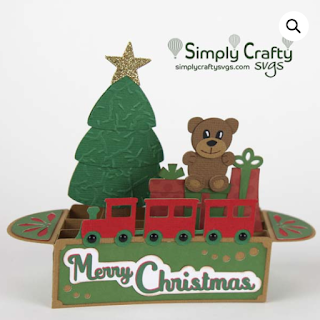

This is the file I used. Just click on the photo to visit the page in Simply Crafty SVGs online store.

Christmas Tree with Train Box Card

Janet, DT Member Simply Crafty SVGs

Blog: Crafting Quine 
Instagram: @CraftingQuine

Simply Crafty SVG Files:
Christmas Tree with Train Box Card


22 Jan 2020

Love Bug Box Card from Simply Crafty SVGs


Hiya, I have a nostalgia post for your today. Do you remember a series of movies from the 1960s featuring a mischievous VW Beetle? Well using the Bug Box Card from Simply Crafty SVGs I've made a love bug of my own. I think it's a cute version for a Valentine's or Birthday card.


Materials Used:
White, Red, Blue & Black Medium weight Textured Cardstock
Black Gloss Cardstock
Silver Matt Metallic Cardstock
Silver Glitter Paper
Clear Acetate (optional)
Thick Printer Paper
Beacon 3-in-1 Adhesive
Dimensional Adhesive Tape
Grey Ink Pad
Silhouette Cameo
Inkjet Printer


Files Used:
Simply Crafty SVGs Bug Box Card

Other Digital Files: 
Shadow Scenery Dingbat by Lettering delights (OTF)
Watercolor Ombre Pattern by Amy Robison (Studio)
LW Quirky font by Lori Whitlock (OTF)

Background

I filled the background piece with a watercolour ombre pattern and one of the scenery dingbats. I set this up as a Print & Cut on think printer paper to make an easy custom background.


These pictures show I intensified the colour using the Image Effects Tools in the Silhouette software. (excuse these two photos having the piece upside down, I did notice before printing).


The Background was cropped and filled with black.  The horizon line shown is the top/bottom edge where the pattern is tiled. This becomes visible when the design is scaled down and moved using the Panning function.


The pattern was moved until the edge just showed  above the hills. Then the Print & Cut was set up to minimise paper by moving the bottom print mark up towards the top of the paper.


Stripes

I cut the car from the white cardstock, inking the edges with grey ink for added definition.  The stripes of coloured paper were added during assembly. I cut long, narrow strips from the edge of the 12" square paper. One strip each of blue and red was sufficient for the whole car. The pieces were applied as each layer was assembled making them easy to align.


Race Number

This wouldn't have been a love bug without a race number, and this one was easily made by drawing two circles. The numbers, were written in LW Quirky font and removed from the smaller circle using 'Make Compound Path'. This could be substituted with the birthday age, for a birthday card, or with a red heart for Valentine's.


This is the file I used. Just click on the photo to visit the page in Simply Crafty SVGs online store.


Janet, DT Member Simply Crafty SVGs

Blog: Crafting Quine 
Instagram: @CraftingQuine


Simply Crafty SVG Files:
Bug Box Card

19 Sept 2019

Beer Crate Big Rig Box Card re-using Packaging


Hiya! Inspiration can come from some weird and wonderful places, and this week's card inspiration was no exception.  I had a card to make for a beer-loving friend, and wondered how I could incorporate the gorgeous impressionistic landscape design from the packaging of one of our favourite beers. A quick browse around the Simply Crafty SVG shop, and I found the perfect SVG cutting file - the Big Rig Box Card.


I made up the card with a few little changes, and I've detailed these below in case you'd like to make one too. The instructions here refer to the Silhouette Studio Designer Edition software, but could easily be adapted for other die cutting software and machines such as the Cricut.

Materials Used:
Cardboard Packaging
Black, Grey, Yellow, Brown & Light Green Medium weight Textured Cardstock
Yellow Pearl Cardstock
Red Paper Scrap
Double-sided Decorative Card/Paper (for the envelope)
Beacon 3-in-1 Craft Adhesive
Tonic Nuvo Crystal Drops in English Mustard
Plaid Embossing Folder & Embossing Machine (Cuttlebug)
Bronze Metallic Sketch Pen (Silhouette)
Bronze Metallic Marker Pen (Sharpie)
Silhouette Cameo or other Digital DieCutting Machine

Files Used:
Simply Crafty SVGs Big Rig Box Card
Simply Crafty SVGs Beer Bottle Card

Other Font Files: 
Ariel Bold font (pre-installed)
Lettering Delights Simple Italic sketch font


Colors
I picked out some matching colours of cardstock from my stash. Most of these are American Crafts medium-weight textured cardstock. I also added some pale yellow pearl card stock (not pictured).


Assembly
I cut the pieces from the various cardstocks, using the yellow pearl in place of the metallic cardstock recommended by the designer. The designer has provided a YouTube video with instructions, and I followed these changing out the decorative panels. The pieces fit together perfectly, so it was a fun and easy assembly process.


Decorative Panels
One long and one short panel were cut from a trimmed piece of the packaging, which I secured to the cutting mat with additional washi tape, as it was somewhat thicker than regular cardstock. I placed it upside down because I wanted to cut a piece from the lower part of the picture, and it was easier to align that way.


Additional Decorations
I cut out the word 'beer' in Ariel font from the front fender/bumper then backed it with a second one in a contrasting colour. I cut the brewery's emblem out of the packaging too. I didn't have the embossing folder suggested in the assembly video, but made do by using the striped parts of a plaid embossing folder.


Bottles
I used a bottle and the simple cap piece from the Beer Bottle Card. I copied them into the rig file, then reduced it in size, replicated it several times, then overlapped them slightly. Then I welded them together and cut two identical strips of bottles.


The bottle tops were drawn on with a bronze metallic marker pen, and then the bottle strips were adhered to the insides of the rig.


Sentiment
The final decorative panel was cut from the smooth side of a piece of textured cardstock and I used a Silhouette sketch pen to write a sentiment on it. The headlights were made more dimensional with the addition of some yellow crystal drops and allowed to dry completely (overnight). As an afterthought I added plain black circles of cardstock on the reverse of the wheels.


Envelope
The more eagle-eyed amongst you may have noticed my big faux-pas. I first cut the envelope at the original size, and once the bottles were added to the rig it was too small to fit the card in. I simply cut another one (the polka-dotted one), but stretched it length-wise prior to cutting to be tall enough hold the rig and its load!


Here is the finished card with an uncut box. I think the recipient will like this one and I hope you do too!


These are the files I used. Just click on the photo to visit the page in Simply Crafty SVGs online store.


Blog: Crafting Quine 
Instagram: @CraftingQuine

Simply Crafty SVG Files:
Big Rig Box Card
Beer Bottle Card


23 Aug 2018

Glow in the Dark Space Card


Hiya, on the Silhouette UK Blog today, I have a space themed box card featuring glowing embellishments cut from Silhouette's Printable Glow in the Dark Sticker Sheets.

The card design is the Space Rocket Planets 3D Box Card file (#135755) by Snap Dragon Snippets which can be purchased from the Silhouette Design Store, or direct from SVG Attic.

Here are the materials I used in this project:

AC Smooth Navy Cardstock
Patterned Papers (Graphtec GB, All Occasions, and My Mind's Eye, Summer Splash)
Silhouette Glow in the dark Sticker Sheets
Silhouette Metallic Vinyl (red)
Vinyl Scraps (blue, green & yellow)
Double-sided Adhesive Tape
Dimensional Foam Pads
Silhouette Cameo or Portrait

Pop over to the Silhouette UK Blog for more details.


26 May 2018

Simply Crafty SVGs Father's Day Blog Hop


Welcome to the first ever Simply Crafty SVGs Blog Hop! THE HOP HAS NOW CLOSED, but you can still visit all the blogs on the hop for some great Father's Day inspiration.

The winner of the $5 Simply Crafty SVGs Store Gift Voucher for this blog is Jill Beattie - CONGRATULATIONS Jill! 

I have a Father's Day card for ultra cool dads for you using the cute Side-by-Side Box Card with additional surf elements from the Surf 'n Swim Box set and the Surfer's Paradise Card.


This was such a fun make, I loved adding all the little details. I've shared how I made some of my favourite parts with you below.

To find these and other great files click here: Simply Crafty SVGs 

Thank you for participating in the Father's Day Blog Hop featuring Simply Crafty SVGs' files. To enter for your chance to receive a Simply Crafty SVGs' Gift Certificate you must leave a comment below and follow this blog. The more blogs in the hop you visit and comment on, the more chances you have to win! 

Contest runs from 05/26/2018 12:00 AM EST to 05/28/2018 11:59 PM EST. One WINNER from each blog will be awarded a $5 gift certificate, and one GRAND PRIZE WINNER will be awarded a $10 gift certificate based on all comments from all blogs. All winners will be announced June 2, 2018 on the Simply Crafty SVGs Blog. You can check back here to see if you are a winner on THIS blog! 

Please continue the hop by visiting the next crafter on the list!
2. Janet ⇚ YOU ARE HERE
3. Julie
4. Lena
5. Leslie
6. Nancy

Make sure you visit each one, leave a comment and follow 
so that you have more chances to win :)
Do visit the store and try one of Simply Crafty SVGs files. 

There a lots of free SVG files to try too!


Flames Paint Job

My first customisation was to the vehicle's paint job. I 'borrowed' the layered flames from one of the surfboard boxes. It needed minimal re-sizing to fit the body of the vehicle. I cut duplicate copies and trimmed the flames by hand so that all the flame design on all panels aligned correctly.


Wheels

The tyres were cut from black cardstock with a shiny finish and layered for added dimension.  The rims are cut from matte silver metallic cardstock and trimmed with metal stars.


Licence Plates

I added small plates both back and front which can be customised in all sorts of ways.  I used the Stencil Font which came with Microsoft Office.


Surf Board

The surf board comes from the Surfer's Paradise Card and has an added 'Dad' decal; just a simple oval shape with an offset and the letters cut from the top layer (written in Ariel Bold). Don't forget to keep the counters (interior parts from the cut letters) as they are so easy to mislay! The assembled board is then mounted onto the central brace.


Here's a list of all the bits and pieces I used.

  • American Crafts Textured Cardstock (white, red, yellow, orange)
  • Centura Pearl Black Cardstock
  • Silver Metallic Cardstock
  • Tim Holtz Ideology Adornments Metal Stars
  • Self-Adhesive Square Gems (red & orange)
  • Bead (for door handle)
  • Beacon Zip Dry Adhesive
Do contact me if you need any additional information.

Follow me on Instagram for extra crafting inspiration!


16 May 2018

Anyone for Tennis? Cutting intricate pieces in Vinyl

Wimbledon and USA Open Tennis Cards made by Janet Packer (Crafting Quine) from the "At The Ball Park Card' by Simply Crafty SVGs.

Hiya, Anyone for tennis? Today I've adapted the At The Ball Park  card file from Simply Crafty SVGs into a tennis card - in fact TWO tennis cards! Thinking of the Grand Slam Tournament, I've made a US Open as well as a Wimbledon version.


Living in the UK, I don't see many baseball games (live, or televised). However, tennis features much, much more, and Wimbledon was always such a HUGE event in my household as a child. I couldn't find any dimensional tennis cards out there, so I thought the fun baseball card could be successfully adapted.

I substituted the baseball and starred balls for tennis balls, and used tennis rackets in place of the baseball bats.  The court was a little more tricky and I sliced off the baseball field and welded on an offset of the tennis court.

For my card I needed some tennis images, and I found these open source ones at Openclipart.org. However, although they can be downloaded as SVG files, they aren't what you'd call 'cut ready'.

Tennis Racket by johnny_automatic
Tennis Court by netalloy
Tennis Ball by casino

I'll have a separate post on how to manipulate the new images ready for cutting, but in this post I'm concentrating on cutting out the intricate bits in vinyl (and a surprise material)! Now, I should emphasise that all the original pieces will cut fine; it's just my new bits that were too intricate to cut from cardstock.


Tennis Court Lines

The court lines are cut from white vinyl.

Wimbledon and USA Open Tennis Cards made by Janet Packer (Crafting Quine) from the "At The Ball Park Card' by Simply Crafty SVGs.


The Wimbledon court has card stripes to represent the grass courts used in the UK ...

Wimbledon and USA Open Tennis Cards made by Janet Packer (Crafting Quine) from the "At The Ball Park Card' by Simply Crafty SVGs.


whereas the US Open court is flat blue to represent the hard courts used in the USA tournament.

Wimbledon and USA Open Tennis Cards made by Janet Packer (Crafting Quine) from the "At The Ball Park Card' by Simply Crafty SVGs.


The cut for the lines could have been paper (the one on the right), but paper would have been tricky to adhere without some glue residue, so self-adhesive vinyl was a 'cleaner' way to go.

Wimbledon and USA Open Tennis Cards made by Janet Packer (Crafting Quine) from the "At The Ball Park Card' by Simply Crafty SVGs.


Tennis Net

Now the material chosen for the net might come as a bit of a surprise. It is actually some trimmed, self-adhesive, paper lace.

Wimbledon and USA Open Tennis Cards made by Janet Packer (Crafting Quine) from the "At The Ball Park Card' by Simply Crafty SVGs.


Very quick and easy to apply.

Wimbledon and USA Open Tennis Cards made by Janet Packer (Crafting Quine) from the "At The Ball Park Card' by Simply Crafty SVGs.


Tennis Rackets

I cut the tennis racket bodies from wood-look vinyl for a retro look. They could also have been cut from silver, or coloured vinyl, to resemble steel, aluminium or carbon fibre.

Wimbledon and USA Open Tennis Cards made by Janet Packer (Crafting Quine) from the "At The Ball Park Card' by Simply Crafty SVGs.


As it is would have been difficult to adhere the paper handle on top of the vinyl, I trimmed off the handle first, before applying it to the cardstock backing piece. Then it was an easy matter to apply the paper handle onto the racquet.

Wimbledon and USA Open Tennis Cards made by Janet Packer (Crafting Quine) from the "At The Ball Park Card' by Simply Crafty SVGs.


Sentiments

The sentiments were written in LW Classic in the Silhouette Studio software and then cut from white vinyl. I love how it is possible to design custom sentiments without having to rely on using stamps or someone else's phrases.

Wimbledon and USA Open Tennis Cards made by Janet Packer (Crafting Quine) from the "At The Ball Park Card' by Simply Crafty SVGs.


You'll noice that I have cut extra dots for the exclamation mark. I find that this is good insurance in case one is lost along the way.

Wimbledon and USA Open Tennis Cards made by Janet Packer (Crafting Quine) from the "At The Ball Park Card' by Simply Crafty SVGs.


Tennis Balls

I LOVE how these tennis balls turned out. They are made of two layers, the white under part, and three separate yellow/green top pieces. The American Crafts cardstock was the perfect colour! As an aside, do you think that tennis balls are green or yellow? My husband says yellow, but I say green.

Wimbledon and USA Open Tennis Cards made by Janet Packer (Crafting Quine) from the "At The Ball Park Card' by Simply Crafty SVGs.


Here's the finished US version of the card.

Wimbledon and USA Open Tennis Cards made by Janet Packer (Crafting Quine) from the "At The Ball Park Card' by Simply Crafty SVGs.


I like them both. Which is your favourite?