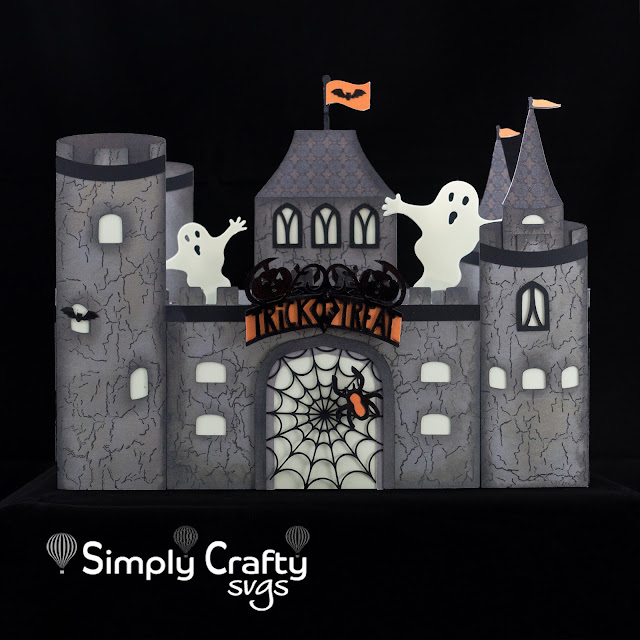
Hello, Janet here with a new Halloween project. I've used the SVG file for the Dragon Castle Card from Simply Crafty SVGs as a starting point for this folding haunted castle.
You might have noticed that I can't resist changing things up a bit and as Sandy's files are so well designed and versatile they are the perfect for this. Sandy's castle box card is great as it is, and comes with a super dragon - brilliant for all the 'Game of Thrones' fans in your life. Not only that, the file contains a bonus shaped card of the dragon in all his/her glory!
However, I needed something bigger so I enlarged the castle design and used two castles stuck back-to-back. Then I added some Halloween embellishments and the castle was transformed. I was so pleased when I realised that it still folded down. That means I can easily store it and reuse it next year.
Materials Used:
Grey Heavyweight Card in A3 sheets 240 gsm
Crackle-textured Background Stamp
Black Soot and Frayed Burlap Distress Oxide Inks
Patterned papers in Grey and Orange
Black Paper
Silhouette Glow-in-the-Dark Sticker Paper
Black Wink of Stella Pen
Beacon 3-in-1 Adhesive
Dimensional Adhesive Pads
Silhouette Cameo
Silhouette 12" x 24" Cutting Mat
Files Used:
Simply Crafty SVGs Dragon Castle Card
Silhouette Studio Files:
Haunted House Accessories by Samantha Walker (ghosts) (#34010)*
Trick or Treat Halloween Banner by Emily Dyer (#97615)
Spider Web by Silhouette (#2954)*
Spider & Web by Sarah Bailey (spider) (#33514)
Bats by Lori Whitlock (#156856)
*also available as SVGs
Resizing and Cutting
I enlarged all the castle card components so that the biggest piece would fit onto A3 cardstock approx. 11.5" x 16.5". The file piece shown is roughly 8" x 16". The I cut double the number of card bases, panels and door frames from the grey cardstock. I also cut additional small towers to put on the inside of the castle.
Decorating the Card/Castle Base
I used black distress oxide ink to blend some ink around the the edges of the inside parts of the castle (parts not covered with panels).
Decorating the Panels
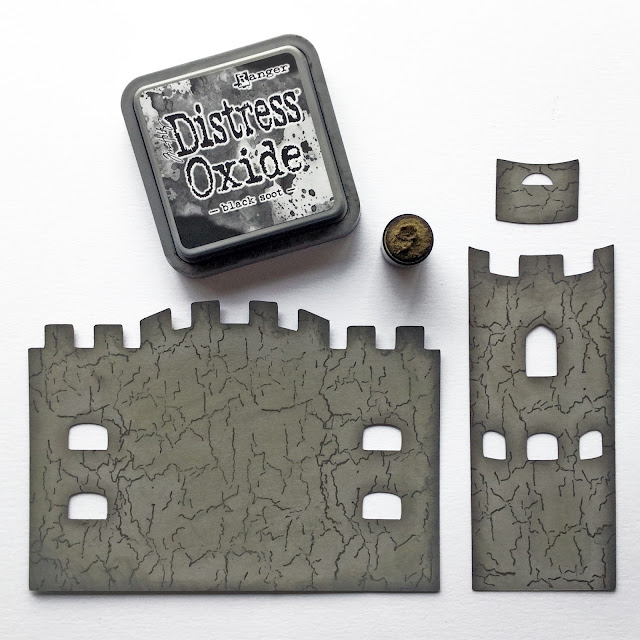
The panels were stamped with a texture background stamp. This is an old one from Personal Impressions (P765). I think it may be discontinued as I couldn't find it online. It's so long since I used a quality large mounted stamp like this, it has a real luxury feel to it! However, most texture stamps would work, especially brickwork, stone or marble.
I then blended Distress Oxide ink around the edges with a mini sponge dauber and also lightly rubbed some Frayed Burlap ink over the surface to give the panels a bit of colour variation.
Windows and Doors
Using the panels as a template, I drew the windows onto the bases. On the front of the castle I added scraps of glow-in-the-dark sticker to cover the window openings (they will later be covered with the panels). As an alternative I cut out the windows on the rear of the castle with a craft knife and placed orange vellum over the windows. I preferred the glow-in-the-dark ones, but the vellum is an adequate alternative.
Attaching the Panels
The window frames, flagpoles and battlement strips were cut from black paper, the flags from orange, and the roof pieces from grey patterned paper. It is a good idea to made up the panels before attaching them to the base. Sandwiching the vellum or glow-in-the-dark paper between the base and the panels really shows the detail in the window frames off nicely. The picture below shows the vellum version.
Card Assembly
Both written (PDF) and video instructions are available for this file and it is very straightforward to put together. I assembled both halves of the castle independently, remembering to put the rear panels on the inside of the card rather than the back, where the two castles are joined together. I reversed one of the castles so the towers matched up on each side, but it would look fine with them alternating too.
Decorations
The two ghosts were cut from the glow-in-the-dark sticker paper, with a second set in reverse. I sandwiched a narrow strip of grey card between each matching set which was used to attach the ghosts above the castle walls.
I substituted the door for a glow-in-the-dark panel with a spider's web sandwiched between the two door frame parts.
The spider was made from several layers of black and orange card and mounted proud of the web on adhesive foam pads.
The 'Trick or Treat' banner was cut from black paper and layered with some orange paper behind and mounted above the door frame. A black Wink of Stella pen was used to give the black parts a bit of gloss and shine.
Finally, a few bats were added on the flag and in other random places.
Here is the castle in the dark with the ghosts a-glowing!
There are so many options for decorating this Halloween castle, it is hard to know when to stop!
Bye for now,
Janet, DT Member Simply Crafty SVGS
Blog: Crafting Quine
Instagram: @CraftingQuine
Simply Crafty SVG Files:
Dragon Castle Card


16 comments:
wow Janet this is gorgeousssss love it.
Gr Karin
Thank you Karin - this was such a fun make!
This is a wonderful project. What a clever design and I love all the finishing touches - stunning work, Janet xx
Absolutely fabulous project - great idea to stick two together!!
Love it!!
xx
Fabulous, fun and so detailed!
xx
WOW these s is amazing.
Hugs go
Linda xxx
Oh very fun indeed!!!
An absolutely fantastic project Janet. I love your 'scary' elements xx
This is so stunning Janet, a fabulous idea. My boys would love this for Halloween. Cathy x
This is spooktacular Janet - it's so impressive and it glows in the dark! Shabneez x
fantastic project! and I love how that texture background stamp really brings it to life :)
Thanks, you've got to love glow-in-the-dark!
Thank you - I love transforming plain card, it can be so effective!
Fantastic project !!!
Wow, just amazing
LOVE it, fabulous castle!!!
Post a Comment