

Hiya! Have you ever combined 3d SVG files together? When you do you can make something completely unique without having to design from scratch and it's a great way to get even more from purchased files.
For Halloween this year I've combined the Gnome Box file with the Hovering Witch Hat from Simply Crafty SVGs to make a super big Witchy Gnome Box. I also made a cat companion by making changes to the Gnome Box. In this post I've included details of how to make the combinations and changes so that you can do the same or add your own twist to these versatile files.
WITCH

Materials Used:
Black, Purple & Grey Medium-weight Textured Cardstock
Green & Purple Patterned Paper
Glow-in-the-Dark Sticker Paper (Silhouette brand)
Green Brad
Black, Purple & Grey Medium-weight Textured Cardstock
Green & Purple Patterned Paper
Glow-in-the-Dark Sticker Paper (Silhouette brand)
Green Brad
White Embroidery Thread
Beacon 3-in-1 Craft Adhesive
Double-sided Dimensional Tape
Black Glitter
Multi-colour Sparkle Spray
Black Distress Oxide Ink and Ink Blender
Silhouette Cameo or other Digital DieCutting Machine
Main Files Used:
Simply Crafty SVGs Gnome Box
Simply Crafty SVGs Hovering Witch Hat
Other Files Used:
Halloween Spider Set by Lori Whitlock (spider) SVG/Studio
Bats by Lori Whitlock SVG/Studio
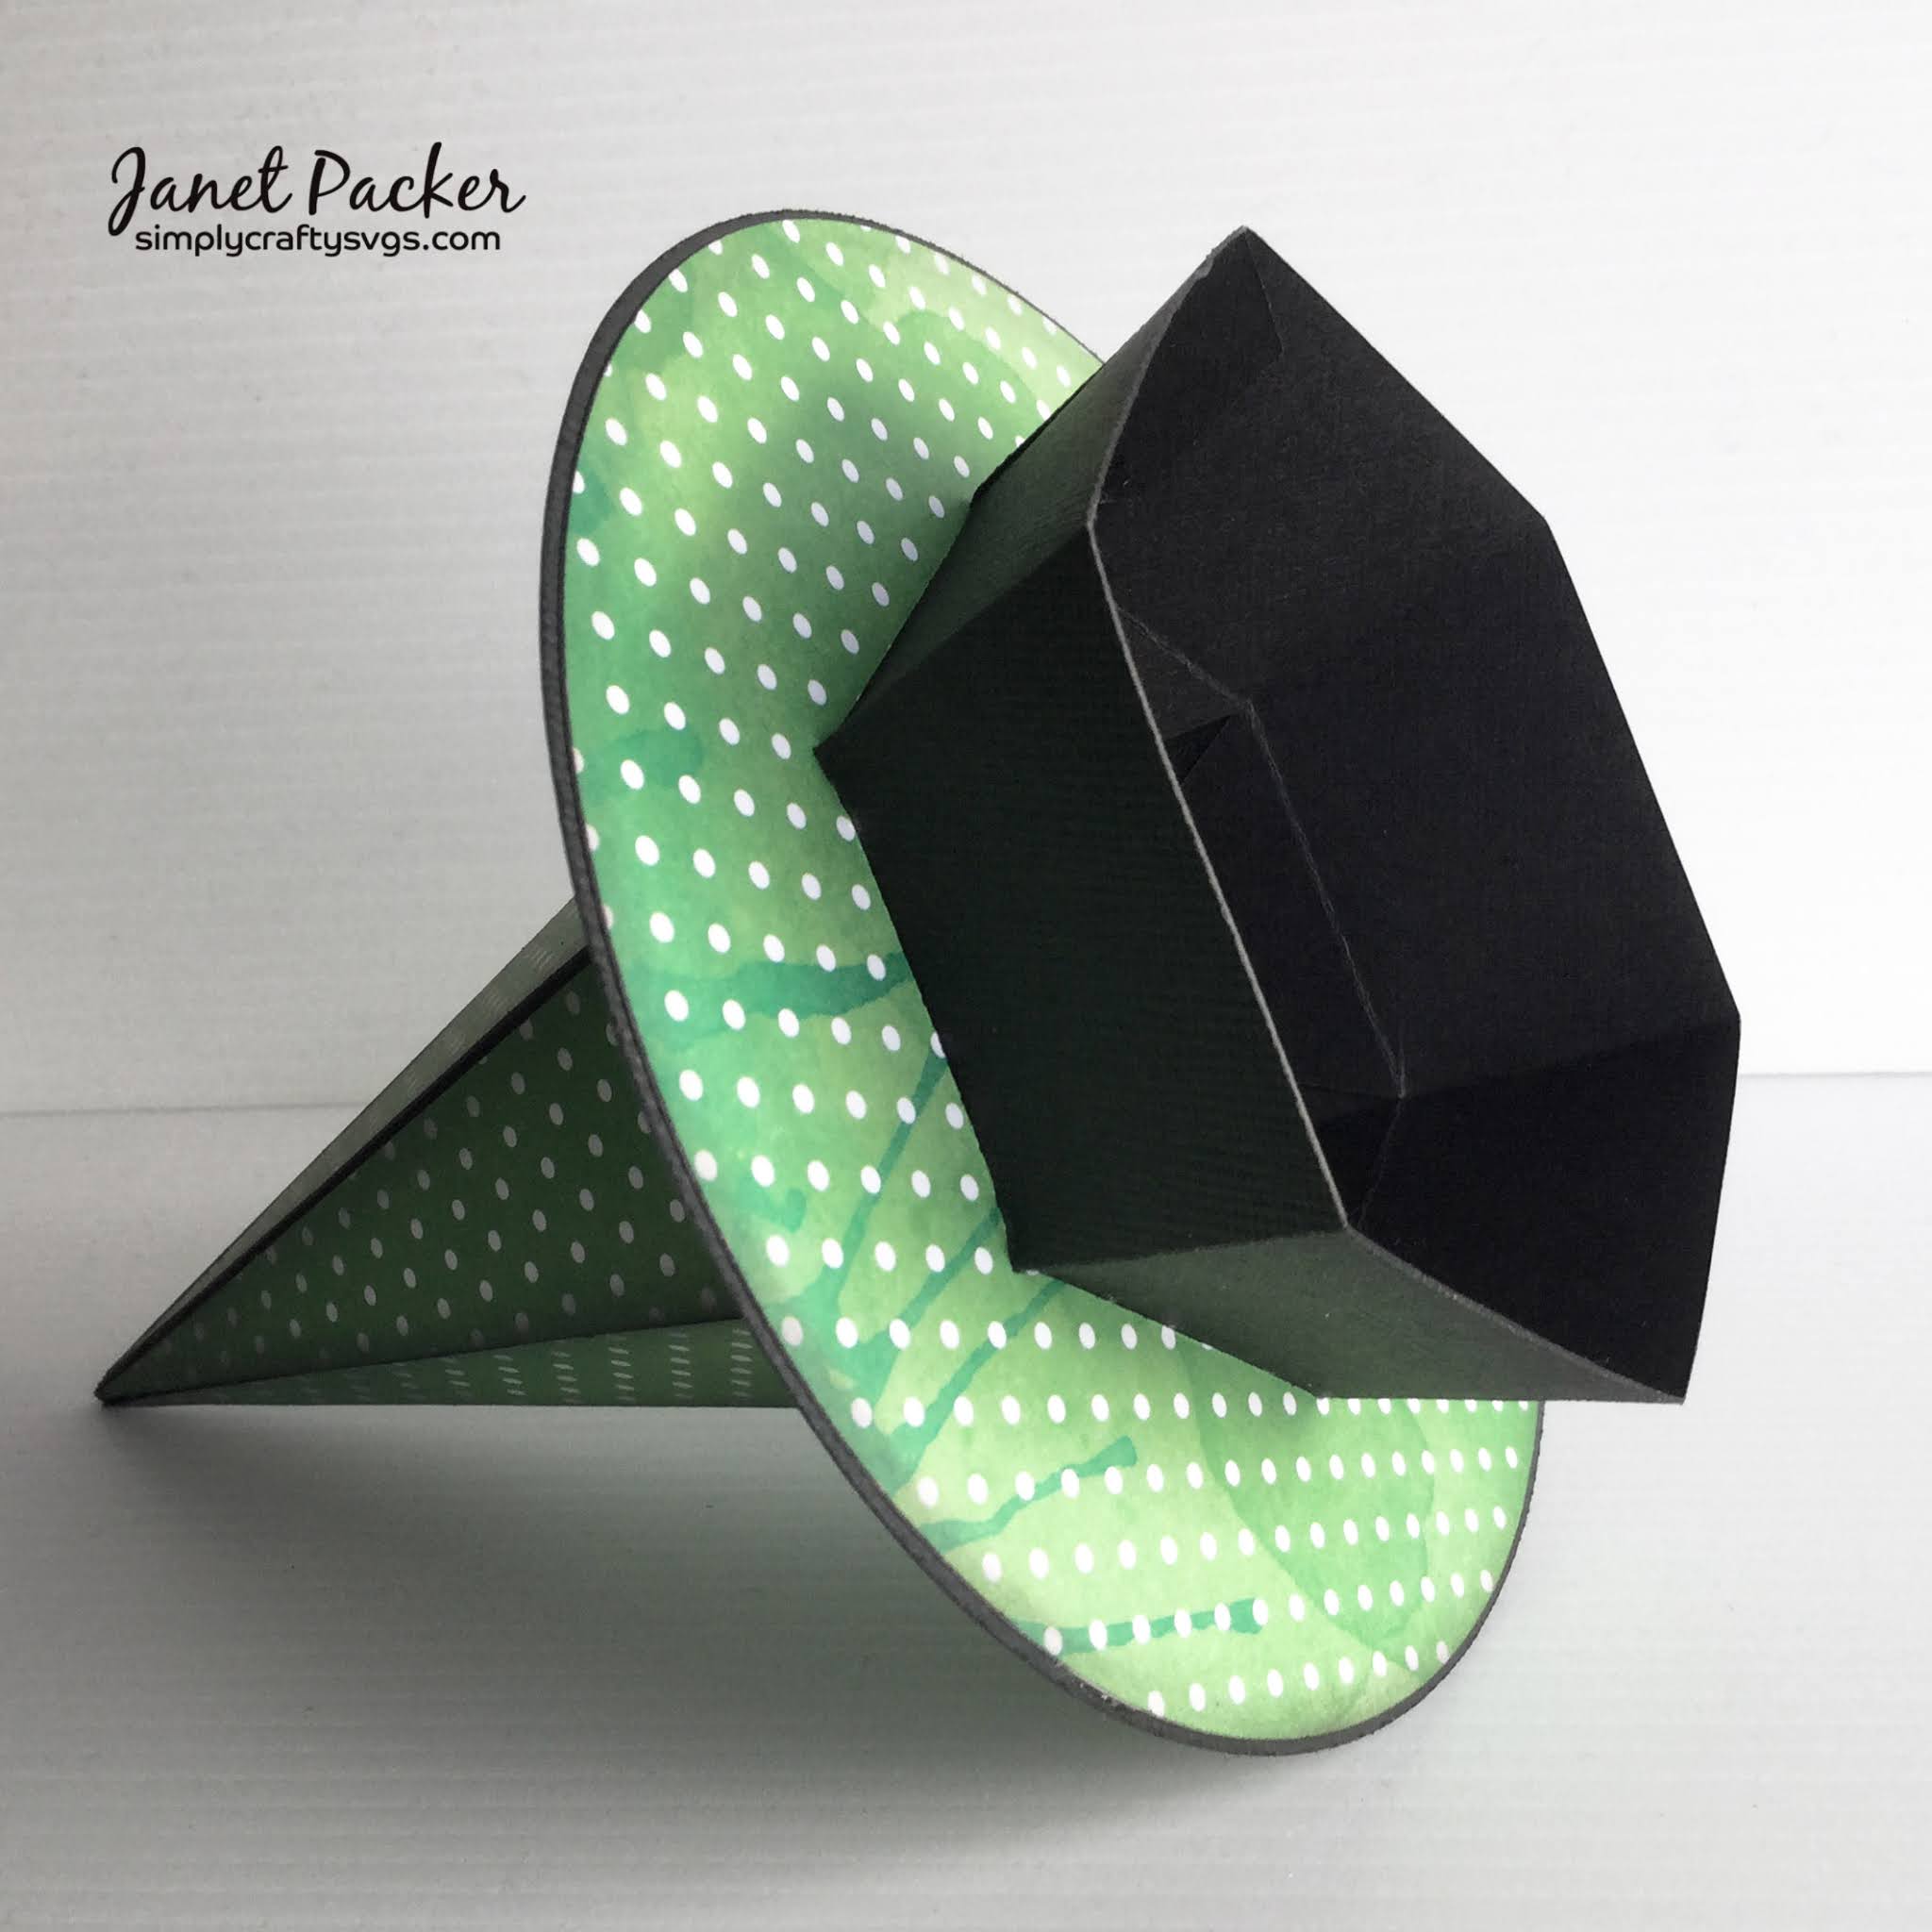
The witch is made with the body of the Gnome file, and the crooked hat mostly from the Hovering Witch Hat plus a few more changes.
Size
The witch is bigger than the original gnome, the finished height being approximately 16". The larger size allows more halloween candies to be stored within, yay! I enlarged all the gnome pieces used by about 185%. This size allows the body sections to fit three to a page on 12" x 12" cardstock. I selected only the body sections and lower hat portion (black), body panels and lower hat panel (purple pattern), gnome feet (purple) and gnome beard (grey) to size up.
Main Files Used:
Simply Crafty SVGs Gnome Box
Simply Crafty SVGs Hovering Witch Hat
Other Files Used:
Halloween Spider Set by Lori Whitlock (spider) SVG/Studio
Bats by Lori Whitlock SVG/Studio
The witch is made with the body of the Gnome file, and the crooked hat mostly from the Hovering Witch Hat plus a few more changes.
Size
The witch is bigger than the original gnome, the finished height being approximately 16". The larger size allows more halloween candies to be stored within, yay! I enlarged all the gnome pieces used by about 185%. This size allows the body sections to fit three to a page on 12" x 12" cardstock. I selected only the body sections and lower hat portion (black), body panels and lower hat panel (purple pattern), gnome feet (purple) and gnome beard (grey) to size up.
Hat Brim
The hat brim is a newly designed piece, made to fit the dimensions of the gnome hat top (pointed piece) only in the software, as the gnome piece was not actually cut. Using the dimension of one lower edge of the enlarged hat top, I drew a 6-sided shape with the drawing tool with sides of that length and centred it within a circle of 8 inches diameter. The new brim then fits at the join of the lower and the upper hat pieces (described in the next section).

Hat
The upper hat part with the bend in it comes from the Hovering Witch Hat file and the lower part is from the gnome file. It is easy to make them fit together as both hats are hexagon shapes. Select the four pieces that make up the top part of the hat, and increase the size of them all together until the bottom edge length matches that of the lower part (same length used for the brim internal octagon). Cut from black cardstock and decorate with glitter spray (mine was old and gloopy, but the drops and blobs made an interesting pattern and texture). Follow the construction directions in the video for the Hovering Hat file, remembering to add the string for a spider once the first two (smallest) pieces are attached. Attach the remaining two pieces then adhere the Gnome Hat base and slide the brim on from the top. It should stop at the point where the two hat pieces join. My brim was a little big so I cut a small circle with a slightly smaller hole and added that on too of the first brim. It barely shows, but looks like a design feature anyway. It is finished by adding a spider to the string.

Nose
The nose, cut from green patterned paper, is cut using the top three of the four pieces re-sized for the hat described in the previous section. Using the lighter weight paper makes construction easier. A green brad was added to mimic a wart.

Face
The face is the top half of an enlarged body panel, cut from green patterned paper and was trimmed by hand to a point to indicate the witch's chin. I made an attempt to add some contouring by blending on Black Soot Distress Ink. This also toned down the brightness of the white dots somewhat.
The face is the top half of an enlarged body panel, cut from green patterned paper and was trimmed by hand to a point to indicate the witch's chin. I made an attempt to add some contouring by blending on Black Soot Distress Ink. This also toned down the brightness of the white dots somewhat.

Hair
The witch's hair is made from two enlarged beard pieces, shrunk (width-wise only) to about 4.5" at the widest point. The top edge was adjusted using point editing to fit the new hair line and cut from grey card. As the individual strands are narrower than previously, care should be taken when curling them so that they do not break away (no need to ask how I know that)!

Feet
The feet were cut at the enlarged size from purple cardstock. Assembly directions are on the Gnome YouTube video.

Rather than mounting them flat on the box base, I decided to adhere them together and to mount the box on top the feet. I added a piece of folded scrap card to steady the box weight at the back.

Assembly
The box base was assembled as per the gnome assembly video and the patterned panels adhered. The box base was then stuck to the feet.

The face is attached to the hat below the brim. The hair was also stuck to the lower edge of the brim and part of the lower hat panel (trimmed down to three sections) was added at the rear.
The nose was then stuck to the face.

Finishing Touches
Your choice, but I added a black bat to her hair and a set of 'boo' buttons made with card circles layered over glow-in-the-dark paper. Then the witch is ready to fill with Halloween treats!

WITCH'S CAT
Materials Used:
Black, grey, pink and purple Medium-weight Textured Cardstock
Green Patterned Cardstock
Glow-in-the-Dark Sticker Paper (Silhouette brand)
Black, grey, pink and purple Medium-weight Textured Cardstock
Green Patterned Cardstock
Glow-in-the-Dark Sticker Paper (Silhouette brand)
Beacon 3-in-1 Craft Adhesive
Double-sided Dimensional Tape
Black Distress Oxide Ink and Ink Blender
Multi-colour Sparkle Spray
Silhouette Cameo or other Digital DieCutting Machine
Main Files Used:
Simply Crafty SVGs Gnome Box
Simply Crafty SVGs Bunny Easter Basket
Other Files Used:
Fish and Yarn by Hero arts (fish skeleton & ball of wool) SVG/Studio
3D Classy Cat Luminaire (cat's eyes) SVG/Studio
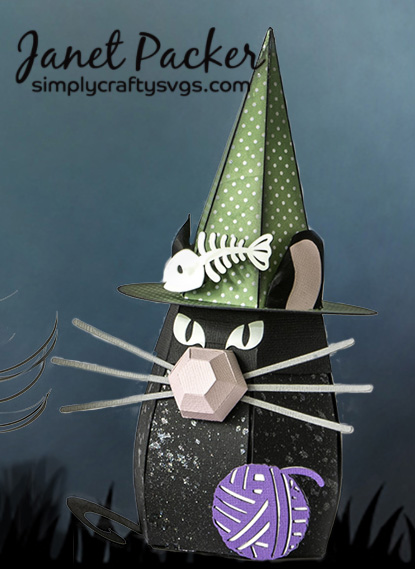
The cat was made at the original gnome size. The same hat brim as used on the witch (above) was added, at a smaller size, but otherwise construction was similar to that of the gnome (omitting the feet).
Main Files Used:
Simply Crafty SVGs Gnome Box
Simply Crafty SVGs Bunny Easter Basket
Other Files Used:
Fish and Yarn by Hero arts (fish skeleton & ball of wool) SVG/Studio
3D Classy Cat Luminaire (cat's eyes) SVG/Studio
The cat was made at the original gnome size. The same hat brim as used on the witch (above) was added, at a smaller size, but otherwise construction was similar to that of the gnome (omitting the feet).
Whiskers were added from the Bunny Easter Basket file, eyes from the luminaire, and the fish skeleton and yard were added to decorate.

The tail and ears were hand cut additions.
These were lots of fun to make. I hope you'll try them, and enjoy them too!
These are the files I used. Just click on the photo to visit the page in Simply Crafty SVGs online store.
 |  |
 |
I've used the Gnome Box file several times before and I can honestly say that it is one of my all-time favourite files. Details of the previous makes are still available through links at the bottom of this post.Here are some links to my previous makes with the Gnome Box file:
 |
| 8 Ways to customise your Christmas Gnome |

Blog: Crafting Quine
Instagram: @CraftingQuine
Simply Crafty SVG Files:
Gnome Box
Hovering Witch Hat


