Showing posts with label Distress Ink. Show all posts

11 Jul 2018

Combining Files to make a Fun Drinks Wagon

Fun 3D Drinks Wagon in paper and card make for Simply Crafty SVGs by Janet Packer (Crafting Quine) https.craftingquine.blogspot.com . Uses  Little Wagon, Tent Camping Box, and Beer Bottle Card


Hiya.  Today I have a hybrid project using some great files from Simply Crafty SVGs to make a playful 3D project. The weather here in Scotland is breaking records for high temperatures and rain-free days! At times like these, BBQs are dusted off and outdoor parties are the order of the day. This project would make a fun table centre for such occasions.


Little Waggon


Fun 3D Drinks Wagon in paper and card make for Simply Crafty SVGs by Janet Packer (Crafting Quine) https.craftingquine.blogspot.com . Uses  Little Wagon, Tent Camping Box, and Beer Bottle Card


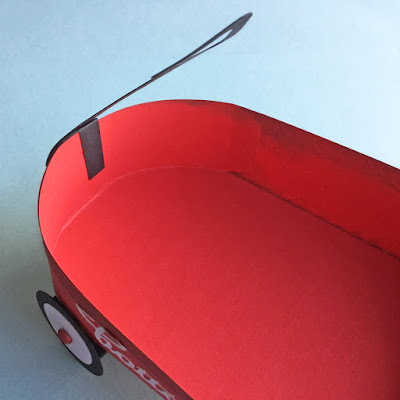
I cut and assembled the Little Wagon SVG file with minimal alteration, just increasing the size a little and adding some custom lettering.

As I would be adding extra weight to the finished wagon, I added some extra bracing pieces behind the wheels. This was achieved by simply folding a strip of cardstock into a rectangle, and adhering it between each set of wheels. The braces are barely visible when the wagon is upright.

Fun 3D Drinks Wagon in paper and card make for Simply Crafty SVGs by Janet Packer (Crafting Quine) https.craftingquine.blogspot.com . Uses  Little Wagon, Tent Camping Box, and Beer Bottle Card


I also decided to secure the pull handle in position by adding a little piece of folded card, stuck to both the handle and the waggon front.

Fun 3D Drinks Wagon in paper and card make for Simply Crafty SVGs by Janet Packer (Crafting Quine) https.craftingquine.blogspot.com . Uses  Little Wagon, Tent Camping Box, and Beer Bottle Card


Wooden Chest


Fun 3D Drinks Wagon in paper and card make for Simply Crafty SVGs by Janet Packer (Crafting Quine) https.craftingquine.blogspot.com . Uses  Little Wagon, Tent Camping Box, and Beer Bottle Card


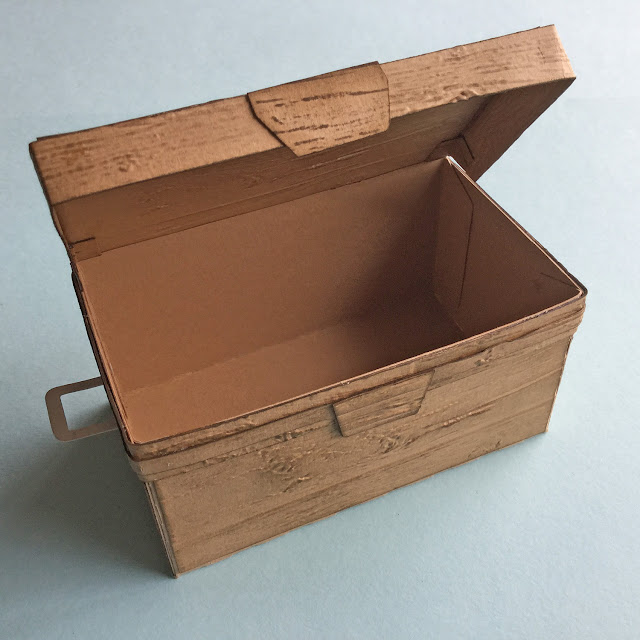
The wooden chest is adapted from the cooler from the Tent Camping Box file. I initially made it in blue so it looked like my large plastic cooler, but I decided that a more vintage look was required, so endeavoured to make it look like a rustic chest.

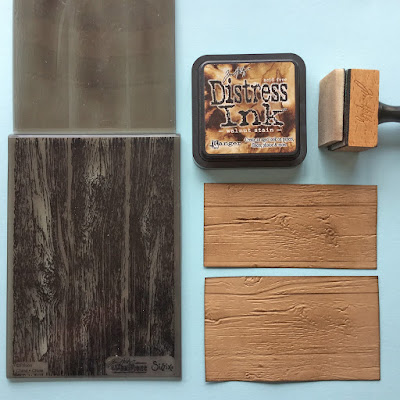
It was the perfect opportunity to try out my new embossing folder (a 3D Texture Fades Embossing Folder by Tim Holtz called Lumber). The texture was enhanced by applying Walnut Stain Distress Ink to the edges and the top surface of the panels I made (details to follow).

Fun 3D Drinks Wagon in paper and card make for Simply Crafty SVGs by Janet Packer (Crafting Quine) https.craftingquine.blogspot.com . Uses  Little Wagon, Tent Camping Box, and Beer Bottle Card


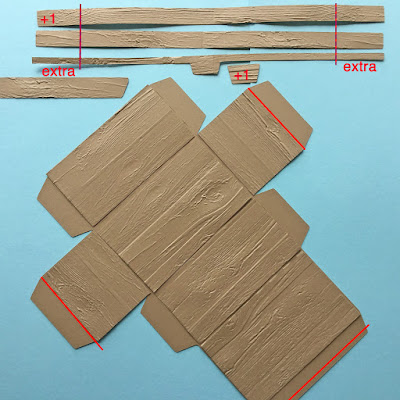
The chest was scaled up in size to suit the wagon. I cut the chest from kraft cardstock, and then cut a duplicate to cut up for panels (just using scissors). By cutting off the chest sides I was able to fit the pieces through my embossing machine.

Fun 3D Drinks Wagon in paper and card make for Simply Crafty SVGs by Janet Packer (Crafting Quine) https.craftingquine.blogspot.com . Uses  Little Wagon, Tent Camping Box, and Beer Bottle Card


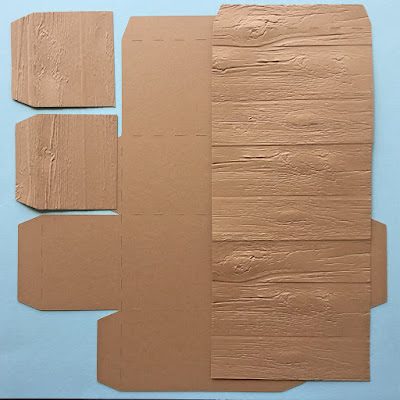
I then cut the individual panels apart, trimming them to be slightly smaller. I also cut an additional strip to make a lip around the chest lid, and also made the long strips longer still, so that they would wrap around three sides of the chest. The panels were then adhered to the base piece and the flaps trimmed as shown below.

Fun 3D Drinks Wagon in paper and card make for Simply Crafty SVGs by Janet Packer (Crafting Quine) https.craftingquine.blogspot.com . Uses  Little Wagon, Tent Camping Box, and Beer Bottle Card


I relocated the piece which sould have been on the bottom of the chest, and stuck it to the inside of the lid instead as it would show more there.

Fun 3D Drinks Wagon in paper and card make for Simply Crafty SVGs by Janet Packer (Crafting Quine) https.craftingquine.blogspot.com . Uses  Little Wagon, Tent Camping Box, and Beer Bottle Card

It was then simply a matter of assembling the chest and attaching the lip with some spare tabs of card (visible in the pic of the complete chest, above). The chest was finished by applying the decorative strips (not necessarily where they were intended to be), and adding handles cut from silver metallic card.


Beer Bottles


Fun 3D Drinks Wagon in paper and card make for Simply Crafty SVGs by Janet Packer (Crafting Quine) https.craftingquine.blogspot.com . Uses  Little Wagon, Tent Camping Box, and Beer Bottle Card


I minimised the inner beer bottle shape from the Beer Bottle Card SVG file together with the cap, the neck label, and two of the front label pieces (there are loads to choose from).  I made a 12" x12" Print & Cut on cream cardstock for the pale parts of the label, adding the phrase "Cheers m' beers" in a font which I then curved to match the shape of the label. Read more about how to do a 12" x 12" Print & Cut here.

Fun 3D Drinks Wagon in paper and card make for Simply Crafty SVGs by Janet Packer (Crafting Quine) https.craftingquine.blogspot.com . Uses  Little Wagon, Tent Camping Box, and Beer Bottle Card


Prior to applying the labels, the bottles (a double thickness), were coated with Nuvo Crystal Glaze on the non-textured side, and left to harden overnight. The effect is very glass-like in real life, but doesn't show well in the photos.

The labels and caps were then adhered, and the bottles were arranged in the chest. I LOVE the bottle cap design that comes with the file - it's a great little detail and looks so realistic cut from metallic card. I added some plastic ice cubes to keep the bottles upright (available from florist suppliers). The chest was then loaded onto the little wagon.

Fun 3D Drinks Wagon in paper and card make for Simply Crafty SVGs by Janet Packer (Crafting Quine) https.craftingquine.blogspot.com . Uses  Little Wagon, Tent Camping Box, and Beer Bottle Card


All three files are available from the Simply Crafty SVGs website and heaps of ideas for using the files on the Simply Crafty SVGs blog.


18 Oct 2017

Halloween Gruesome Brew Luminary from Simply Crafty SVGs 3D Beer Glass File


Halloween Grusome Brew Luminary by Janet Packer (Crafting Quine) using Simply Crafty SVGs 3D Beer Glass file. http://craftingquine.blogspot.co.uk


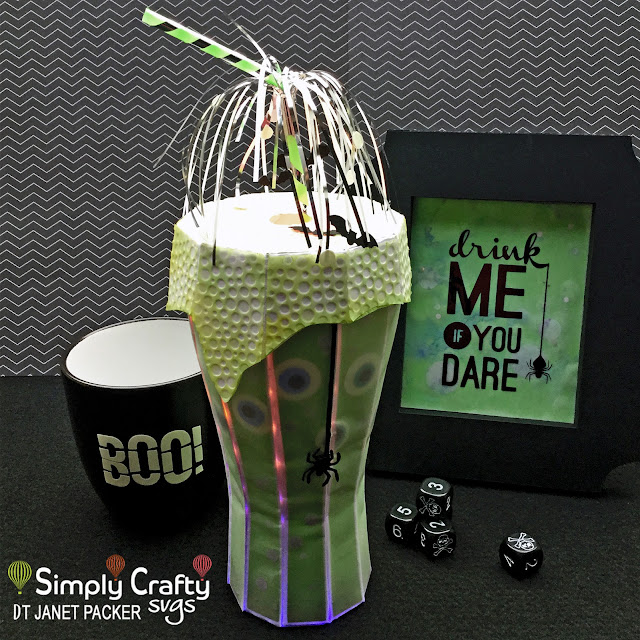
Hello, Janet here with a Halloween project using another amazing cutting file from Simply Crafty SVGs. There are many fantastic Halloween designs in the shop, but I decided that I'd transform the 3D Beer Glass into a gruesome brew luminary, complete with eyeballs, green foam, and led lights.  I've included details on how you can make this 'brew' for yourself. I used a Silhouette Cameo® 3, but the SVG files used for the glass can be utilised with other desktop die cutting machines (details here).


Halloween Grusome Brew Luminary by Janet Packer (Crafting Quine). Tutorial using Simply Crafty SVGs 3D Beer Glass file. http://craftingquine.blogspot.co.uk


MATERIALS:
White Cardstock
Green Paper
Vellum
Glow-in-the-dark Sticker Paper
Scraps of Coloured Paper and Card
Beacon 3-in-1 Glue
Distress Ink in Walnut Stain
Distress Oxide Ink in Distressed Pistachio
Bubbles Embossing Folder
Manual Embossing/Die-cutting Machine
Silhouette Cameo
Multi-coloured LED Light String
Drinking Straw with Firework Frill


The Faux Glass Base

Cut the base pieces from white cardstock and the panels from green paper. Make an offset of the base pieces and cut them from vellum.

Before assembling, darken the bottom edge of the green panels to represent sediment in the glass.

Halloween Grusome Brew Luminary by Janet Packer (Crafting Quine). Tutorial using Simply Crafty SVGs 3D Beer Glass file. http://craftingquine.blogspot.co.uk

Curl the base pieces before attaching the green panels.  Align the vellum pieces and bend over the right edge and adhere it on the underside of the panel with clear craft glue on the right edge only.

Halloween Grusome Brew Luminary by Janet Packer (Crafting Quine). Tutorial using Simply Crafty SVGs 3D Beer Glass file. http://craftingquine.blogspot.co.uk

Before securing the vellum on the other edges add eyeballs and vellum circles. For the circles I used vellum left over from another project which had been 'smooshed' with Distress Oxide Inks.

Halloween Grusome Brew Luminary by Janet Packer (Crafting Quine). Tutorial using Simply Crafty SVGs 3D Beer Glass file. http://craftingquine.blogspot.co.uk

Make eye balls with circles cut from glow-in-the-dark sticker paper, with smaller circles adhered on top (white card could be substituted). Draw on red veins to the eyeballs if desired.

Continue to assemble the base as directed in the designer's instructions.


The Green Foam

Since the completed base is thicker because of the extra vellum layer, enlarge the lid pieces slightly to compensate (base pieces and panels).

To allow light to shine though the top, add a large circular hole to the top of the lid on both lid pieces with sufficient width to cover the tabs. Cut from white cardstock.

Cut the panels from vellum. Duplicate the 10-sided shape adding a smaller hole to allow the straw to pass through. Cut that from vellum.

Emboss all the vellum pieces with a bubble embossing folder.


Halloween Grusome Brew Luminary by Janet Packer (Crafting Quine). Tutorial using Simply Crafty SVGs 3D Beer Glass file. http://craftingquine.blogspot.co.uk


Tint the pieces with Cracked Pistachio Distress Oxide Ink.  Adhere them to the main lid piece and assemble the lid.


Additional Decorations


Halloween Grusome Brew Luminary by Janet Packer (Crafting Quine). Tutorial using Simply Crafty SVGs 3D Beer Glass file. http://craftingquine.blogspot.co.uk


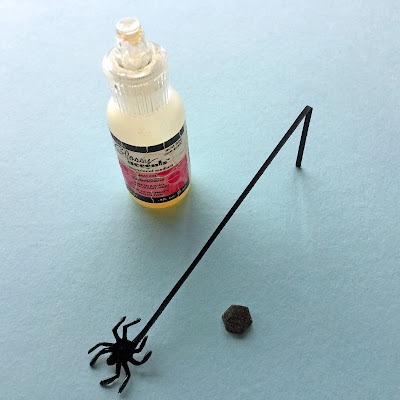
Add a dangling spider to the side of the glass.

Halloween Grusome Brew Luminary by Janet Packer (Crafting Quine). Tutorial using Simply Crafty SVGs 3D Beer Glass file. http://craftingquine.blogspot.co.uk


Attach small black bats and glow-in-the-dark bubbles to the ends of the firework frill on the straw. 


To Finish
Add a battery-operated white or coloured LED light string. (My lights were bundled with blue and green lights at one end and red and orange lights at the other, I left them bundled as they were).

Halloween Grusome Brew Luminary by Janet Packer (Crafting Quine). Tutorial using Simply Crafty SVGs 3D Beer Glass file. http://craftingquine.blogspot.co.uk


Turn on the lights, put the lid on, and insert the straw.


Halloween Grusome Brew Luminary by Janet Packer (Crafting Quine). Tutorial using Simply Crafty SVGs 3D Beer Glass file. http://craftingquine.blogspot.co.uk


Display

I displayed the brew with a 'Drink me if you dare' sign in a black bracket-shaped frame, a layered green paper and vellum background, and words in black sign vinyl.

Halloween Grusome Brew Luminary by Janet Packer (Crafting Quine). Tutorial using Simply Crafty SVGs 3D Beer Glass file. http://craftingquine.blogspot.co.uk


I think this will make a great addition to my Halloween display this year.


Bye for now,
Janet, DT Member Simply Crafty SVGS


Simply Crafty SVG Files:
Beer Glass

Files for Accompanying Stand:
3D Bracket Shaped Frame by Lori Whitlock  
Drink Me Phrase by Rhonna Farrer

28 Sept 2015

Class: Watercolor for Cardmakers

The Watercolor for Card Makers Class covers many different watercolour techniques in several different mediums. On day1 Jennifer McGuire demonstrated how to watercolour with Tim Holtz Distress Ink markers.


Here is my practice piece, stamped in versamark ink, heat embossed with gold embossing powder and coloured with the distress markers, paint brush and lots of water.


Here is the card I made with it, layered on a white square edged with gold embossing and a piece of pale mauve card with stripes of clear heat embossing.

I think I'm going to enjoy this class (provided I find the time)!


Stamp
You Gnome Me So Well by My Favorite Things 


chyevgt3o


dn3f8396t


27 Aug 2015

Online Card Classes BACKGROUND CHECK

Background Check - Day 1


It turns out to be yet another fantastic class from Online Card Classes

Ink blending with Distress Inks and an ink blending tool seems easy to do, but not so easy to do WELL. It's harder than it looks - and messy too!


A stamped water reaction using a large background stamp and a mixture of water and mica powder adds interest (and shine) to the piece. 


Stamping the image again from the ink lifted from the stamped piece further extends the mica mixture.


11 Jul 2015

Making Stencils with the Silhouette Cameo


With an electronic cutter, like the Silhouette Cameo, stencils are cheap and easy to make. 

I make reusable stencils and masks from translucent plastic subject dividers. 
Mine are quite old and were bought in the US, very similar to these, they are softer and less brittle than the polypropylene 'popper'-ed wallets. The slight colouration is useful as they show up on your cutting mat.

They can be used with texture paste, spays, mists or with ink blending tools and stamping ink.

If you have a Silhouette cutter and use the Silhouette Online Store you can download and cut designs very easily; just search 'background', 'overlay', 'mask', 'doilie' or 'doily'.


This one is the Wood Pattern Background by Tanya Batrak, design #49120. I think it works equally well for water as in my Origami Fish project.


This one is Flower Scolloped Circle Simplified by Samantha Walker design #4836.

Other favourites of mine are Antique Doily by Lori Whitlock design #15658 and Scattered Raindrops background by Loni Stevens, design #26878.


I designed this set myself, but it very similar to the Honeycomb Screen by Jennifer Wambach design #56061. It shows how you can easily adapt the design to mask out a portion of the stencil. Folks have been asking me for cut settings and a video - I'll have to get back to you on that!