28 Apr 2017

Lion head Card and Stand


Hiya, Today I have a post over on the Silhouette UK blog showing how to make a stand to add to a card to transform it into an item of home décor. I've included a file of the stand shape and it's free to download too. Just pop over to the Silhouette UK blog to download it in DXF format.


I just love, love , LOVE the Lion Head file that I used to demonstrate the stand, designed by one of my favourite designers in the Silhouette Design Store - Nik Squirrell -  AND she's from the UK too (Kent)! So, as well as the lion silhouette (no pun intended) I couldn't resist making a card too.


I made the background by blending pigment inks using the yellow and orange colours from a Clearsnap ColorBox Pigment Inkpad (Primaries).  They blend so much more easily than dye inks - I must remember to use them more often.

The lion head silhouette was cut from Canvas Corps Chalkstock card.  I'm not sure if it is available in the UK, but its worth seeking out as its really smooth and cuts beautifully with the Silhouette Cameo.


I mounted the Lion head onto an easel card and added a sentiment in gold vinyl. The name 'Lisa' is a cut-out with more blended card showing through from below. If you're wondering why the scissors, it was a card for my hairdresser, lion, mane, get it?


16 Apr 2017

Mama Bear Wood Veneer Picture


Hiya.
Today I have a new post on the Silhouette UK blog about another NEW product - Silhouette Wood Sheets. I wanted to try these out since I first heard that the Silhouette family of machines could cut wood in this form.  These are a super-thin wood veneer and are self adhesive with a protective paper backing. On the blog I describe how I used the product and how to best cut it.

I made a little framed wall art using the sweet Mama Bear design by Sweet Afton.


It looks great on my gallery wall.  I love the natural, rustic feel.

I can't wait to use it for card embellishments too.


14 Apr 2017

Using SVGs to Create in Silhouette Studio Designer Edition


Fancy Cat designs in a varity of media by Janet Packer (Crafting Quine). Original design by Sanqunetti Design.


Hiya, this week I had the opportunity to try out the new Fancy Cat Cutting File from Sanqunetti Design. I used the designer edition of the Silhouette Studio software, but the variety of file types included allow the design to be used with most cutting machines (SVG, DXF, PDF & JPG). Note, the DXF format can be used with the basic edition of the Silhouette Studio software too.


I wasn't sure if the design would be better suited to card, vinyl or something else. It turned out it that the image suited EVERYTHING and so I made it up in all the media I had readily available (heat transfer vinyl, caper/card and sticker paper).


HEAT TRANSFER VINYL (Pyjama Bag)

I made up a little pyjama bag using a variation of the phrase "the cat's pyjamas" - perfect to use with this image. I used soft, velvety, flocked vinyl for the black parts, sparkly gold glitter vinyl for the heart and glasses, and regular smooth vinyl for the remainder.

Fancy Cat designs in a varity of media by Janet Packer (Crafting Quine). Original design by Sanqunetti Design.


CARDSTOCK (Greeting card)

For the card I designed a semi-shaped card using an offset of the cat's head and a patterned rectangle. The background piece was made using the Silhouette's Print & Cut function, with most of the pieces being cut from textured cardstock.  The glasses and heart are made with card with a glitter heat transfer veneer (yes, you can iron heat transfer on to card). The heart is finished with the recipient's  initial cut from regular sign vinyl. Of course, a monogram or small name could be added as an alternative.

Fancy Cat designs in a varity of media by Janet Packer (Crafting Quine). Original design by Sanqunetti Design.


STICKER PAPER (Custom Stickers)

Using the Print & Cut function again, I made a sheet of personalised stickers using the included JPEG image.

Fancy Cat designs in a varity of media by Janet Packer (Crafting Quine). Original design by Sanqunetti Design.


What a lovely extra surprise to include a sheet of stickers with a child's greeting card?


Fancy Cat designs in a varity of media by Janet Packer (Crafting Quine). Original design by Sanqunetti Design.


REGULAR SIGN VINYL (Vinyl Decal)

I had intended to made a decal for a cat treat jar with some custom text. However, I'd used all my pink sign vinyl, so that is a project for another day.


VERSATILITY (Using SVG & DXF)

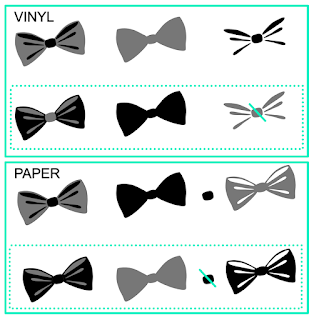
The files allow for all manner of variations and customisations. The diagram shows some possible options for the bow.

For vinyl, I chose to make the black flock more prominent than the grey, and used the lower of the two vinyl variations with the loose 'shadow' pieces, omitting the 'knot' piece.

For the card, I decided I'd prefer to have fewer loose pieces and so made the bow and shadow pieces a compound path, and again omitted the 'knot'.

A even simpler solution would be to just use the bow outline - the choice is your's!


Fancy Cat designs in a varity of media by Janet Packer (Crafting Quine). Original design by Sanqunetti Design.


I hope you find this demonstration of the versatility of these cutting files useful.  Let me know  (in the comments section below) if you have any further suggestions. I love hearing from you.


11 Apr 2017

Welcome Spring Card - April Elemental Challenge at Daring Cardmakers


Packer (Crafting Quine) for the Daring Cardmakers April 2017 Elemental Challenge


Hiya, I have something new for you today. I've been loving the challenges over at Daring Cardmakers, but find the weekly deadline a little tight to fit in with my other crafting commitments. However, I was so taken with the April Elemental Challenge that I dropped everything to make this card. It will also double as an Easter card for my Mum, so I didn't feel in the least guilty.


These are the photos from the Elemental Challenge. I love the colour and image selection, just right for Spring and Easter cards.

I firstly selected to make some daisies from Vellum with added pink tips. I used the 'Print & Cut' facility to make these from a digital file on my Silhouette Cameo (Lori Whitlock's 12-Petal Flowers). Daisy was my Gran's first name, so they hold a special place in my heart.

Welcome Spring vellum daisy card. Designed by Janet Packer (Crafting Quine) for the Daring Cardmakers April 2017 Elemental Challenge.


I added some centres cut from yellow felt - they reflect the colour and fluffiness of the duckling.

Packer (Crafting Quine) for the Daring Cardmakers April 2017 Elemental Challenge


Then it was out with the distress inks and a bit of smooshing and flicking to make the double watercolour background. I'd forgotten how much I enjoy using wet colour (and also how stained my fingers get too).

Packer (Crafting Quine) for the Daring Cardmakers April 2017 Elemental Challenge


I hand cut the stems and then adhered them to the card, and added a tiny bow of twine (another element from the inspiration).

Finally I added a sentiment in teal metallic vinyl (a free file from the Silhouette Design Store from a few week's ago). I just removed some of the bits that I didn't want by ungrouping and releasing its compound path.


Packer (Crafting Quine) for the Daring Cardmakers April 2017 Elemental Challenge


I hope you like the card, I certainly enjoyed making it, and enjoyed the Daring Cardmakers challenge too.


5 Apr 2017

Print & Cut with A3 Card and Paper


Hello, today I intended to use this week's FREE file from the Silhouette Store to make some wrapping paper, although it turns out I neither made wrapping paper, nor even used paper. However, I did use the free file and discovered that I could use A3 media and the large cutting mat (12 in. x 24 in. ) with the Silhouette Cameo's Print & Cut technology.


Instead of using it as a cut design I decided to use it as a printed element, and instead of using it filled, as in the picture, I used the outline.

This is so easy to do in the Silhouette Studio software; simply choose a suitable colour and change the line thickness.


Now, my first thought was that this would make a great repeated element for wrapping paper and I could print it in A3 and wrap just about any gift.  So I changed my mat to 12 in. x 24 in. and my virtual paper to A3 and off I went, rotating, aligning and duplicating until I had a A3 page of lovely bunnies.


Then disaster struck -  I realised that I didn't have any A3 paper, only cardstock! 260gsm would never work as wrapping paper.

However,  if print & cut would work with my A3 mat, then I could choose a project and fill the project shapes with my new paper. I'd never tried it, but thought if the registration marks will display, then there was a chance it would work.


I chose to make a 3D Tissue Box file, that wouldn't need wrapping and opened Lori Whitlock's Tissue Box file in the same work space. Then I had another Eureka moment - I could delete the bunnies that I didn't need and save on printer ink.


The result? The registration marks and the box pieces printed perfectly. The Cameo read the registration marks first time and cut the pieces beautifully.


There was very little ink wasted (the excess pink shown below was a bleed/printing margin rather than any cutting inaccuracy.)


I was then able to quickly assemble the box and even made a tag with the excess pieces from the top centre of the box.


To summarise then, YES, Print & Cut works with A3 media. Result!

In case it isn't evident, I've just treated myself to an A3 Printer, and I'm exploring ways to use it with my Silhouette, and with crafting generally. If you have an idea you'd like to share, or you'd like me to explore, please add it to the comments below.

I love my regular followers! If you'd like to follow my blog, the follow buttons are up on the right hand side, or add your email address to receive an email whenever a new post is published.


2 Apr 2017

New Cork Sheets


Using Silhouette Cork Sheets - Cover an MDF Shape - Weld a pattern to a shape - by Janet Packer for Silhouette UK Blog


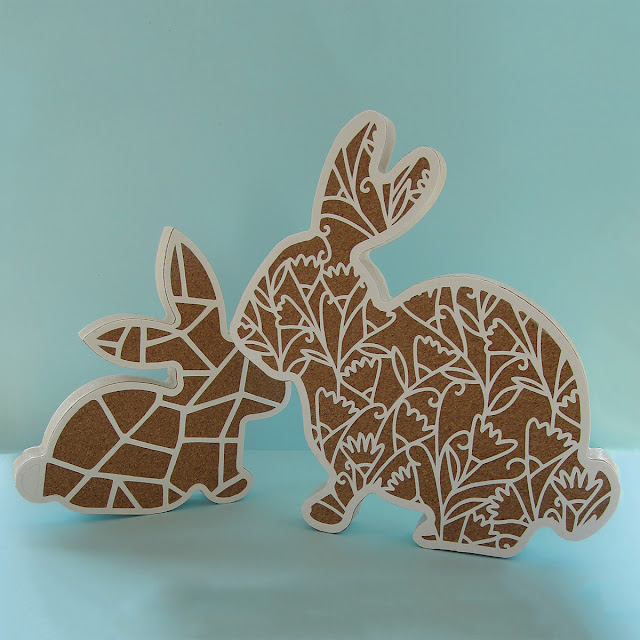
Hiya, this week I had the opportunity to play with the NEW Silhouette® Cork Sheets and this post on the Silhouette UK Blog was the result.

I also included a little seasonal project, using the cork to cover an MDF or wood shape for Easter/Spring. I've also been following a course on the Creative Live App called Craft Photography Fundamentals tutored by Candice Stringham. I'm loving trying out her hints for top down photos.


Using Silhouette Cork Sheets - Cover an MDF Shape - Weld a pattern to a shape - by Janet Packer for Silhouette UK Blog


Now, back to the cork sheets ...

... they can be coloured with stamping ink,


Using Silhouette Cork Sheets - Cover an MDF Shape - Weld a pattern to a shape - by Janet Packer for Silhouette UK Blog


... tiny pieces cut successfully,


Using Silhouette Cork Sheets - Cover an MDF Shape - Weld a pattern to a shape - by Janet Packer for Silhouette UK Blog


... heat transfer material adheres too.


Using Silhouette Cork Sheets - Cover an MDF Shape - Weld a pattern to a shape - by Janet Packer for Silhouette UK Blog


Over on the blog I show how I made these Easter/Spring decorations by covering MDF shapes with a mix of cork and faux leather paper.


Using Silhouette Cork Sheets - Cover an MDF Shape - Weld a pattern to a shape - by Janet Packer for Silhouette UK Blog


I used these digital files from Jamie Koay and Nic Squirrell


Hope you like them.