Showing posts with label Silhouette Studio® software. Show all posts

26 Jan 2019

Just my cup of tea - a wiper card

You (really) are my cup of tea. A Lori Whitlock Wiper Card made by Janet Packer using card toppers made from a Dingbat font. https://craftingquine.blogspot.co.uk for GraphtecGB Silhouette UK


Hiya, over on the Silhouette UK Blog today I have  a new style of card from the Silhouette Design Store. Lori Whitlock, one of my favourite designers, has a new range of fun Valentine's wiper cards which have a central swipe up part which appears once the card is opened. There are quite a few of these interactive cards to choose from, but I wanted to make one with a tea theme, and so used a couple of other files by Lori including the Tea Time Dingbats font to make teacup and teapot toppers.

You (really) are my cup of tea. A Lori Whitlock Wiper Card made by Janet Packer using card toppers made from a Dingbat font. https://craftingquine.blogspot.co.uk for GraphtecGB Silhouette UK


DESIGNS USED:

Wiper Card Valentine Balloon Card by Lori Whitlock (#285948)

You Are My Cup of Tea phrase by Lori Whitlock (#267429)

Tea Time Dingbats Font by Lori Whitlock (#279453)


MATERIALS USED:

Textured Cardstock - 12" x 12" in white, mint and navy

Patterned Scrapbooking Papers - 6" x  6"

Scrap of Clear Acetate

Silhouette Adhesive-Backed Cardstock in mint, sea mist, grey and strawberry

Silhouette Sketch Pens in red and pink

Silhouette Cameo 3


The designer has a full video tutorial on how to put these cards together, so my post just shows the small changes that I made. I used the Valentine Balloon Card as it has a pop up sentiment in a rounded rectangle shape (some of the pop ups are animals or other more specific shapes).

My post on the Silhouette UK Blog includes instructions on the following:

(1) Changing the Print & Cut message to a cut out phrase - one of the words uses a 'marquetry' technique.

(2) How to separate the pieces in one element of the dingbat font, and which ones to remove to make a cuttable file.

(3)  How to make a floating piece with adhesive-backed cardstock on acetate.

(4) Tip for placement, sizing and orientation of the new toppers.


I'm so pleased with how the card turned out and urge you to experiment with dingbat fonts. They open up so many possibilities.


24 Jun 2017

Re-colour Print & Cut Designs


Hiya,
Have you tried printable vinyl yet?  My Facebook feed seems to be full of requests on where to buy various patterns and subjects.  You can now buy vinyl to print for yourself, so there really is no limit to your creativity. I used it to make vinyl decals to decorate a phone cover on the Silhouette UK Blog this week.  I chose a selection of designs and made a set of three sheets of decals to gift in a presentation box. I call it a DYP kit - a Decorate Your Phone kit!


I've done the entire kit in two posts. This one, Part One, shows how to make the decals. Part Two will show how to make cover inserts and the gift box with customised holders for the cover and decal sheets.


I USED:

Silhouette Printable Vinyl

Clear Phone Cover

Various Designs from the Silhouette Store (listed in the Silhouette UK post)

Printer


The Post includes instructions on how to colour-match designs from different collections and designers to make a cohesive set of decals using the 'Color Picker' tool in the Silhouette Studio® software (love that tool)!


I hope you'll click over and visit the Silhouette UK Blog and look at some of the fantastic projects and tutorials there.


6 Jun 2017

Cut and decorate your own Leatherette Bookmarks


Make your own bookmarks with Silhouette Leatherette and a FREE file from the SilhouetteUK Blog. Designed by Janet Packer (CraftingQuine) for the Silhouette UK Blog.


Hiya, today I have a new post over on the Silhouette UK Blog on using Silhouette Leatherette Sheets. Yes, the leatherette sheets can be cut very successfully on any of the Silhouette machines (not the Mint, of course).

Not only does the post contain a tutorial on cutting the leatherette it includes how to cut and decorate bookmark AND a  free cutting file for the bookmark.  You can only download the file from the Silhouette Blog, so you'll need to pop over there if you want (or go ahead as design your own).


I decorated the bookmarks with heat transfer vinyl (HTV) using the beautiful Many Flowers Border file by Nic Squirrell (#177994).


I think they turned out nicely and look very professional.  Do you prefer the smooth or flocked finish?


Oh ... and bonus points if you can tell me the title of the book in the photos!


14 Apr 2017

Using SVGs to Create in Silhouette Studio Designer Edition


Fancy Cat designs in a varity of media by Janet Packer (Crafting Quine). Original design by Sanqunetti Design.


Hiya, this week I had the opportunity to try out the new Fancy Cat Cutting File from Sanqunetti Design. I used the designer edition of the Silhouette Studio software, but the variety of file types included allow the design to be used with most cutting machines (SVG, DXF, PDF & JPG). Note, the DXF format can be used with the basic edition of the Silhouette Studio software too.


I wasn't sure if the design would be better suited to card, vinyl or something else. It turned out it that the image suited EVERYTHING and so I made it up in all the media I had readily available (heat transfer vinyl, caper/card and sticker paper).


HEAT TRANSFER VINYL (Pyjama Bag)

I made up a little pyjama bag using a variation of the phrase "the cat's pyjamas" - perfect to use with this image. I used soft, velvety, flocked vinyl for the black parts, sparkly gold glitter vinyl for the heart and glasses, and regular smooth vinyl for the remainder.

Fancy Cat designs in a varity of media by Janet Packer (Crafting Quine). Original design by Sanqunetti Design.


CARDSTOCK (Greeting card)

For the card I designed a semi-shaped card using an offset of the cat's head and a patterned rectangle. The background piece was made using the Silhouette's Print & Cut function, with most of the pieces being cut from textured cardstock.  The glasses and heart are made with card with a glitter heat transfer veneer (yes, you can iron heat transfer on to card). The heart is finished with the recipient's  initial cut from regular sign vinyl. Of course, a monogram or small name could be added as an alternative.

Fancy Cat designs in a varity of media by Janet Packer (Crafting Quine). Original design by Sanqunetti Design.


STICKER PAPER (Custom Stickers)

Using the Print & Cut function again, I made a sheet of personalised stickers using the included JPEG image.

Fancy Cat designs in a varity of media by Janet Packer (Crafting Quine). Original design by Sanqunetti Design.


What a lovely extra surprise to include a sheet of stickers with a child's greeting card?


Fancy Cat designs in a varity of media by Janet Packer (Crafting Quine). Original design by Sanqunetti Design.


REGULAR SIGN VINYL (Vinyl Decal)

I had intended to made a decal for a cat treat jar with some custom text. However, I'd used all my pink sign vinyl, so that is a project for another day.


VERSATILITY (Using SVG & DXF)

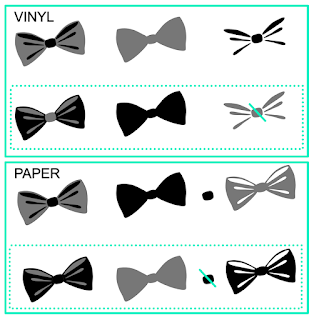
The files allow for all manner of variations and customisations. The diagram shows some possible options for the bow.

For vinyl, I chose to make the black flock more prominent than the grey, and used the lower of the two vinyl variations with the loose 'shadow' pieces, omitting the 'knot' piece.

For the card, I decided I'd prefer to have fewer loose pieces and so made the bow and shadow pieces a compound path, and again omitted the 'knot'.

A even simpler solution would be to just use the bow outline - the choice is your's!


Fancy Cat designs in a varity of media by Janet Packer (Crafting Quine). Original design by Sanqunetti Design.


I hope you find this demonstration of the versatility of these cutting files useful.  Let me know  (in the comments section below) if you have any further suggestions. I love hearing from you.


12 Feb 2017

New Digital Papers

Hello,

Do you use digital papers and elements in your Silhouette projects? I LOVE them and especially love using the digital papers in the Silhouette Studio® software.  It is great to be able to add papers to the library and to rescale the patterns to suit my projects. 

I was very excited to see that Snap Click Supply Co. had digital files available from a new designer last week; Down This Road - Designs by Angie.


These are some of the digital paper packs that jumped into my shopping basket.


Flurries of Fun Papers


Star Quality Papers


{Phone}omenal Papers


Love You 2 Pieces Papers


Aren't they fabulous? I love that they come with the solid papers too - a ready-made colour pallet.

Here is the first set I've downloaded, sitting in my (pre-cloud) Library.


Here I'm preparing a colour swatch, colour-picking extra colours from one of the pattered papers. I save the swatches in the 'My Own Designs' folder in the library.  I can then open the swatch directly into my project and recolour just about any design to match my digital papers.


I'll be sharing some completed projects that I make with these papers soon. Promise.


29 Jan 2017

Preview Images in Silhouette Studio® Software


Hello,  Today I have a post about previewing larger images of files downloaded into the Silhouette Studio® software over on the Silhouette UK blog. This facility is only available in Cloud-based versions.

Pop over there to see how to see these larger previews in Show Properties.


I also show how to  check what version of Silhouette Studio® you're running.

This one is 3.8.150 Designer Edition (Cloud):


Some other useful links:
  • Download the latest versions of Silhouette Studio software here
  • Silhouette Studio® software FAQs here


I hope you find the information useful.


1 Oct 2016

SVGs


 Hello, I have a new post over on the Silhouette UK Blog today. This is about how to open SVGs on in the Silhouette Studio software, but only in the Designer Edition and above.


In the post I used a free SVG file that I downloaded from Open Clip Art called Aegishjalmur Retraced. 


I show how to download it, and how to work out how it will cut. In the file there are two versions, one made up of lines, and one welded together.

One of the versions could easily be changed, and to that I added some wording.


From this new file I made a vinyl decal in gold vinyl which I added to acrylic coasters purchased from Acrylic Craft


If you download SVG files from the Internet you will generally find that they don't have cut lines selected. Simply turn them on by selecting Cut in the Cut Window.

2 Sept 2016

Pumpkin Latte Love Card

Cards that will hold a gift card are always useful, aren't they? I made this one with an Autumnal feel using this week's new SVG release from Sanqunetti Design - Pumpkin Latte Love SVG.


Supplies Used
6" X 6" card blank
Patterned papers from Lawn Fawn (Let's Polka Mon Amie) & Doodlebug (Friendly Forest)
Plain cardstock Lawn Fawn (Fundamentals - Green)
Silhouette adhesive corrugated paper
Silhouette metallic sketch pen
Card adhesive


The SVG file needed only a few adjustments to make the gift card holder.


These are the extra steps required:

  • Form an interior for the cup to form the card carrier by making an internal offset of the cup in the Silhouette Design software. Attach the cup lid to the carrier piece without applying adhesive to the lower edge (to allow it to overlap the cup).
  • Cut the collar for the cup in kraft-coloured adhesive corrugated paper, this cuts beautifully in the software using the recommended settings.  
  • Make an attachment strip sized to be hidden behind the cup's collar. Make it long enough so that the ends can be folded under and, once attached to the collar, used to attach the collar to the card, Ensure that it is folded closely enough to the edges of the collar to allow the card carrier to pass through, but not allow it to fall through the bottom.
  • Use the Silhouette sketch pen to write the sentiment using the Silhouette machine (swop the blade for a brown metallic pen). Use an interior offset to fill in the lettering.


I'm entering this card in a couple of special UK challenges this month. 

'O' is for Open challenge at the ABC Challenge


4 Aug 2016

Custom Colour Fabric Designs - a Pincushion

Tutorial by Janet Packer (craftingQuine)  #silhouettecameo #silhouette #fabric #sewing #pincushionHello folks,

Today on the Silhouette UK Blog I show how to make a custom-coloured piece of fabric, ideal for projects requiring small amounts of material. The tutorial shows how to colour a cut file in the Silhouette Studio software to create a uniquely coloured fabric design.

I needed a 5.5" fabric square for a no-sew project which I printed on to Silhouette Printable Cotton, along with registration marks and then cut out with the Silhouette.

I like to use background designs from the Silhouette Design store as they cover a good sized area of the design space (often 12" x12"). You can find them by selecting Search Designs, adding criteria to the Browse Designs box (I wanted a roses pattern so added 'roses background') and then filter by Cut Type, choosing Regular Cut.


In the tutorial I show you how to colour the background using a colour swatch ...


... and add a white outline to enhance the design.


Using the software's print and cut feature I printed the design onto the Silhouette printable fabric on my printer, and then cut it on the Silhouette Cameo.

With the square of printed fabric I made up this pin cushion kit that I bought online.


I added a little vinyl around the base.


And voila! 


I think I might make more of these as gifts for sewing friends. What projects could you make with 5.5" squares of fabric in your favouire colours?


Catch up with me on social media:  Profile | My Blog | Pinterest | Twitter | Instagram


22 Jul 2016

Adding photos to cards


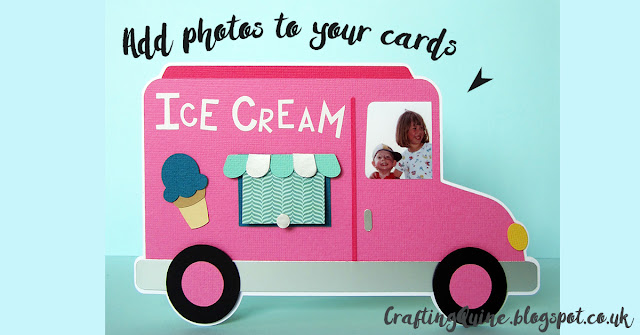
Ice-cream Van Card with Photo by Janet Packer #CraftingQuine #SanqunettiDesign #card making #photos


Hello, today I have a fun new card for you. 

Judy over at Sanqunetti Design has just released this ice-cream van svg file and, once made into a card, the windows are just perfect for a bit of personalisation.  I added a photo in the driver's window and a lift the flap window for a surprise message. It's so nice for relatives to receive a special card combined with a family photo. 


I made these changes to the file to make the card:

Flip the Design
The quickest course of action would be to make this file into a top fold card, However, I find top fold cards usually collapse when they've been on display for a few days, no matter how high the gsm of the card used. A side fold stands up so much better  (literally), so I selected all the file elements and flipped them so that it could have a fold on the left.


Extend the card size 
By increasing the size of the file pieces and by making the card base into 2 pieces, with a flap to join them, the photo is a better size for viewing and it is still possible to fit front and back onto a sheet of A4 or letter size paper. 


Add a Photo
Its easy to use the Silhouette Studio software to isolate the driver's window cut shape and to crop the photograph to the exact size and shape. Add the print and cut marks to the photo paper and the Silhouette will cut out the printed photo.


Add a Flap
Instead of just cutting a rectangular window from the pink van shape I broke the cut path in the top corners and substituted a perforated line. Now it's just perfect for a secret message or a second photo.


Here's the finished card - fun huh?


The file is available to purchase for download from Sanqunetti Design and is available at 50% off for a limited time.


Have you added photos to your cards? How did you do go about it?


SaveSave

27 Apr 2016

Paper Tassels - FREE Cutting File

Tassels are quite the craft accessory of the moment. They are a little more contemporary than a bow and they look great crafted in paper.  Not only are they a great embellishment for many different paper crafting projects, they also look fabulous as a decorative element on gift packages.


I couldn't find a ready-made tassel file that was quite right for what I needed so I designed my own from scratch using the Designer Edition of the Silhouette Studio Software. The tassel file is available for you to download in Studio format for FREE over on the Silhouette UK Blog! Not only that, there is a step-by-step tutorial on how to put a tassel together, enhance your own tassel file and add some nifty finishing touches.


#silhouette #silhouettecameo #freefile #file #studiofile #tassel #paper tassel #silhouetteuk

Design Used: FREE Tassel File

#silhouette #silhouettecameo #freefile #file #studiofile #tassel #paper tassel #silhouetteuk #giftwrapping


I'm so please to have the opportunity to share this file with you. It's a little thank you to you, to the Silhouette crafting community, for giving me so much support and inspiration.

I added this make to the Silhouette Challenges blog - you could add your Silhouette makes too.