Showing posts with label home decor. Show all posts

26 Sept 2018

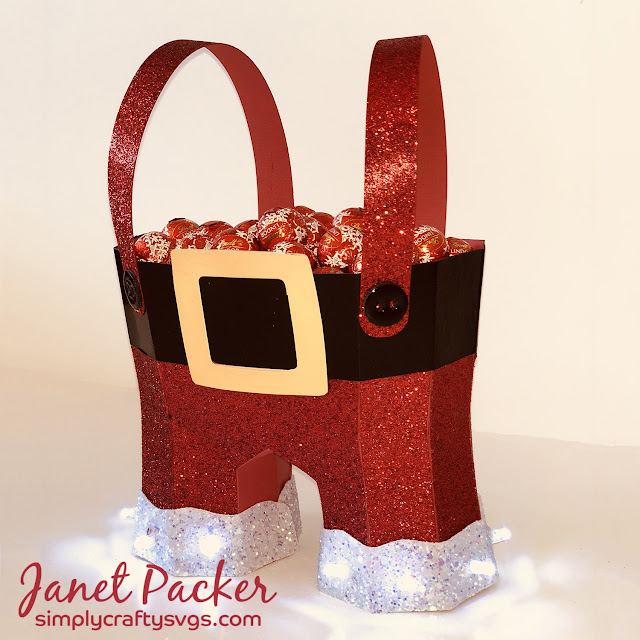
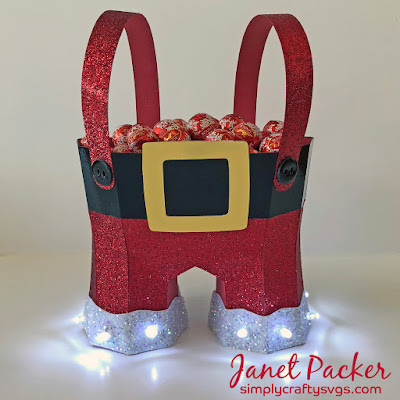
Light Up Santa Pants Box from Simply Crafty SVGs

Light Up Santa Pants Box. By Janet Packer CraftingQuine using the SVG cutting file by Simply Craft SVGs. http://www.craftingquine.blogspot.co.uk

Hiya, This week I've had such fun playing with the Santa Pants Box SVG File by Simply Crafty SVGs. I enjoyed it so much that I made two versions: a regular Santa one, and an Elvis version.

At first glance there seem to be a lot of pieces, but most of them fit together in the same way, and the designer, Sandy, has made a fabulous video that guides you through every step. I made both using my Silhouette Cameo and the Silhouette Studio Designer Edition software, but any changes I made could be replicated in other cutting software and with other machines.

Light Up Santa Pants Box. By Janet Packer CraftingQuine using the SVG cutting file by Simply Craft SVGs. http://www.craftingquine.blogspot.co.uk


For the Santa version I made very few changes, but I've shown the ones that I did make below, in case you'd like to do the same.


Materials Used:
Red and Black Medium-weight Bazzill Cardstock
Red Glitter Paper from UK supplier, Syntego)
Black Sign Vinyl
Gold Mirror Card
White Glitter Fabric
Beacon 3 in 1 Craft Adhesive
Tonic Studios Nuvo Crystal Glaze
String of White LED Lights
Bradawl/Pokey Tool/Hole Punch
Silhouette Cameo


Files Used:
Simply Crafty SVGs Santa Pants Box SVG File


Scaling Up the SVG File
I made the whole box a little larger. To do this I opened one of the files in the software, and then used Merge to bring in each of the other files. I then placed the biggest on the mat, selected all the files, and increased the size proportionally until the chosen one filled the 12"x12" cutting mat entirely (holding down the shift key when dragging one of the corner handles). This increased the size of the finished box (with braces/suspenders) from 8.25" to 9", and it made it somewhat easier to install the LEDs (needing more candies to fill it though)!


Sketching rather than Cutting the Numbers
To aid assembly Sandy has numbered all the leg pieces in the order in which they should be attached. I'm an impatient crafter so I changed the line colour of the numbers and, using Cut by Line Colour, I drew the numbers on with a sketch pen. I used a speed of 10 to do this, so it was sketched almost as fast as I could have drawn them.


Base Alignment
Once all the leg pieces were attached I found it helpful, when adhering the base piece, to use a second, slightly smaller piece under the flaps to hold a more regular shape (made using the Internal Offset function). My glue has a good amount of wiggle time, so I added glue to both base pieces (to stick to the top and the bottom of the tags), and wiggled it around until I had a good alignment.

Light Up Santa Pants Box. By Janet Packer CraftingQuine using the SVG cutting file by Simply Craft SVGs. http://www.craftingquine.blogspot.co.uk


Here are the pants before any panels are attached, and with the base pieces in place.

Light Up Santa Pants Box. By Janet Packer CraftingQuine using the SVG cutting file by Simply Craft SVGs. http://www.craftingquine.blogspot.co.uk

Glitter Panels
I cut the pants panels from red glitter paper. I chose paper over a thicker card, as it moulds more easily to the shaped base and consequently is easier to adhere. The glitter is encapsulated into the paper surface, which means there is minimal shedding (and mess), and the panels adhere more easily. Additionally, it is better for your blade and cutting mat then regular glitter cardstock.


Buttons
Real buttons would be great to use on the box, but I didn't have any black ones in the correct size. I cut extra button pieces so that each button was made from four pieces stacked and adhered together. I finished off with a coating of glaze to make them shiny. In this pic the glaze is still wet and looks a bit cloudy, they did dry to be beautifully shiny though.

Light Up Santa Pants Box. By Janet Packer CraftingQuine using the SVG cutting file by Simply Craft SVGs. http://www.craftingquine.blogspot.co.uk


Making the Belt Shiny
Once I had my buttons ready, I thought that the belt should really be shiny too. In this picture the bottom belt piece is cut from card, and in the upper one I've covered the card with a layer of adhesive sign vinyl. I think I like it much better.

Light Up Santa Pants Box. By Janet Packer CraftingQuine using the SVG cutting file by Simply Craft SVGs. http://www.craftingquine.blogspot.co.uk


Golden Buckle
The belt buckle was cut from gold mirror card. I found a scrap from some packaging that was perfect excepting it was a little thin. To counter this I cut a second buckle from spare card and adhered the two together.


Adding Glittery Cuffs
I first cut the cuff pieces from card, and then used them as pattern pieces to cut the white glitter fabric. It is really thick, too thick and irregular to cut on my Silhouette, but cut easily with scissors. Other materials that would be great for the cuffs are faux fur, or simple glittered cardstock. However, I had this fabric in my stash, so thought I'd make use of it.

Light Up Santa Pants Box. By Janet Packer CraftingQuine using the SVG cutting file by Simply Craft SVGs. http://www.craftingquine.blogspot.co.uk


Adding Lights
I made holes for the bulbs for a short string of battery-operated LED lights around the fabric pieces for the base of the trouser legs.  After adhering them with Fabric adhesive, I made matching holes in the assembled pants using a pokey tool, and then a knitting needle.

Light Up Santa Pants Box. By Janet Packer CraftingQuine using the SVG cutting file by Simply Craft SVGs. http://www.craftingquine.blogspot.co.uk


The lights were pushed  through from the inside of the pants legs, so they partially protruded through the holes (this works fine, as long as the holes are tight, fractionally smaller than the lights).

Light Up Santa Pants Box. By Janet Packer CraftingQuine using the SVG cutting file by Simply Craft SVGs. http://www.craftingquine.blogspot.co.uk


Light Up Santa Pants Box. By Janet Packer CraftingQuine using the SVG cutting file by Simply Craft SVGs. http://www.craftingquine.blogspot.co.uk


Oh, and here's Elvis version. I hummed 'Suspicious Minds' the entire time I was assembling this one!

Light Up Santa Pants Box. By Janet Packer CraftingQuine using the SVG cutting file by Simply Craft SVGs. http://www.craftingquine.blogspot.co.uk


Here is a link to the Elvis buckle (a freebie cutting file in SVG format).

Light Up Santa Pants Box. By Janet Packer CraftingQuine using the SVG cutting file by Simply Craft SVGs. http://www.craftingquine.blogspot.co.uk


I hope you find these as much fun as I did. Do subscribe if you'd like to regularly read my hints and tips for Simply Crafty SVGS and others files. I also have tutorials and inspiration posts, and occasionally have a FREEBIE file too.

15 Sept 2018

Canvas Feathers Table Setting


Canvas Feathers table setting using Silhouette Printable Cotton Canvas. Includes information on the relative merits of the Cotton Canvas and the Cotton Fabric. Designed for SilhouetteUK Bllog by Janet Packer https://CraftingQuine.blogspot.co.uk


Hiya, over on the Silhouette UK Blog today I have this pretty table setting for a special occasion made using the Silhouette Printable Cotton Canvas. Previously I've used Silhouette Printable Cotton, so I took the opportunity to compare the two and share the differences between the two products, hopefully helping you choose the perfect one for your project.


Canvas Feathers table setting using Silhouette Printable Cotton Canvas. Includes information on the relative merits of the Cotton Canvas and the Cotton Fabric. Designed for SilhouetteUK Bllog by Janet Packer https://CraftingQuine.blogspot.co.uk


I used the Printable canvas to give a more rustic look to this project to complement the natural linen table cloth and napkins.

The post also contains instructions on how to make the canvas feathers. Essentially, the feathers were cut in pairs and assembled back to back. The adhesive backing made this a quick and easy process - no mess either.

Canvas Feathers table setting using Silhouette Printable Cotton Canvas. Includes information on the relative merits of the Cotton Canvas and the Cotton Fabric. Designed for SilhouetteUK Bllog by Janet Packer https://CraftingQuine.blogspot.co.uk


Designs used from the Silhouette Design Store:


7 Jul 2018

Custom Cake Toppers


Hiya, Over on the Silhouette UK Blog today I have a set of new Chipboard projects. The Silhouette Chipboard Sheets cut and layer beautifully to make stronger items, and this week I have used them to make a set of co-ordinating cake toppers for a special occasion. The post included details on how to make a dimensional topper for a large cake, a smaller variation for cupcakes, and an economical way of making tabletop confetti.


Materials Used

  • Silhouette Chipboard Sheets
  • Silhouette Glitter Heat Transfer (copper)
  • AC Textured Cardstock
  • Beacon 3-in-1 Craft Adhesive
  • Silhouette Cameo 3
  • Domestic Iron
  • Silcone Sheet

Designs Used

  • Crown Me Phrase by Lori Whitlock (#215545)
  • Princess Wands/Cake Toppers by Lori Whitlock (#63758)
  • Peanut Butter & honey Font by ScrapNFonts (#143690)


The layered chipboard can be decorated with all kinds of media: paint, decorative papers, vinyl, and more. I wanted my toppers to be glittery, but I didn’t want to risk getting glitter on the cakes. The perfect solution was to fuse glitter heat transfer vinyl onto the toppers to give a neat, flake-free finish. I used the Silhouette Glitter Heat Transfer in a rich copper. ... read more (at Silhouette UK Blog)


27 Apr 2018

Decorate an Ikea Bekvam Stool with Vinyl


Hi, I've finally decorated my new Ikea Bekvam Step Stool. I used water-based dye and varnish to colour and protect the wood and heat transfer vinyl (HTV) to decorate that self-assembly wooden stool. The wood products I chose were super easy to use, almost odourless, and environmentally friendly too!


I used water-based products from Littlefair, a UK company located in Darwen, Lancashire.


Materials Used

IKEA Bekvan Wooden Step Stool
Water-based Wood Dye in Beach Hut Green by Littlefair
Water-based Extra strong Matt Varnish by Littlefair
Heat Transfer Vinyl in Cream


STEP 1 - Preparing the Wood

The stool arrived planed and sanded, but unfinished. Water-based products do raise the grain a bit, so my solution was to brush a light cover of plain water onto the wood surfaces. Once they were dry I used some fine sand paper to smooth off the surface. There was no need to spend too much time and effort, I just made sure that I removed all the dust residue.


STEP 2 - Dying the Wood

My colour choice was Beach Hut Green from the the Pastel Range of Littlefair water-based wood dyes.  I applied two coats with a flat paint brush along the grain of the wood. It dries really fast, so this didn't take long at all.


STEP 3 - Varnishing the Wood

A varnished surface helps the HTV adhere, and I used the Littlefair Extra Strong varnish in the matt finish, applying one coat on all the surfaces following the grain of the wood again. On the step parts I rubbed down the surface with fine sandpaper, cleaned up the dust and then applied a second coat of varnish. Some varnishes are VERY smelly, but this product wasn't at all. A bonus was the easy clean up - the brush cleaned up beautifully in warm soapy water.


STEP 4 - Leaving the Surface to Harden

The varnished finish was touch dry within a few hours, but I left it a couple of days before applying the final decoration to make sure that it was really hard.


STEP 5 - Cutting and Applying the Decoration

I used some of the Hollyhocks designs by Nic Squirrell and cut them from heat transfer vinyl on my Silhouette Cameo. Details on how to cut and apply them, and why I chose heat transfer over regular vinyl, are over on the Silhouette UK Blog, so pop over there if you want to learn more.


I love how this turned out - so much better than the old one that I never did get around to decorating!

Pin the tutorials with these graphics ...


13 Apr 2018

Design your own Vinyl Decal to make a Wooden House Sign


Hiya, I love using my Silhouette to make unique gifts and this week I've designed my own vinyl decal to decorate a plain wooden house blank as a gift for my daughter. All it took was a couple of fonts and a bird file from the Silhouette Design Store (and a wee bit of manipulation in the Silhouette Design software). I have a tutorial to show you how to design your own decals on the Silhouette UK Blog today.


The digital files used are:
A Little Birdie Told Me by Hero Arts (#56886)
Willow Bloom Font by Skyla Design (#235171)
LW Sketchy Font by Lori Whitlock (#76191)

A few folks have asked me where I sourced the wooden house blank from. Well, we found it in the clearance section of our local Tesco supermarket and it cost pence rather than pounds! It was already decorated, but that was soon covered over with a couple of coats of grey chalk paint.

Surprisingly, the supermarket can be a great source for craft blanks!  This coffee sign was one I re-purposed some months ago by recovering the front face with black paper. If you like the look of using white gel pens with your Silhouette there are heap of useful tips on that post too!


Have you found an unusual source for crafting materials - do share!


5 Feb 2018

Simply Crafty SVGs Design Team


Hello, I'm happy to announce that I will be part of the Simply Crafty SVGs Design Team for a further term.  Simply Crafty SVGs designs and sells fabulous 3D digital cutting files for cardmaking and papercrafting.

I'm thrilled to have some lovely new teamies. You can read their bios over at the Simply Crafty SVG Blog


Here are some of my favourite projects from the past 6 months.


Handy Storage Drawers


Orchid Box Card


Chalkboard Bird House


Haunted Halloween Castle


Santa Express Box Card


Terrier Pin Cushion


All the project posts contain information on how to recreate these projects, just click on the link below each picture to read more.

I'm SO looking forward to the new term, and can't wait to see the new files that will be released over the coming months.


1 Feb 2018

Make your own Lightbox Photo Panels

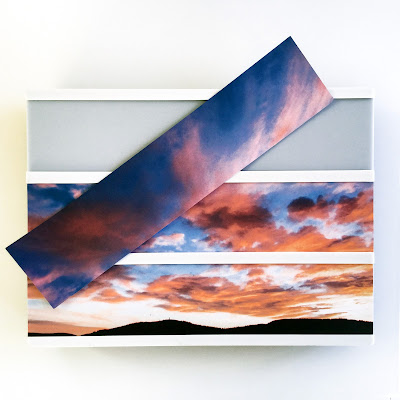
Custom Lightbox Panels by Janet Packer (CraftingQuine) using Print & Cut and the Silhouette Cameo Large 12" x 24" cutting mat. Tutorial written for the Silhouette UK Blog.


Hiya,  Today I have a post on the Silhouette UK blog using my Silhouette Cameo to customise a lightbox with a large photo, using Print & Cut to make perfectly sized panels.

Custom Lightbox Panels by Janet Packer (CraftingQuine) using Print & Cut and the Silhouette Cameo Large 12" x 24" cutting mat. Tutorial written for the Silhouette UK Blog.


I was so pleased to receive this lightbox as a Christmas gift as I've wanted on for ages.  I've seen that you can buy photo panels to go in the light boxes, but I wanted to make one featuring a photo of a local beauty spot. Because of the size of my lightbox (just a tad over A4 size) I used A3 paper and the larger cutting mat, the Silhouette 12" x 24" Cameo® Cutting Mat.  With it I did a giant Print & Cut and so made panels that were the perfect size for my lightbox. The instructions in my post will show how you can do it too (and maybe help with any large-scale Print & Cut projects you are thinking of undertaking). Of course, if you have a smaller lightbox, you could make the panels with the regular cutting mat.


Custom Lightbox Panels by Janet Packer (CraftingQuine) using Print & Cut and the Silhouette Cameo Large 12" x 24" cutting mat. Tutorial written for the Silhouette UK Blog.


I used:

A3 Printer Paper

Large Format Printer (A3 or bigger)

Silhouette® 12" x 24" Cameo Cutting Mat

Silhouette Cameo® 3


Custom Lightbox Panels by Janet Packer (CraftingQuine) using Print & Cut and the Silhouette Cameo Large 12" x 24" cutting mat. Tutorial written for the Silhouette UK Blog.

The photo is the view from our house (taken by my husband) and I think it shows that there are SOME advantages to living in the north east Scotland!  What photo would you put in your lightbox?

Bye for now,

20 Jan 2018

Polar Bear Luminary with Silhouette Glitter Sheets

Polar Bear Luminary made with Silhouette Printable Sticker Paper by Janet Packer for the Silhouette UK Blog and Janet's Crafting Quine Blog . Designs by Nic Squirrell and Sarah Hurley from the Silhouette Design Store.

Hiya, I have new post over on the Silhouette UK Blog today using Silhouette's new printable media – printable glitter sticker paper. Today's project cuts the sheets to make a cute piece of home using the Polar Bears Papercut Lantern file by Nic Squirrell to make a fun wintry, seasonal luminary.

Polar Bear Luminary made with Silhouette Printable Sticker Paper by Janet Packer for the Silhouette UK Blog and Janet's Crafting Quine Blog . Designs by Nic Squirrell and Sarah Hurley from the Silhouette Design Store.


The lantern is made in three layers. An exterior layer of adhesive glitter paper featuring the polar bear design that is layered over a vellum layer printed with a night sky (Constellation Background by Sarah Hurley also from the Silhouette Design Store). Between the two is an acetate layer to which the polar bears are adhered and which gives shape, rigidity, and shine to the lantern.

Polar Bear Luminary made with Silhouette Printable Sticker Paper by Janet Packer for the Silhouette UK Blog and Janet's Crafting Quine Blog . Designs by Nic Squirrell and Sarah Hurley from the Silhouette Design Store.


The post includes details on how to re-size the design to fit an LED candle as well as how to cut the materials and assemble the luminary.

Polar Bear Luminary made with Silhouette Printable Sticker Paper by Janet Packer for the Silhouette UK Blog and Janet's Crafting Quine Blog . Designs by Nic Squirrell and Sarah Hurley from the Silhouette Design Store.


The polar bear design could be changed out for other images - penguins, swans, even fairies would look great.

I do hope you'll try the glitter sticker sheets for cut projects too. 


7 Jan 2018

Flip Top Calendar using Silhouette Studio's Move tool

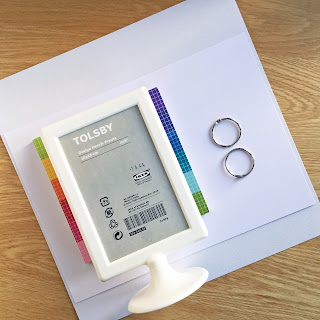
LINK to TUTORIAL : Flip Top Calendar designed by Janet Packer (CraftingQuine) for the Silhouette UK Blog using IKEA Tolsby picture frame.

Hello and Happy New Year.  I had a post on the Silhouette UK Blog a few days ago showing how to make this flip top calendar. It used Silhouette's Print & Cut and Move functions.  It was cheap to make (the frame I used cost just £1 from IKEA), and would look great on a desk, beside a telephone, or even as a small gift.

I used the 2018 Calendar set by Alaa' K (parts 1, 2, 3, 4), resizing them to fit a bought picture frame. I also adjusted the position of the holes using the Move function.

The bright coloured papers are from MFT Graphic Grid 6x6 paper pad. There are twelve different colours - perfect for this project!


LINK to TUTORIAL : Flip Top Calendar designed by Janet Packer (CraftingQuine) for the Silhouette UK Blog using IKEA Tolsby picture frame.


LINK to TUTORIAL : Flip Top Calendar designed by Janet Packer (CraftingQuine) for the Silhouette UK Blog using IKEA Tolsby picture frame.


Hope you have a happy and organised 2018!


17 Dec 2017

Decorated Christmas Crackers with Silhouette Glitter Sticker Sheets


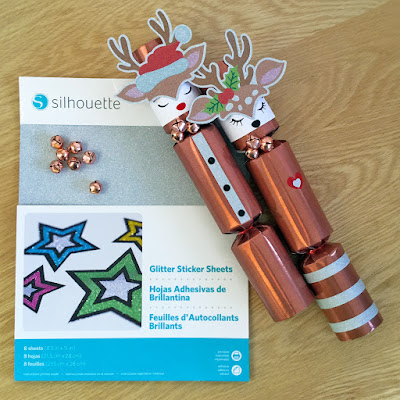
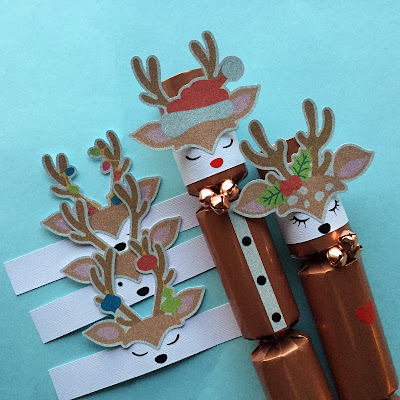
Hiya, today I have a post on the Silhouette UK Blog on the NEW Silhouette® Glitter Sticker Sheets.  It includes a festive project using glitter stickers to decorate some home-made Christmas crackers. I used the Oh Deer heads by Lettering Delights from the Silhouette Store. They are also available as a bundle from Lettering Delights.

Custom Christmas Crackers designed by Janet Packer (CraftingQuine) for the Silhouette UK Blog using Silhouette Adhesive Glitter Sticker Sheets.


The Glitter sticker sheets are new to the UK. There are 8 sheets in a pack, each sheet being 8.5in. x 11in., or 215 mm x 280 mm. The sheets are glittery with a slightly silvery colouration.  They can be printed with any pattern on a home printer. The sheets are adhesive-backed, so no additional adhesive is needed.

My post over on the Silhouette UK blog covers the cut settings for the Silhouette Cameo 3.  I didn't have immediate success with them so I've included lots of tips on using this media specifically.  These tips are useful for using Print & Cut media generally, especially useful for those who haven't let got to grips with this extremely useful function of the Silhouette family of machines.


Custom Christmas Crackers designed by Janet Packer (CraftingQuine) for the Silhouette UK Blog using Silhouette Adhesive Glitter Sticker Sheets.


There are also brief instructions on how to use the Oh Deer heads to make wrappers to decorate homemade Christmas crackers. They could be used for many other projects too; toppers, picks and even napkin holders.