Showing posts with label Silhouette UK Design Team. Show all posts

6 Aug 2017

Fast Cardmaking with Adhesive Cardstock - Unicorn Card


Hiya, This week on the Silhouette UK Blog I've been using my Bokeh backgrounds and Silhouette Self-adhesive Cardstock to make fast cards.


Using self-adhesive cardstock speeds up the cardmaking process; no need for adhesives, scissors or protective mat. Just cut out the design, peel, press and your card is made.


I used the Unicorn Card design by Nic Squirrell (#176308).

My post includes instructions on how to make this card and a few extra tips and suggestions on how to make speedy cards. Feel free to add any of your own in the comments below the post.


21 Jul 2017

Alcohol Ink and Vellum Butterfly Card - Faux Stained Glass Technique


Hiya,  I'm featuring a card using one of my favourite card-making techniques on the the Silhouette UK Blog today - faux stained glass!  The Silhouette cuts great frames to show off the pattern variations and rich colours of decorated vellum paper.  I've adapted the card design so that  light can pass through and display the inked vellum to best effect. I used self-adhesive cardstock to give a clean, smear-free finish.


To make the card I used the following:


Butterfly Card #124784 file download by StudioIlustrado

Butterfly Mother's Day Card #59805 for the little butterflies

Silhouette® Cameo 3

Pearlescent vellum from Create & Craft

Tim Holtz Alcohol inks & blending solution

Black medium-weight cardstock

Liquid craft glue

Black Silhouette Adhesive Cardstock


On the full post you'll find details on:
  • Preparing the vellum,
  • Adapting the card base,
  • Making an independent frame for the stained-glass,
  • Aligning the vellum insert, and
  • Finishing touches.


Oh, and don't forget to use the vellum scraps from around the butterfly to make smaller butterflies to use for other projects. Even the bits rescued from the bin!


I hope you'll try this out - the stained glass effect is beautiful in real life.


10 Jul 2017

Quick Cork Coasters


Hiya, over on the Silhouette UK Blog today I have a FAST gift tutorial. I've decorated blank cork coasters with smooth heat transfer vinyl. The Silhouette Heat Transfer material is easy to cut and fast to prepare.


You'll need:

Silhouette Smooth Heat Transfer Material

Blank Cork Coasters/Circles (95mm diameter, 6mm thick)

Tea Cup Pennant Files by Nic Squirrell #73419

Heat Press or Iron


In the post I show you how to prepare the design, and how to cut and apply the heat transfer material.


Hope you'll try this - I think they turned out great!

P.S. If you have any queries I won't be able to repsond right away as I'm holiday-ing on the beautiful Isle of Skye (this post was scheduled ahead). If you leave a message here I'll get back to you as soon as I can after my return!


1 Jul 2017

Make Custom Insets for Your Gift Boxes and Gift Cards


Hiya. Today on the Silhouette UK Blog I have Part 2 of the 'Decorate Your Phone Kit'. Last week, in Part 1,  I shared a tutorial on making small decal sheets from re-coloured Print & Cut designs. Today I have 3 mini tutorials, completing the gift box, showing how to;
  1. make a custom box insert,
  2. make a gift card or sheet holder, and
  3. scan the gift (to use in customising the box insert and making phone cover sheets).


Pop over to the blog if you think you'll find any of these mini-tutorials useful. They can easily be adapted for all sorts of presentation boxes and gifts.


24 Jun 2017

Re-colour Print & Cut Designs


Hiya,
Have you tried printable vinyl yet?  My Facebook feed seems to be full of requests on where to buy various patterns and subjects.  You can now buy vinyl to print for yourself, so there really is no limit to your creativity. I used it to make vinyl decals to decorate a phone cover on the Silhouette UK Blog this week.  I chose a selection of designs and made a set of three sheets of decals to gift in a presentation box. I call it a DYP kit - a Decorate Your Phone kit!


I've done the entire kit in two posts. This one, Part One, shows how to make the decals. Part Two will show how to make cover inserts and the gift box with customised holders for the cover and decal sheets.


I USED:

Silhouette Printable Vinyl

Clear Phone Cover

Various Designs from the Silhouette Store (listed in the Silhouette UK post)

Printer


The Post includes instructions on how to colour-match designs from different collections and designers to make a cohesive set of decals using the 'Color Picker' tool in the Silhouette Studio® software (love that tool)!


I hope you'll click over and visit the Silhouette UK Blog and look at some of the fantastic projects and tutorials there.


15 Jun 2017

Embellish Card with Flocked Heat Transfer


I love adding a little something extra to my cards, especially those for very special occasions. I've found that using flocked heat transfer material gives fantastic fuzzy texture to select elements and is very easy to do.


On the Silhouette UK Blog today I've combined the use of the heat transfer with a new style of card; the new Insta-cube card by Lori Whitlock. They are small folded cards powered by a rubber band. When you pull a card from its decorated sleeve it pops up to form a cube. I know a couple who are expecting their first baby later in the year, so I selected the baby version and think it will make a lovely keepsake.


I gave some of the elements (the giraffe, the heart and the 'B' in baby) a fluffy texture to make the card and sleeve extra tactile. Although I used flocked heat transfer vinyl, felt or speciality flocked paper could be used instead.


Materials
Medium-weight card for the base

Printable Cardstock

Coloured or patterned card/paper

Rubber band (about 2.75"/ 70 mm)

Strong double-sided adhesive tape

Yellow Flocked Heat Transfer (HTV)

Baby Insta-Cube Card file by Lori Whitlock #198865

Iron or Heat Press

Printer


How to Use Heat Transfer Material

1. Select the pieces that you are going to cut from heat transfer. Remember that heat transfer elements need to be flipped.  

2. Place heat transfer material shiny side to the mat and cut the pieces and then weed (remove the bits you don't need).

3. Separate the elements and then activate the adhesive on the HTV by pressing the designs into place. Use an iron, or heat press on a lower heat setting than normal and allow to cool before carefully peeling off the backing (warning: it does get very hot).

I used heat setting 6 on my Hobby Jack heat press (which I believe is around 120ºC, so a good bit cooler than you'd use for garments). You can use an iron (non-steam) with a similar temperature, but if you move the iron around, the design may shift too. Press initially for 8 seconds, and allowed it to cool and then re-press for a few more seconds if it hasn't stuck.  Ensure you use a protective layer between the HTV and the hot platen. For ease I use a silicon sheet fixed to the upper platen of my press.
 
4. Check carefully by lifting a corner of the backing sheet. You may need to encourage the flock to separate from the backing with a flat tool, and hold down the part that has separated against the card (don't pull it straight up from the card). A heat press isn't necessary, but it does a better job of applying heat evenly so that your base card doesn't scorch.


This is a such a fun card design, and there are a number of other designs to choose from.

I think that the fuzzy elements make this card extra special. Do let me know if you have a go at using heat transfer on your cards technique in the comments below.


6 Jun 2017

Cut and decorate your own Leatherette Bookmarks


Make your own bookmarks with Silhouette Leatherette and a FREE file from the SilhouetteUK Blog. Designed by Janet Packer (CraftingQuine) for the Silhouette UK Blog.


Hiya, today I have a new post over on the Silhouette UK Blog on using Silhouette Leatherette Sheets. Yes, the leatherette sheets can be cut very successfully on any of the Silhouette machines (not the Mint, of course).

Not only does the post contain a tutorial on cutting the leatherette it includes how to cut and decorate bookmark AND a  free cutting file for the bookmark.  You can only download the file from the Silhouette Blog, so you'll need to pop over there if you want (or go ahead as design your own).


I decorated the bookmarks with heat transfer vinyl (HTV) using the beautiful Many Flowers Border file by Nic Squirrell (#177994).


I think they turned out nicely and look very professional.  Do you prefer the smooth or flocked finish?


Oh ... and bonus points if you can tell me the title of the book in the photos!


29 May 2017

A Mouse Ice cream Cart and Hints on Using Scraps


Hiya, Over to the Silhouette UK Blog today I have a post all about using scraps, making your media go further, and using substitutes if you don't seem to have just what you need. To illustrate these tips I made this cute little Mouse Ice Cream Cart by Samantha Walker.


Here are some close-up pics of my favourite tweaks.


Cork ice-cream cones


A tiny silver tray in the cool box (great for a secret message).


A birthday message on the custom chalkboard


I hope like this fun little project and that the post gives you some ideas for using up your bits and pieces.


If you have tips of your own I'd love to hear about them in the comments. Do share!


19 May 2017

Chalkboard Labels for Homemade Preserves


Hiya,

I don't have a big garden, but I love growing things to eat. Rhubarb grows a little too successfully, and its big leaves shade the lawn, causing it to die off if we don't pick it regularly. To use up an extra large harvest, I recently made a hot and spicy chutney with our rhubarb and shop-bought fresh root ginger.  I wanted to 'prettyfy' the jars to give some as gifts. and made custom chalkboard labels.


Over on the  Silhouette UK Blog today I show how I made the labels with my Silhouette® CAMEO 3, Chalkboard Cardstock and a favourite gel pen in the Silhouette Pen Holder. I used a few of these lovely circular frames designed by Lori Whitlock and a Sketch font called Sisters, designed by Riva Wilkins. I used a white gel pen to draw the frames and write the labels, a draw and cut technique.


I also added some tiny mini labels just for fun and some black and white baker's twine to finish.

Do you make preserves?  If not, these labels would look equally pretty on store-bought preserves. Why not pop over to the blog and see how it's done?


11 May 2017

Make Your Own Cork Stickers


Hiya,  I've a new post over on the Silhouette UK Blog today.  I've been working with adhesive cork sheets a lot recently.  I haven't shared all my projects yet because some of them are for future publication, but I will share when I can.

Last month I wrote in general about how to use the cork sheets. I used the cork sheets to cover MDF shapes, and the designs I cut were quite large. As promised I've returned to the Silhouette Cork Sheets to make sticker embellishments for my cards.

I've discovered that you can paint and stencil onto cork. I've painted through a stencil with acrylic paint and with pigment ink.  The pigment ink gave the neater effect, but not all colours worked equally well.  I like the look I achieved with one of the Tim Holtz Distress Oxides. This was using Broken China. The results were quite crisp with just a cardboard stencil.


However, I like the neater and more detailed results achievable using Silhouette Heat Transfer Material. This involves pressing heat transfer vinyl onto the cork sheets with an iron or heat press.

Here are some beach huts I designed in the Silhouette Studio software. Better still, the adhesive backing on the cork stays sticky, so are easy to apply to projects - no additional adhesive required. I did find it a little time consuming to apply the vinyl colours to one cork piece at a time though and looked for a better way to decorate a whole sheet of stickers at once.


For my Silhouette post I made a selection of sweet themed stickers using some of the simpler elements from designs purchased from the Silhouette Design Store:
  • Gingerbread Peppermint & Candy Cane by Kristen Magee #35782
  • Valentine Choc Rack Tall Card by Snapdragon Snippets #73620
  • Filofax Planner Donut Bookmark Clip by PPbN Designs #76883  


The post tells you how I made and cut the cork stickers and then decorated them with two layers of HTV one whole sheet of stickers at a time. Yes, with this method I decorated 15 stickers in just two pressings - a huge time-saving!

It also gives cut settings for both Cameo and Curio, and details on how to press the designs.

To use the stickers, its simply a matter of peeling off the backing paper. They can be used on cards, scrap layouts and other papercrafting projects.  I made a few into planner clips. The cork sticks really well when a pair are used back-to-back, securing the clip in between.


I hope you'll experiment too. I'd love to know how you get on and what you make. You could share pics on my NEW Facebook page Janet Packer CraftingQuine.


1 May 2017

Shaker Maze Card


Hiya,
I recently made a birthday card for a friend who is an a-MAZE-ing baker, and today I've shared it over on the Silhouette UK Blog. Its one of my favourite shaker cards, this time with a maze incorporated.


I used the Heart Maze file by Tanya Batrak because it has an open space in the centre for a more detailed decorative element. I enlarged the space and built up the layers so that the beads could move around the maze. I also added indentations to the central picture for the beads to rest, turning the card into a little game.

These are the files I used for the Silhouette Design Store:

Heart Maze file by Tanya Batrak (#172861)

Cupcake file by PattyYoung Designs (#34751)

Yellow Daisy font by Rivka Wilkins (#106927)

Over on the blog I've included a tutorial on how to put this card together. Its not a quick make, but has a truly fun result. I speeded up the whole process by cutting the pieces from adhesive card stock.

You might like the other Shaker card tutorials I have over on the Silhouette UK Blog:
Making Shaker Cards - Pt 1 The Basics
Making Shaker Cards Pt 2 The Cards, and
Anchored Shaker Elements.

I hope my friend enjoys her birthday card.


2 Apr 2017

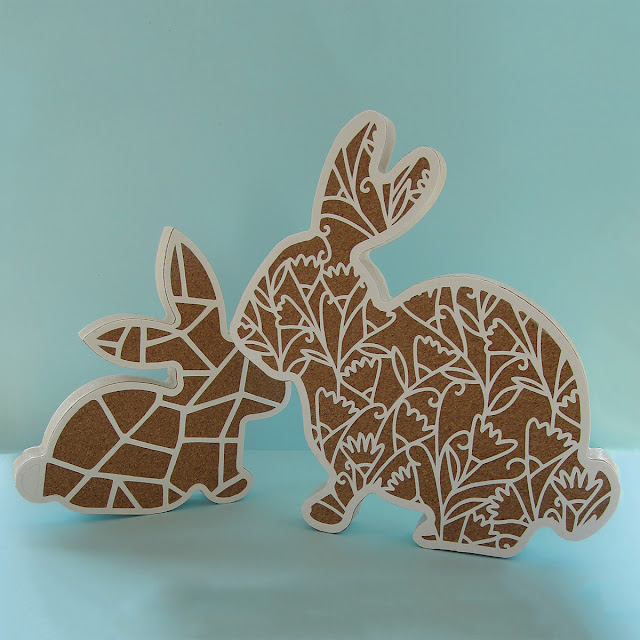
New Cork Sheets


Using Silhouette Cork Sheets - Cover an MDF Shape - Weld a pattern to a shape - by Janet Packer for Silhouette UK Blog


Hiya, this week I had the opportunity to play with the NEW Silhouette® Cork Sheets and this post on the Silhouette UK Blog was the result.

I also included a little seasonal project, using the cork to cover an MDF or wood shape for Easter/Spring. I've also been following a course on the Creative Live App called Craft Photography Fundamentals tutored by Candice Stringham. I'm loving trying out her hints for top down photos.


Using Silhouette Cork Sheets - Cover an MDF Shape - Weld a pattern to a shape - by Janet Packer for Silhouette UK Blog


Now, back to the cork sheets ...

... they can be coloured with stamping ink,


Using Silhouette Cork Sheets - Cover an MDF Shape - Weld a pattern to a shape - by Janet Packer for Silhouette UK Blog


... tiny pieces cut successfully,


Using Silhouette Cork Sheets - Cover an MDF Shape - Weld a pattern to a shape - by Janet Packer for Silhouette UK Blog


... heat transfer material adheres too.


Using Silhouette Cork Sheets - Cover an MDF Shape - Weld a pattern to a shape - by Janet Packer for Silhouette UK Blog


Over on the blog I show how I made these Easter/Spring decorations by covering MDF shapes with a mix of cork and faux leather paper.


Using Silhouette Cork Sheets - Cover an MDF Shape - Weld a pattern to a shape - by Janet Packer for Silhouette UK Blog


I used these digital files from Jamie Koay and Nic Squirrell


Hope you like them.

25 Mar 2017

New Chalkboard Cardstock - Family Menu Chalkboard - with FREE Design Elements


Family Menu Chalkboard by Janet Packer for Silhouette UK.  Make a custom menu board using chalkboard cardstock. with a FREE header shape cutting file.


Hiya,

You might have realised by now that I LOVE having the to opportunity to try out new products and this week I got to try a NEW Silhouette product in the UK - Silhouette Chalkboard Cardstock


Family Menu Chalkboard by Janet Packer for Silhouette UK.  Make a custom menu board using chalkboard cardstock with a FREE header shape cut file..


This cardstock has a surface similar to that of the Silhouette Chalkboard Vinyl, but slightly smoother surface. Obviously, it is thicker (like medium-weight cardstock) and more rigid but similar in that it has a peel-off backing sheet covering a sticky adhesive surface. It was fun to play with - it is always good to try out a few different techniques before committing to a project. I really liked the effect of writing with gel pens, so used my Silhouette Pen Holder and Uni ball white gel pen to make a Family Menu Chalkboard. I made the permanent decorations with matte white vinyl so I wouldn't erase the days by mistake when I was being over-enthusiastic with erasing the meal listings.


Family Menu Chalkboard by Janet Packer for Silhouette UK.  Make a custom menu board using chalkboard cardstock. with a FREE header shape cutting file.


So, if you'd like to make something similar with you Silhouette® CAMEO, Portrait or Curio, head on over to the Silhouette UK Blog for a tutorial and the low-down on this new product.


Family Menu Chalkboard by Janet Packer for Silhouette UK.  Make a custom menu board using chalkboard cardstock. with a FREE header shape cutting file.


These are the items you'll need: 
Black Picture Frame (**)
Silhouette Chalkboard Cardstock
White Matte Adhesive Vinyl
Clear Transfer Material
White Marker Pen (Uni ball)
Silhouette Pen Holder
Downloaded Typewriter Key Font like LW Type Print
Downloaded Sketch Font like Rivka Wilkins' Madilyn Font
Downloaded Plain Font like LW Perfect Type Font


The Silhouette UK Blog links to a FREE file to make a modified header for your chalkboard.


Family Menu Chalkboard by Janet Packer for Silhouette UK.  Make a custom menu board using chalkboard cardstock. with a FREE header shape cutting file.


The piece in the download just needs to be welded on to a rectangle matching the size of the top of your frame, all achieved very easily in the Silhouette Design software. As a bonus, the file format is GSD so may be used in other software too.


NOW, for readers of THIS blog I have a special gift for you! You can download an exclusive file of the additional Design Elements as shown in the wee picture below. They are also in GSD format, and are downloadable HERE.


Family Menu Chalkboard by Janet Packer (Crafting Quine).  Make a custom menu board using chalkboard cardstock. with a FREE Design Elements cutting file.


Family Menu Chalkboard by Janet Packer for Silhouette UK.  Make a custom menu board using chalkboard cardstock. with a FREE header shape cutting file.


(**) Note on the frame: I re-cycled an old certificate frame, originally with a bevelled edge. The rather unpleasant red-brown stain was covered with matte black acrylic paint and also turned around, to have the flat rear frame surface facing front.

I love chalkboard items and using this chalkboard cardstock is an easy way to obtain a very neat and effective look. I hope you'll try it.