Showing posts with label flock HTV. Show all posts

6 Oct 2018

Glow in the Dark Bottle Gift Bag for Silhouette UK

Design Tips for Silhouette Studio. Partial Knock Out Text Technique. Designed by Janet Packer Crafting Quine for Graphtec Silhouette UK


Hi, On the Silhouette UK Blog today I've designed the decal for this Halloween bottle bag using heat transfer materials. It is designed in the Silhouette Studio software, and the materials are cut with a Silhouette Cameo, and applied using a heat press (an iron would work too).

Design Tips for Silhouette Studio. Partial Knock Out Text Technique. Designed by Janet Packer for Graphtec Silhouette UK


The magical element is the glow in the dark HTV which glows really brightly when the lights are doused, and contrasts well with orange flocked heat transfer.

To make the decal I used a partial "knock out" design technique on one of the words using a ghost design. The post on the Silhouette UK Blog describes how to do this for yourself.

The Silhouette Glow in the Dark Heat Transfer is a dream to weed and apply and gives a fun effect.


DESIGNS USED:


PRODUCTS USED:


22 Sept 2018

Using Flocked Heat Transfer on different Surfaces


Check out the variety of projects you can make using Silhouette Flocked Heat Transfer. I had a small roll of orange heat activated flocked material to play with, and managed to make all these baby gifts! You find details of all the projects over on the Silhouette UK Blog.


It is so versatile - I hope you'll try it.


2 Jun 2018

How to knockout a Vinyl design for Rhinestones


Hello, its been all about the gorgeous Silhouette Rhinestones on the Silhouette UK Blog this week and I've shared a decorative pillow/cushion using rhinestones and flock heat transfer featuring the Eiffel Tower and a custom rhinestone phrase - Ooh La la! Pop over to read that post if you'd like to find out how to design your own rhinestone decal. I used the Eiffel Tower file (#41675) by Samantha Walker and Madilyn Sketch font (#77519) by Rivka Wilkins, both from the Silhouette Design Store.


In this post I'm concentrating on the heat transfer part, and particularly how to 'knockout' the rhinestone design from the flock heat transfer layer to allow the rhinestones to adhere directly to the cover's fabric rather than the flock. This is important because although the stones might initially stick if applied on top of the flock, over time they will likely loosen and drop off.


With regular shapes I use the offset feature in the Silhouette Designer software to make a slightly larger version of the design and then cut the design and the larger holes. However, there is a quicker way with the Designer Edition of the Silhouette software. 

This is how:
  • Copy the rhinestone design, then Paste in Front (right mouse click actions)
  • Release the Rhinestones (from the Rhinestone Panel)
  • With the new copy still selected, increase the size of the rhinestones to the next size up
  • Move the original rhinestone holes away and use to cut the rhinestone template & make the decal
  • Delete any of the new holes which fall to either size of the design
  • Cut the new rhinestone holes along with the background design.
  • Weed the design and the holes.


The vinyl design is applied to the item first and the slightly larger holes are then in perfect alignment with the rhinestone transfer with a small gap around them so the rhinestones can adhere directly to the item without being deflected by the edges of the vinyl design.


The result is very neat and the larger holes are barely visible.

I hope that you find this technique useful for your rhinestone text decals.


15 Jun 2017

Embellish Card with Flocked Heat Transfer


I love adding a little something extra to my cards, especially those for very special occasions. I've found that using flocked heat transfer material gives fantastic fuzzy texture to select elements and is very easy to do.


On the Silhouette UK Blog today I've combined the use of the heat transfer with a new style of card; the new Insta-cube card by Lori Whitlock. They are small folded cards powered by a rubber band. When you pull a card from its decorated sleeve it pops up to form a cube. I know a couple who are expecting their first baby later in the year, so I selected the baby version and think it will make a lovely keepsake.


I gave some of the elements (the giraffe, the heart and the 'B' in baby) a fluffy texture to make the card and sleeve extra tactile. Although I used flocked heat transfer vinyl, felt or speciality flocked paper could be used instead.


Materials
Medium-weight card for the base

Printable Cardstock

Coloured or patterned card/paper

Rubber band (about 2.75"/ 70 mm)

Strong double-sided adhesive tape

Yellow Flocked Heat Transfer (HTV)

Baby Insta-Cube Card file by Lori Whitlock #198865

Iron or Heat Press

Printer


How to Use Heat Transfer Material

1. Select the pieces that you are going to cut from heat transfer. Remember that heat transfer elements need to be flipped.  

2. Place heat transfer material shiny side to the mat and cut the pieces and then weed (remove the bits you don't need).

3. Separate the elements and then activate the adhesive on the HTV by pressing the designs into place. Use an iron, or heat press on a lower heat setting than normal and allow to cool before carefully peeling off the backing (warning: it does get very hot).

I used heat setting 6 on my Hobby Jack heat press (which I believe is around 120ºC, so a good bit cooler than you'd use for garments). You can use an iron (non-steam) with a similar temperature, but if you move the iron around, the design may shift too. Press initially for 8 seconds, and allowed it to cool and then re-press for a few more seconds if it hasn't stuck.  Ensure you use a protective layer between the HTV and the hot platen. For ease I use a silicon sheet fixed to the upper platen of my press.
 
4. Check carefully by lifting a corner of the backing sheet. You may need to encourage the flock to separate from the backing with a flat tool, and hold down the part that has separated against the card (don't pull it straight up from the card). A heat press isn't necessary, but it does a better job of applying heat evenly so that your base card doesn't scorch.


This is a such a fun card design, and there are a number of other designs to choose from.

I think that the fuzzy elements make this card extra special. Do let me know if you have a go at using heat transfer on your cards technique in the comments below.


14 Apr 2017

Using SVGs to Create in Silhouette Studio Designer Edition


Fancy Cat designs in a varity of media by Janet Packer (Crafting Quine). Original design by Sanqunetti Design.


Hiya, this week I had the opportunity to try out the new Fancy Cat Cutting File from Sanqunetti Design. I used the designer edition of the Silhouette Studio software, but the variety of file types included allow the design to be used with most cutting machines (SVG, DXF, PDF & JPG). Note, the DXF format can be used with the basic edition of the Silhouette Studio software too.


I wasn't sure if the design would be better suited to card, vinyl or something else. It turned out it that the image suited EVERYTHING and so I made it up in all the media I had readily available (heat transfer vinyl, caper/card and sticker paper).


HEAT TRANSFER VINYL (Pyjama Bag)

I made up a little pyjama bag using a variation of the phrase "the cat's pyjamas" - perfect to use with this image. I used soft, velvety, flocked vinyl for the black parts, sparkly gold glitter vinyl for the heart and glasses, and regular smooth vinyl for the remainder.

Fancy Cat designs in a varity of media by Janet Packer (Crafting Quine). Original design by Sanqunetti Design.


CARDSTOCK (Greeting card)

For the card I designed a semi-shaped card using an offset of the cat's head and a patterned rectangle. The background piece was made using the Silhouette's Print & Cut function, with most of the pieces being cut from textured cardstock.  The glasses and heart are made with card with a glitter heat transfer veneer (yes, you can iron heat transfer on to card). The heart is finished with the recipient's  initial cut from regular sign vinyl. Of course, a monogram or small name could be added as an alternative.

Fancy Cat designs in a varity of media by Janet Packer (Crafting Quine). Original design by Sanqunetti Design.


STICKER PAPER (Custom Stickers)

Using the Print & Cut function again, I made a sheet of personalised stickers using the included JPEG image.

Fancy Cat designs in a varity of media by Janet Packer (Crafting Quine). Original design by Sanqunetti Design.


What a lovely extra surprise to include a sheet of stickers with a child's greeting card?


Fancy Cat designs in a varity of media by Janet Packer (Crafting Quine). Original design by Sanqunetti Design.


REGULAR SIGN VINYL (Vinyl Decal)

I had intended to made a decal for a cat treat jar with some custom text. However, I'd used all my pink sign vinyl, so that is a project for another day.


VERSATILITY (Using SVG & DXF)

The files allow for all manner of variations and customisations. The diagram shows some possible options for the bow.

For vinyl, I chose to make the black flock more prominent than the grey, and used the lower of the two vinyl variations with the loose 'shadow' pieces, omitting the 'knot' piece.

For the card, I decided I'd prefer to have fewer loose pieces and so made the bow and shadow pieces a compound path, and again omitted the 'knot'.

A even simpler solution would be to just use the bow outline - the choice is your's!


Fancy Cat designs in a varity of media by Janet Packer (Crafting Quine). Original design by Sanqunetti Design.


I hope you find this demonstration of the versatility of these cutting files useful.  Let me know  (in the comments section below) if you have any further suggestions. I love hearing from you.


20 Mar 2017

Personalise a Children's Apron - a Quick design Tweak


Personalize a cut design by Janet Packer (CraftingQuine.blogspot.co.uk).  Make a personalised child's apron.


Hiya,

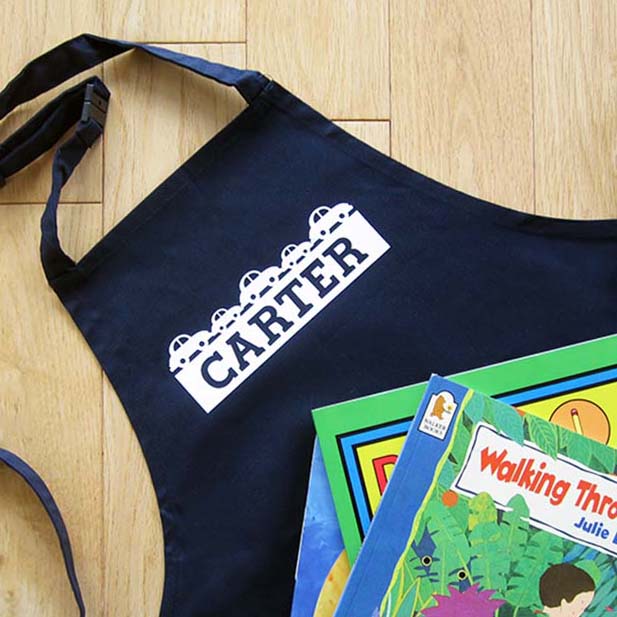
Kids seem to love gifts with their name on them,c  So, needing a gift in a hurry, I decorated this plain apron for a young friend who has a tiny bit of a car obsession, using a design from the Silhouette Design Store. I’m sharing a sep-by-step tutorial for this  quick and easy gift idea over on the Silhouette UK Blog today, using a child’s blank apron and flocked heat transfer material  (HTV) .


Personalize a cut design by Janet Packer (CraftingQuine.blogspot.co.uk).  Make a personalised child's apron.


The design I chose was from a set from the Silhouette Design Store called Baby Toys Borders Set designed by StudioIlustrado. The designer has loads of similarly sized borders with a rectangular base, any of which would work for this purpose. Just search the store for 'Borders set' and filter by 'Studioilustrado' (note, just one 'L') and it will bring up pages of lovely designs - including tractors, seahorses, and even kitchen sets.

I made a few minor adaptations to the file to incorporate the child's name and make a one-piece decal which makes it super easy to weed and align on a garment (or on a flat hard surface if regular vinyl is used). This would be ideal for anyone new to changing files, or to using heat transfer material. do pop over to the Silhouette blog and take a look.
Personalize a cut design by Janet Packer (CraftingQuine.blogspot.co.uk).  Make a personalised child's apron.

Firstly, I show how to edit the design to allow sufficient space for some text
Personalize a cut design by Janet Packer (CraftingQuine.blogspot.co.uk).  Make a personalised child's apron.
Then I type the child’s name in an easy-to-read font - Lori Whitlock’s Super Font


Personalize a cut design by Janet Packer (CraftingQuine.blogspot.co.uk).  Make a personalised child's apron.


Once reversed design is cut out on your digital cutting system (this would fit Silhouette®Cameo, Portrait or Curio) it is a straightforward design to iron or press onto the font of the apron.


Personalize a cut design by Janet Packer (CraftingQuine.blogspot.co.uk).  Make a personalised child's apron.

There you have it - add a matching gift tag and your gift is ready.

Of course, the same personalised design (not reversed) can be used on almost any hard surface too, using regular vinyl, so you could make even more co-ordinating items.

I hope you'll try it!


1 Dec 2016

Applying Heat Transfer Vinyl to Hessian


HTV Santa Sack on Hessian by Janet Packer for Silhouette Uk Blog


Hello,  Over on the Silhouette UK Blog we are celebrating Christmas with 12 days of fabulous Christmas makes. My post is the 1st Day of Christmas and shows how to decorate a hessian Santa sack. The sacks I decorated don't have a drawstring, so need a band closure and a decorative bow.

Santa Sack by Janet Packer - Flocked Heat Transfer Vinyl on Hessian sack


I used matt white flock heat transfer material on hessian with just a few silver stars to highlight the design. In the post I take you through how to decorate a Santa sack with designs and fonts from the Silhouette Design Store.

The post contains a number of tricks and tips including how to make the vinyl stick to hessian (which can be a little tricky).

Santa Sack by Janet Packer - Flocked Heat Transfer Vinyl on Hessian sack

Santa Sack by Janet Packer - Flocked Heat Transfer Vinyl on Hessian sack


I hope you'll try using HTV on Hessian, Jute, Burlap or cotton canvas and pop over to the Silhouette UK Blog for instructions and hints on using these trickier materials.

Look out for the second day of Christmas on Friday - Nadine has a special treat for you!


SaveSave