28 Jun 2017

School Owl Mini Album


The school year is almost over so I made this mini album with 'Back to School in mind.  It is made using a new SVG release from Sanqunetti Design - School Owl SVG and Silhouette chipboard.


Supplies Used

Silhouette Cameo®
Silhouette Chipboard 12"x 12" sheets
Silhouette Adhesive Cork
AC Textured Cardstock in various colours
Patterned Papers
1"/25mm Binder/Book Rings
Beacon 3-in-1 Adhesive
Dimensional adhesive pads


Aside from resizing the owl to about 5" wide, the owl pieces were cut without adjustment from textured and patterned papers. Some were duplicated to give more dimension. The feathers were subtracted from the owl body prior to cutting it from adhesive cork. 

To make the album pages, I made an offset of the owl base and released the compound path , removing the 'gap' around the glasses. A rounded rectangle with holes was welded on to give space and strength for the binding rings.


The pieces were sized so that four pages could be cut from a 12" x 12" sheet of chipboard. I cut eight in total, doubling up the front and back covers. This gave four pages for photos, journaling and notes, but there is room for at least four more using the 1" rings, and even more if a larger size is used. The same page pieces were cut in various plain and patterned pages adhered to cover the chipboard.


Then it is simply a matter of assembling the owl on the front cover and threading the pages onto the rings. 


The School Owl cutting file is available from the Sanqunetti Design website and at Judy's Etsy store.


I love how easy it is to make uniquely shaped albums based on almost any SVG design in the Silhouette Studio software.  I'm wondering, what album I should make next?


27 Jun 2017

Chalkboard Birdhouse

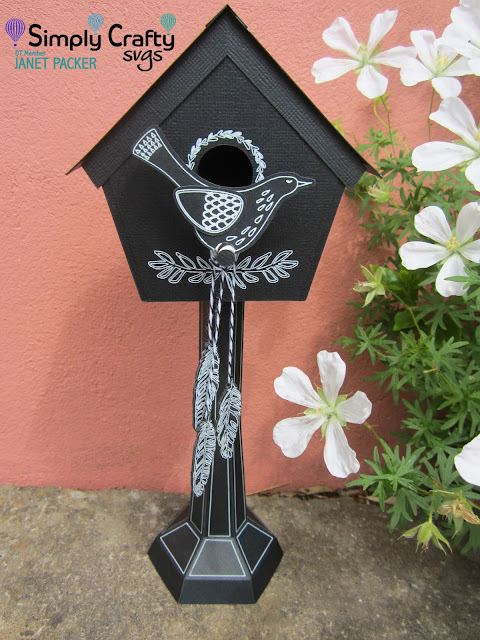
Chalkboard Birdhouse by Janet Packer (Crafting Quine) using Silhouette Sketch Pens. Tutorial combining Simply Crafty SVGs Birdhouse Box and Holiday Lamp Post. http://craftingquine.blogspot.co.uk


Hiya, Janet here with my first ever Design Team post for Simply Crafty SVGs. Today I have a fun little chalkboard birdhouse made by combining the Bird House Box and the Holiday Lamp Post. It's made almost entirely from black cardstock and decorated with white gel pen. I've included details on how you can make this 'hybrid'. I used a Silhouette Cameo® 3, but of course these svg files can be used with other desktop die cutting machines (details here).


MATERIALS:
Black AC Textured Cardstock
White Uni-ball Signo Gel Pen
Black & White Baker's Twine
Black & White Patterned Paper
(Shine Bright from Kaisercraft)
Black & White Paper Straw
Beacon 3-in-1 Glue
Silhouette Pen Holder
Silhouette Cameo


Adding a Perch

Prior to cutting add holes to the birdhouse file to allow a perch (paper straw) to pass through from front to back. Also added corresponding holes to the front and back panels. It is easy to match them up by measuring the diameter of the straw and drawing a circle in the software of the same size. Then temporarily position the panels in place on the main piece on the virtual cutting mat, and copy the hole to the correct position on all of the pieces.  Make it an integral part of the design by selecting each part and one copy of the hole, and then making each into a compound path.

Chalkboard Birdhouse by Janet Packer (Crafting Quine) using Silhouette Sketch Pens. Tutorial combining Simply Crafty SVGs Birdhouse Box and Holiday Lamp Post. http://craftingquine.blogspot.co.uk


Decorating the Birdhouse

The main birdhouse makes extensive use of the Silhouette Cameo's sketch facility to draw the decoration using the Silhouette Pen Holder and my favourite white gel pen with designs from the Silhouette Design Store (listed below).

The Cameo 3 has a dual carriage and so can use a pen to sketch in one holder with the AutoBlade in the other. I usually do the sketching first with a pause to let the pen dry before continuing to do the cut - no smudges that way!


Chalkboard Birdhouse by Janet Packer (Crafting Quine) using Silhouette Sketch Pens. Tutorial combining Simply Crafty SVGs Birdhouse Box and Holiday Lamp Post. http://craftingquine.blogspot.co.uk


Constructing the Birdhouse

The construction part is straightforward as Sandy includes a set of instructions in pdf format with each of her files.

I also recommend following Sandy's advice for crease lines, and use a shallow continuous cut instead of the dashed lines (these files are supplied with both). 

Using textured cardstock gives a variety of surfaces; use the rougher side facing out for the main parts, and the alternate with the smoother side for the sketch work on the panels.

Chalkboard Birdhouse by Janet Packer (Crafting Quine) using Silhouette Sketch Pens. Tutorial combining Simply Crafty SVGs Birdhouse Box and Holiday Lamp Post. http://craftingquine.blogspot.co.uk


Making the Stand

Use the pole and base pieces from the Holiday Lamp Post to make a stand for the birdhouse. A pinstripe line can be added to the pieces by using the polygon line drawing tool, adding a line just inside the outer faces. Then use the sketch function to sketch the lines before cutting out the pieces.

Chalkboard Birdhouse by Janet Packer (Crafting Quine) using Silhouette Sketch Pens. Tutorial combining Simply Crafty SVGs Birdhouse Box and Holiday Lamp Post. http://craftingquine.blogspot.co.uk


Once the pole and stand are constructed and attached to each other use the base from the lantern part to attach them to the birdhouse.  Simply use the knife tool to 'remove' the mounting base from the lantern.


Push the tabs at the top of the constructed pole piece through the hexagonal hole, bend them over and adhere them to the mounting base. When it is firmly stuck, adhere the new top to the underside of the birdhouse.


Adding the Bird

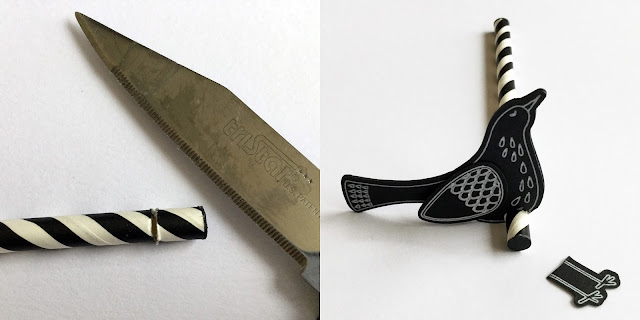
Save the waste circles cut from the birdhouse and adhere them to the ends of the trimmed straw. Then cut a slit in the straw with a serrated knife. Carefully trim the legs off the bird's body and push the bird into the slit. A blob of adhesive behind the bird ensures that the bird stays in place. Once dry push the perch through the holes in the assembled birdhouse and add more adhesive at the entry points to keep the perch in place and the bird upright.

Chalkboard Birdhouse by Janet Packer (Crafting Quine) using Silhouette Sketch Pens. Tutorial combining Simply Crafty SVGs Birdhouse Box and Holiday Lamp Post. http://craftingquine.blogspot.co.uk


Feather Embellishments

Sketch and cut two sets of feathers, one the mirror image of the other. Make an additional set with a slit at the quill end, so that the feathers can be layered back-to-back with a piece of twine entrapped between the layers.


Finally tie the feathers onto the perch to hang below the birdhouse ...

Chalkboard Birdhouse by Janet Packer (Crafting Quine) using Silhouette Sketch Pens. Tutorial combining Simply Crafty SVGs Birdhouse Box and Holiday Lamp Post. http://craftingquine.blogspot.co.uk


... and that completes the chalkboard birdhouse.

Chalkboard Birdhouse by Janet Packer (Crafting Quine) using Silhouette Sketch Pens. Tutorial combining Simply Crafty SVGs Birdhouse Box and Holiday Lamp Post. http://craftingquine.blogspot.co.uk


It's such fun to combine files to make something unique. I hope you'll try it.


Bye for now,
Janet, DT Member Simply Crafty SVGS

Blog: https://CraftingQuine.blogspot.co.uk
Instagram: https://www.instagram.com/craftingquine


Simply Crafty SVG Files:
Bird House Box
Holiday Lamp Post

Additional Silhouette Files:
Leaf & Flower Border Set (Nic Squirrell) #87418
Late Summer Border (Nic Squirrell) #146669 
Monogram Circle frame (Lori Whitlock) #192922 
Patterned Bird (Nic Squirrell) #65418
Wild Bird Feathers (Nic Squirrell) #151820 


24 Jun 2017

Re-colour Print & Cut Designs


Hiya,
Have you tried printable vinyl yet?  My Facebook feed seems to be full of requests on where to buy various patterns and subjects.  You can now buy vinyl to print for yourself, so there really is no limit to your creativity. I used it to make vinyl decals to decorate a phone cover on the Silhouette UK Blog this week.  I chose a selection of designs and made a set of three sheets of decals to gift in a presentation box. I call it a DYP kit - a Decorate Your Phone kit!


I've done the entire kit in two posts. This one, Part One, shows how to make the decals. Part Two will show how to make cover inserts and the gift box with customised holders for the cover and decal sheets.


I USED:

Silhouette Printable Vinyl

Clear Phone Cover

Various Designs from the Silhouette Store (listed in the Silhouette UK post)

Printer


The Post includes instructions on how to colour-match designs from different collections and designers to make a cohesive set of decals using the 'Color Picker' tool in the Silhouette Studio® software (love that tool)!


I hope you'll click over and visit the Silhouette UK Blog and look at some of the fantastic projects and tutorials there.


15 Jun 2017

Embellish Card with Flocked Heat Transfer


I love adding a little something extra to my cards, especially those for very special occasions. I've found that using flocked heat transfer material gives fantastic fuzzy texture to select elements and is very easy to do.


On the Silhouette UK Blog today I've combined the use of the heat transfer with a new style of card; the new Insta-cube card by Lori Whitlock. They are small folded cards powered by a rubber band. When you pull a card from its decorated sleeve it pops up to form a cube. I know a couple who are expecting their first baby later in the year, so I selected the baby version and think it will make a lovely keepsake.


I gave some of the elements (the giraffe, the heart and the 'B' in baby) a fluffy texture to make the card and sleeve extra tactile. Although I used flocked heat transfer vinyl, felt or speciality flocked paper could be used instead.


Materials
Medium-weight card for the base

Printable Cardstock

Coloured or patterned card/paper

Rubber band (about 2.75"/ 70 mm)

Strong double-sided adhesive tape

Yellow Flocked Heat Transfer (HTV)

Baby Insta-Cube Card file by Lori Whitlock #198865

Iron or Heat Press

Printer


How to Use Heat Transfer Material

1. Select the pieces that you are going to cut from heat transfer. Remember that heat transfer elements need to be flipped.  

2. Place heat transfer material shiny side to the mat and cut the pieces and then weed (remove the bits you don't need).

3. Separate the elements and then activate the adhesive on the HTV by pressing the designs into place. Use an iron, or heat press on a lower heat setting than normal and allow to cool before carefully peeling off the backing (warning: it does get very hot).

I used heat setting 6 on my Hobby Jack heat press (which I believe is around 120ºC, so a good bit cooler than you'd use for garments). You can use an iron (non-steam) with a similar temperature, but if you move the iron around, the design may shift too. Press initially for 8 seconds, and allowed it to cool and then re-press for a few more seconds if it hasn't stuck.  Ensure you use a protective layer between the HTV and the hot platen. For ease I use a silicon sheet fixed to the upper platen of my press.
 
4. Check carefully by lifting a corner of the backing sheet. You may need to encourage the flock to separate from the backing with a flat tool, and hold down the part that has separated against the card (don't pull it straight up from the card). A heat press isn't necessary, but it does a better job of applying heat evenly so that your base card doesn't scorch.


This is a such a fun card design, and there are a number of other designs to choose from.

I think that the fuzzy elements make this card extra special. Do let me know if you have a go at using heat transfer on your cards technique in the comments below.


11 Jun 2017

NEWS : Now on the Simply Crafty SVgs Design Team


Hiya,

I'm thrilled to announce that I've joined the first ever Simply Crafty SVGs Design Team.  You can read the introduction and team member's bios on the Simply Crafty SVG Blog.

The Simply Crafty SVGs Shop has lots of great card and 3D designs in SVG format - great for cutting machines such as the Silhouette Cameo, Sizzix eclips  and Cricut Explore. Each file comes with a PDF document with full assembly instructions. Pop over to the store and checkout Sandy's fabulous designs.


If you have a Silhouette machine you'll need to have the Designer Edition, Designer Edition Plus, or Business Edition to easily import and work with the files.

I'll be sharing my favourite monthly project here on this blog. Look out my first post later this month.
I'm excited to be sharing it with you!


6 Jun 2017

Cut and decorate your own Leatherette Bookmarks


Make your own bookmarks with Silhouette Leatherette and a FREE file from the SilhouetteUK Blog. Designed by Janet Packer (CraftingQuine) for the Silhouette UK Blog.


Hiya, today I have a new post over on the Silhouette UK Blog on using Silhouette Leatherette Sheets. Yes, the leatherette sheets can be cut very successfully on any of the Silhouette machines (not the Mint, of course).

Not only does the post contain a tutorial on cutting the leatherette it includes how to cut and decorate bookmark AND a  free cutting file for the bookmark.  You can only download the file from the Silhouette Blog, so you'll need to pop over there if you want (or go ahead as design your own).


I decorated the bookmarks with heat transfer vinyl (HTV) using the beautiful Many Flowers Border file by Nic Squirrell (#177994).


I think they turned out nicely and look very professional.  Do you prefer the smooth or flocked finish?


Oh ... and bonus points if you can tell me the title of the book in the photos!