Showing posts with label gel pens. Show all posts

20 Jun 2018

Birdhouse Mobile made with the Birdhouse Box by Simply Crafty SVGs


Hiya, This week I've been making a mobile to decorate my craft room using a simplified version of the Birdhouse Box from Simply Crafty SVGs. I love the shape of this birdhouse design and decided to miniaturise the file and use just the foundation shapes (walls and roof base) to make some light-weight houses for the mobile. This is a great project for displaying your hand decorated papers. I have lots of background papers made from gel printing, but for this project I used paper that I'd decorated with distress inks. I used my Silhouette Cameo to cut all the card and paper pieces, but any cutting machine that uses SVGs could be used instead.


Materials Used


Wooden Mobile Hanger Bracket
AC White Textured Cardstock
Smooth Watercolour Paper
Distress Oxide Inks (Peacock Feathers, Salty Ocean, Wilted Violet & Picked Raspberry)
White Gel Pen
Silhouette Pen Holder
Pink & Turquoise Beads
Turquoise Embroidery Thread


Hand-decorated Paper

Each birdhouse roof is cut from watercolour paper that I'd first damped with water and then painted with Distress Oxide inks, blending each colour into the next. Once it had dried, I stamped a crackle pattern in the Salty Ocean colour over the top. Although I'd taped the paper to a board, it still warped as it dried. My solution was to finish off the drying in my heat press. When it was almost dry, I sandwiched it between clean sheets of paper and applied a little low heat. Then I turned of the press, and left in in the closed press to dry completely.


Sketch and Cut Birds

Using a bird design from the Silhouette Design Store (#268417) I sketched the outline of the bird in white gel pen onto the decorated paper and then cut an offset around it. I made a duplicate and some mirrored images, and gave each an eye in crystal Nuvo Drops. Then I adhered them back-to-back on a length of embroidery thread.  Beads were added at the end of the thread to ensure that the thread would hang straight, pulling out any kinks. These beads were re-purposed from a discarded child's bracelet. N.B. If you were making this for child you'd need to omit the beads and spend more time straightening the thread.


3-Dimensional Clouds

I designed my own 3-D clouds to hang on each thread. Each cloud consists of three identical cloud-shaped pieces with a fold line down the centre of each.  Any cloud shape would work so long as it is symmetrical along the fold line.


The clouds were cut from white textured cardstock and the cut edges highlighted with blue oxide ink.


The pieces were folded in half and they were adhered together in sets of three with one side left open. The last sides were stuck with liquid glue around the embroidery thread once the birds and houses had been attached to the threads.


Miniature Bird Houses

I made the houses by reducing the size to 65% of the original.


I used just the house and the roof (without the panels). To keep the weight down, I didn't use the door and frame, but just added a hole in their place, with a simple circle frame around it. The house parts were assembled and two small holes added in the floor, used to attach the thread together with a bead. The the roof was then threaded on and adhered to the house with a bead added on top.


Assembling the Mobile

The four 'house' threads (of identical length), were attached to the mobile hanger arms, and the 'bird' thread was attached to the loop in the centre. The finished mobile is in constant motion and consequently proved somewhat difficult to photograph.


I'm so looking forward to putting this up in my craft room once I've finished tidying and decorating. There is something rather special about having a moving paper craft project on display!


Simply Crafty SVG Files:
Bird House Box


Additional Silhouette Files:
Bird (Fox Sister) #268417
or
Bird (Fox Sister) #268416


23 Feb 2018

Eclipse Card with a drawn Dingbat Font


Hiya, I have a new eclipse card over on the Silhouette UK Blog today using the Silhouette Pen Holder and the Cute Bunny Dingbats Font (#247342) by Carina Gardner.  The dingbat font has lots of cute bunnies (unsurprisingly), and some additional decorative elements. This post addresses the questions that follow, of interest to Silhouette and non-Silhouette users alike.

Which pens can you use with the Silhouette Pen Holder?

The images are drawn onto the card font using my favourite brand of hybrid gel pens, the Pentel Hybrid Gel Grip Metallic Gel Ink Pens - K118.  These fit snugly into the medium sized cuff of the Silhouette Pen Holder and write and draw beautifully without skipping.

In the post I demonstrate the use of some alternative pens, including Sharpie Fine Point markers and Stabilo Fineliners.

The Sharpies with the thicker body like this one only JUST fit in the largest cuff. A better choice are the slimmer Sharpie Ultra Fine Point markers, but these are more difficult to find in non primary colours.

I did find that the point on the end of the Stabilo markers did get a bit bent over. A more durable alternative are the Staedtler Triplus Fineliner Pens - 334 (don't be put off by the triangular barrels - they still fit in the pen holder) as the felt tip is metal clad.


If you click on any of the pen links you'll realise that they take you to the UK-based Tiger Pens online shop. I've included links to them as they have the complete colours ranges of all the pens I've mentioned. I don't have any association with Tiger Pens, except that I usually buy my pens from them as they have a great range (including Copic markers), free delivery, and very prompt service.


Selecting Images from a Dingbat Font

The images from the Dingbat font can be selected from the Glyphs panel in the Designer Edition of the Silhouette Studio software, and the post includes an alternative method for those who only have the basic edition of the software.

I used the Cute Bunny Dingbats Font (#247342) by Carina Gardner, but there are loads of dingbat fonts available from the Silhouette Design Store, and are now available to non-Silhouette users, as they can be downloaded independently of the Silhouette software.


How do you make an Eclipse Card with a Silhouette?

I love using my Silhouette to make cards using the 'Eclipse' technique, where letters are cut from the background and then raised above the background on several cardstock layers. Originally the technique was used with traditional metal alphabet dies, but by using the fonts on your Silhouette there is much more flexibility in terms of font, sizing, style etc.

I describe the technique in detail in my Silhouette post and in the instructions for the Santa Express Box Card.

For these party invite cards the letters were cut from pink cardstock and also from the background panel on which the bunnies had been drawn. The text for the eclipse letters is LW Super Font, although any bold block font that cuts well should work.


I made a couple of variations which include additional text in the Sisters Sketch Font (#76091) by designer, Rivka Wilkins.


I loved using these drawn versions of these bunny images, and I hope you'll try out a dingbat font with your pens. You'll find that the Silhouette Pen Holder gives so much flexibility and variation.


5 Feb 2018

Simply Crafty SVGs Design Team


Hello, I'm happy to announce that I will be part of the Simply Crafty SVGs Design Team for a further term.  Simply Crafty SVGs designs and sells fabulous 3D digital cutting files for cardmaking and papercrafting.

I'm thrilled to have some lovely new teamies. You can read their bios over at the Simply Crafty SVG Blog


Here are some of my favourite projects from the past 6 months.


Handy Storage Drawers


Orchid Box Card


Chalkboard Bird House


Haunted Halloween Castle


Santa Express Box Card


Terrier Pin Cushion


All the project posts contain information on how to recreate these projects, just click on the link below each picture to read more.

I'm SO looking forward to the new term, and can't wait to see the new files that will be released over the coming months.


27 Jun 2017

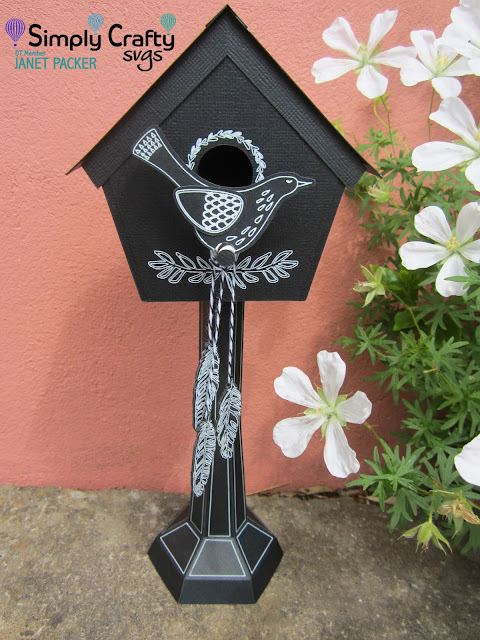
Chalkboard Birdhouse

Chalkboard Birdhouse by Janet Packer (Crafting Quine) using Silhouette Sketch Pens. Tutorial combining Simply Crafty SVGs Birdhouse Box and Holiday Lamp Post. http://craftingquine.blogspot.co.uk


Hiya, Janet here with my first ever Design Team post for Simply Crafty SVGs. Today I have a fun little chalkboard birdhouse made by combining the Bird House Box and the Holiday Lamp Post. It's made almost entirely from black cardstock and decorated with white gel pen. I've included details on how you can make this 'hybrid'. I used a Silhouette Cameo® 3, but of course these svg files can be used with other desktop die cutting machines (details here).


MATERIALS:
Black AC Textured Cardstock
White Uni-ball Signo Gel Pen
Black & White Baker's Twine
Black & White Patterned Paper
(Shine Bright from Kaisercraft)
Black & White Paper Straw
Beacon 3-in-1 Glue
Silhouette Pen Holder
Silhouette Cameo


Adding a Perch

Prior to cutting add holes to the birdhouse file to allow a perch (paper straw) to pass through from front to back. Also added corresponding holes to the front and back panels. It is easy to match them up by measuring the diameter of the straw and drawing a circle in the software of the same size. Then temporarily position the panels in place on the main piece on the virtual cutting mat, and copy the hole to the correct position on all of the pieces.  Make it an integral part of the design by selecting each part and one copy of the hole, and then making each into a compound path.

Chalkboard Birdhouse by Janet Packer (Crafting Quine) using Silhouette Sketch Pens. Tutorial combining Simply Crafty SVGs Birdhouse Box and Holiday Lamp Post. http://craftingquine.blogspot.co.uk


Decorating the Birdhouse

The main birdhouse makes extensive use of the Silhouette Cameo's sketch facility to draw the decoration using the Silhouette Pen Holder and my favourite white gel pen with designs from the Silhouette Design Store (listed below).

The Cameo 3 has a dual carriage and so can use a pen to sketch in one holder with the AutoBlade in the other. I usually do the sketching first with a pause to let the pen dry before continuing to do the cut - no smudges that way!


Chalkboard Birdhouse by Janet Packer (Crafting Quine) using Silhouette Sketch Pens. Tutorial combining Simply Crafty SVGs Birdhouse Box and Holiday Lamp Post. http://craftingquine.blogspot.co.uk


Constructing the Birdhouse

The construction part is straightforward as Sandy includes a set of instructions in pdf format with each of her files.

I also recommend following Sandy's advice for crease lines, and use a shallow continuous cut instead of the dashed lines (these files are supplied with both). 

Using textured cardstock gives a variety of surfaces; use the rougher side facing out for the main parts, and the alternate with the smoother side for the sketch work on the panels.

Chalkboard Birdhouse by Janet Packer (Crafting Quine) using Silhouette Sketch Pens. Tutorial combining Simply Crafty SVGs Birdhouse Box and Holiday Lamp Post. http://craftingquine.blogspot.co.uk


Making the Stand

Use the pole and base pieces from the Holiday Lamp Post to make a stand for the birdhouse. A pinstripe line can be added to the pieces by using the polygon line drawing tool, adding a line just inside the outer faces. Then use the sketch function to sketch the lines before cutting out the pieces.

Chalkboard Birdhouse by Janet Packer (Crafting Quine) using Silhouette Sketch Pens. Tutorial combining Simply Crafty SVGs Birdhouse Box and Holiday Lamp Post. http://craftingquine.blogspot.co.uk


Once the pole and stand are constructed and attached to each other use the base from the lantern part to attach them to the birdhouse.  Simply use the knife tool to 'remove' the mounting base from the lantern.


Push the tabs at the top of the constructed pole piece through the hexagonal hole, bend them over and adhere them to the mounting base. When it is firmly stuck, adhere the new top to the underside of the birdhouse.


Adding the Bird

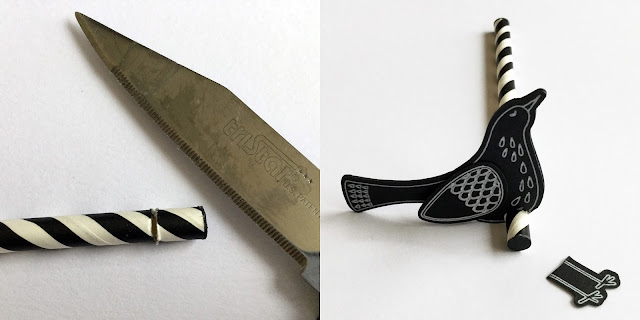
Save the waste circles cut from the birdhouse and adhere them to the ends of the trimmed straw. Then cut a slit in the straw with a serrated knife. Carefully trim the legs off the bird's body and push the bird into the slit. A blob of adhesive behind the bird ensures that the bird stays in place. Once dry push the perch through the holes in the assembled birdhouse and add more adhesive at the entry points to keep the perch in place and the bird upright.

Chalkboard Birdhouse by Janet Packer (Crafting Quine) using Silhouette Sketch Pens. Tutorial combining Simply Crafty SVGs Birdhouse Box and Holiday Lamp Post. http://craftingquine.blogspot.co.uk


Feather Embellishments

Sketch and cut two sets of feathers, one the mirror image of the other. Make an additional set with a slit at the quill end, so that the feathers can be layered back-to-back with a piece of twine entrapped between the layers.


Finally tie the feathers onto the perch to hang below the birdhouse ...

Chalkboard Birdhouse by Janet Packer (Crafting Quine) using Silhouette Sketch Pens. Tutorial combining Simply Crafty SVGs Birdhouse Box and Holiday Lamp Post. http://craftingquine.blogspot.co.uk


... and that completes the chalkboard birdhouse.

Chalkboard Birdhouse by Janet Packer (Crafting Quine) using Silhouette Sketch Pens. Tutorial combining Simply Crafty SVGs Birdhouse Box and Holiday Lamp Post. http://craftingquine.blogspot.co.uk


It's such fun to combine files to make something unique. I hope you'll try it.


Bye for now,
Janet, DT Member Simply Crafty SVGS

Blog: https://CraftingQuine.blogspot.co.uk
Instagram: https://www.instagram.com/craftingquine


Simply Crafty SVG Files:
Bird House Box
Holiday Lamp Post

Additional Silhouette Files:
Leaf & Flower Border Set (Nic Squirrell) #87418
Late Summer Border (Nic Squirrell) #146669 
Monogram Circle frame (Lori Whitlock) #192922 
Patterned Bird (Nic Squirrell) #65418
Wild Bird Feathers (Nic Squirrell) #151820 


19 May 2017

Chalkboard Labels for Homemade Preserves


Hiya,

I don't have a big garden, but I love growing things to eat. Rhubarb grows a little too successfully, and its big leaves shade the lawn, causing it to die off if we don't pick it regularly. To use up an extra large harvest, I recently made a hot and spicy chutney with our rhubarb and shop-bought fresh root ginger.  I wanted to 'prettyfy' the jars to give some as gifts. and made custom chalkboard labels.


Over on the  Silhouette UK Blog today I show how I made the labels with my Silhouette® CAMEO 3, Chalkboard Cardstock and a favourite gel pen in the Silhouette Pen Holder. I used a few of these lovely circular frames designed by Lori Whitlock and a Sketch font called Sisters, designed by Riva Wilkins. I used a white gel pen to draw the frames and write the labels, a draw and cut technique.


I also added some tiny mini labels just for fun and some black and white baker's twine to finish.

Do you make preserves?  If not, these labels would look equally pretty on store-bought preserves. Why not pop over to the blog and see how it's done?