Showing posts with label digital papers. Show all posts

22 Apr 2020

Delivering Sunshine and Rainbows using Simply Crafty SVG's Easter Truck Box


Hiya, Up and down the country, and in many different parts of the world, pictures of rainbows have begun appearing in windows as families and households have worked to stay positive during the lockdown. Rainbows are being seen as a sign of hope, and make a great decoration for gift boxes to give to those who are still working hard, allowing many more of us to socially isolate.

It was simple job to transform the  Easter Truck Box from Simply Crafty SVGs to make a cheerful gift box with a rainbow theme.


I made up the Easter Truck Box in sunshine yellow cardstock, decorated and it with rainbow-printed digital paper panels. I also used the rainbow from the Pot O Gold Treat Box file to show it delivering a rainbow!


Materials Used:
American Crafts Medium Weight Textured Cardstock
White Printable Cardstock/Photo Paper
Manual Embossing Machine & Diamond Embossing Folder
Beacon 3-in-1 Adhesive
White Sign Vinyl
Silhouette Cameo + Designer Edition Software
Colour Printer

Files Used:
Simply Crafty SVGs Easter Truck Box
Simply Crafty SVGs Pot O Gold Treat Box

Other Files Used:
Digital Paper Baptism Day Rainbow by Pebbles in my Pocket


ADAPTATIONS

Panels
I used the Silhouette's Print & Cut function to cut out panels filled with rainbow digital paper.


Wheels
I substituted small hearts instead of bunnies on the wheels.

Doors
The doors were dry embossed with a diamond-pattern embossing folder.

Rainbow
I used the rainbow from the Pot of Gold Treat Box. As the rainbow pieces were individual 'stripes' in the original file, I made a single backing piece by welding the stripes together on a copy of the overlaid stripes. I then flipped a copy the backing and stripes to make a reverse copy, and attached both to opposite sides of the truck. I cut two sets, one being for another project (shown later).


Sentiment
I typed, and sized my sentiments to fit the truck bumpers/fenders and cut them from white sign vinyl - easier to cut than cardstock for these tiny letters.


BONUS PROJECT

My locality also started a teddy bear hunt, where folks were putting teddy bears in their windows to entertain passing children. I couldn't resist making a hat for my daughter's teddy bear using the same cardstock colour palette. The Simply Crafty SVG Propeller Baseball Hat was perfect. I just added a 3D sun instead of the propeller. The bear also has a rainbow attached to his wrist, with a rubber band adhered to the back, to hold it in place.


The propeller hat doubles up as a gift box.


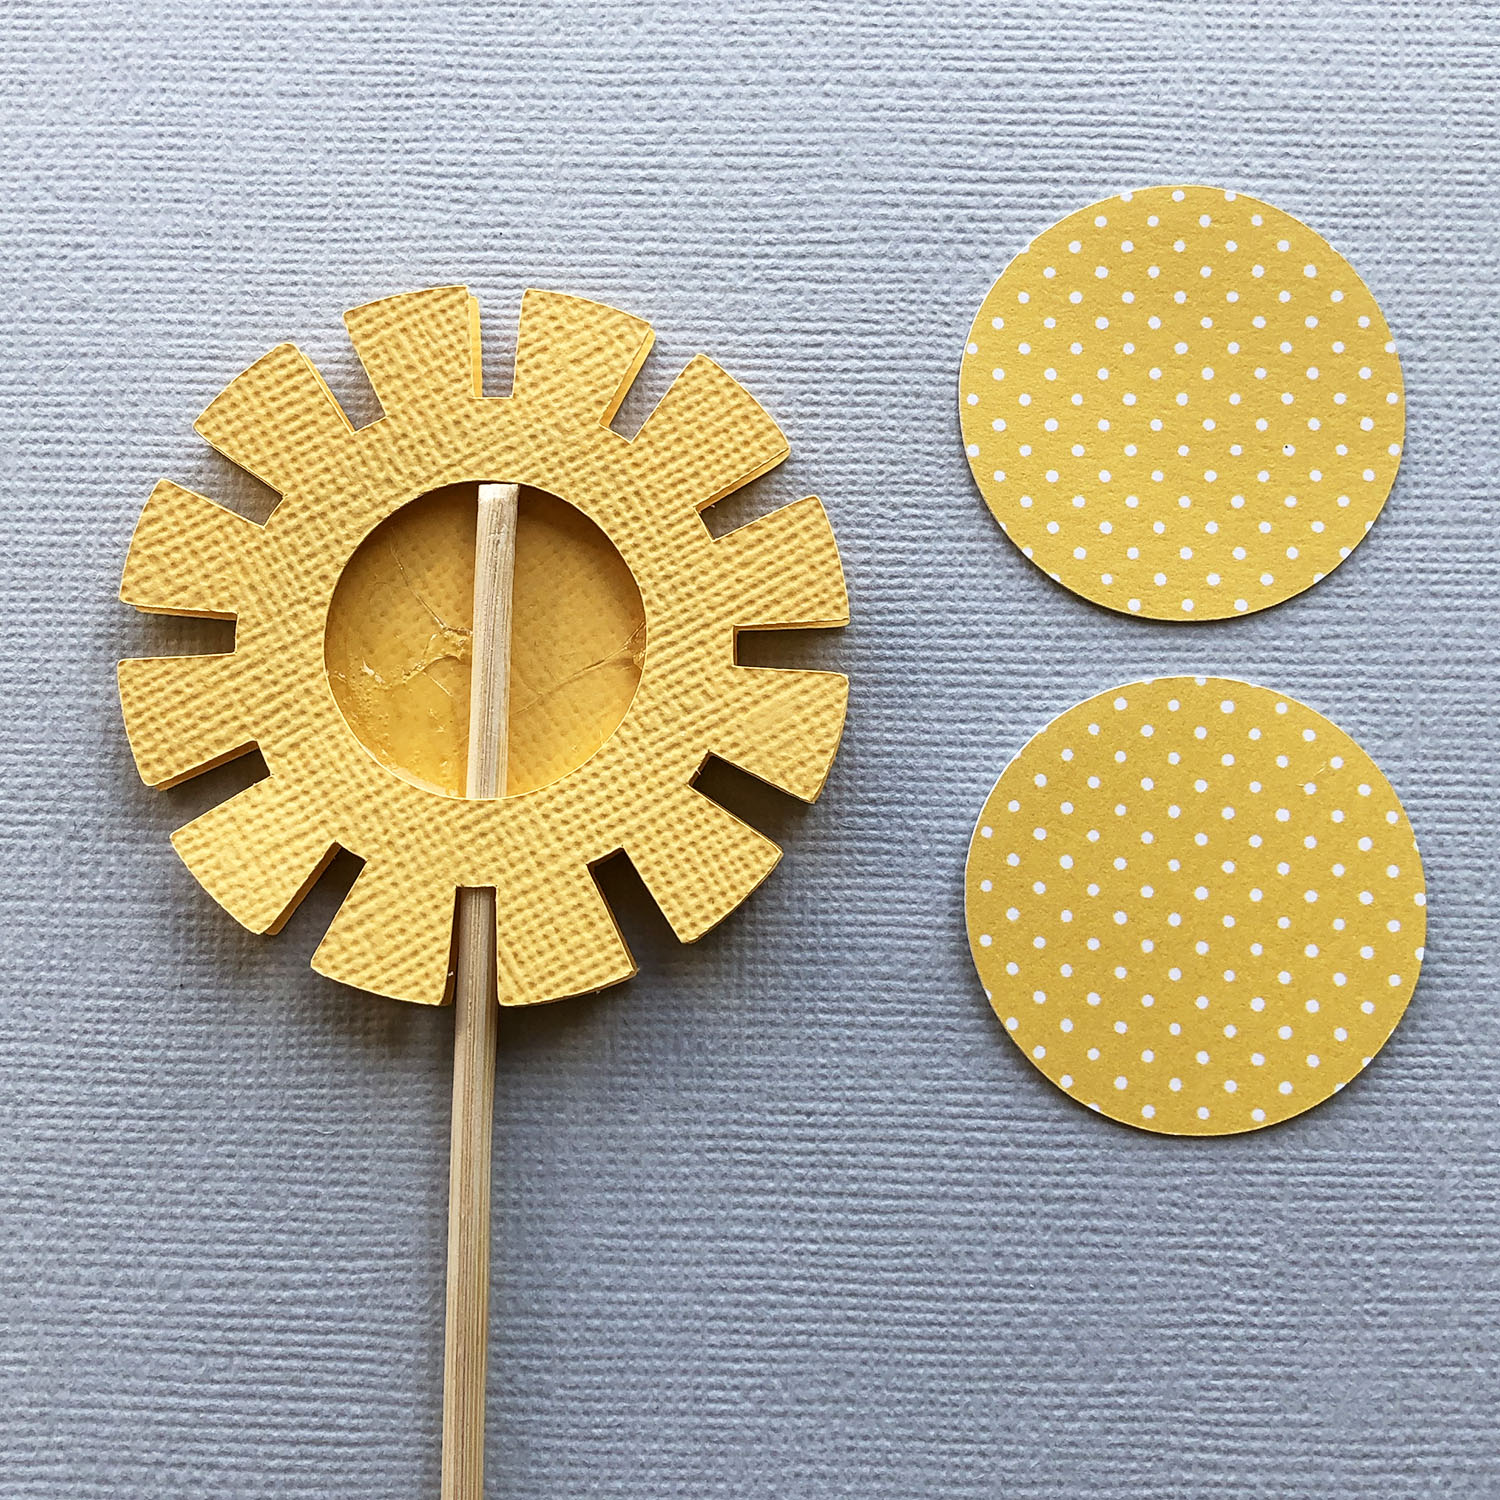
The sun was made using an adapted Sun Shaker element by Lori Whitlock.


The hat and truck make a fun and cheerful window display and the boxes will later be used for gifting. The truck is perfect for small gifts, chocolates, or even packets of seeds.

It's lovely to work on these cheerful projects in such dismal times - delivering sunshine and rainbows!

These are the files I used. Just click on the photo to visit the page in Simply Crafty SVGs online store.


Janet, DT Member Simply Crafty SVGs

Blog: Crafting Quine 
Instagram: @CraftingQuine


21 Feb 2018

Mini Bottle Boxes using the Exploding Wine Bottle Box by Simply Crafty SVGs


Hello.  Janet here with some unusual and useful gift boxes. I've used the SVG files for the Exploding Wine Bottle Box from Simply Crafty SVGs to make mini bottle boxes. The files are designed for a regular sized wine bottle, but I've reduced them to fit my mini bottles of fizz.

My bottles (bought in the UK) are 200 ml, similar bottles available in the USA, are 187 ml, and are roughly one quarter of the volume of a full size bottle. However, merely reducing the box to one quarter of the size would not fit the smaller bottle. The instructions that follow will show you how to adjust the file to fit almost any size of bottle.

I used the Silhouette Cameo and the Silhouette Studio software, but the file can be made with most cutting machines and software that can use SVG files. Check the FAQs for additional information.


Materials Used:
Black Heavyweight Cardstock
Printable Cardstock
Echo Park Fashionista Digital Papers
Black Grosgrain Ribbon
Beacon 3-in-1 Adhesive
Gift Tag
Baker's Twine
Clear Pearl Floral Sprays
Washi Tape
Silhouette Cameo


Files Used:
Simply Crafty SVGs Exploding Wine Box

Other Digital Files: 
Fashionista Paper Packs by Echo Park (pack #1 & #2)


Step 1: Open the Files
Open all the files in one window. The easiest way to do this is to open one of the files and then select File and Merge from the main menu, then to navigate to each of the other files in turn and click select.  This is a little time consuming, but places all the files in one tab so that they can easily be resized together. Select all the pieces, and group them.


Step 2: Measure your bottle
Measure the height and the diameter of the bottle at it's widest point. This is often the base, but if the bottle flairs out from the bottom then add extra to allow for it as best you can.


Step 3: Represent the Bottle in the Software
Draw a rectangle to represent the size of the bottle. It doesn't need to be bottle shaped, as long as it shows the height and the greatest width.  To easily make the rectangle the correct size, open the Transform panel and the Scale tab, enter the dimensions, and click apply.


Step 4: Adjust the file pieces
Rearrange one or more of the upper and lower side pieces as they would be joined when the box is assembled. Place the 'bottle' inside it. Select all the file pieces except the 'bottle'. Select one of the corner grab handles, and holding down the shift key (to keep the size proportionate) move the handle until the combined side piece is of a size where the bottle fits within it. Leave a little space around the bottle width to allow for the bottle to be added and removed easily. You can see in the diagram that the box is still a little tall. You could align the side flaps and slice off the excess using the Knife tool. I chose to cut them as they are, and to trim the excess with a paper trimmer later.


Step 5: Cut and Assemble
Cut the base pieces from black cardstock. Cut the panels from patterned card (mine were made using Print & Cut and digital pattern fills).  To read more about how to fill pieces with digital patterns, this link will take you to other projects where I've previously used Print & Cut. Follow the assembly instructions on the PDF document supplied with the files, or the YouTube video Sandy has made for this file.


Finishing Touches
If you have read any of my previous posts for Simply Crafty SVGs, you'll know that I like to make  adaptations and adjustments. Aside from the re-sizing, here are the other tweaks that I did to the boxes.


Additional Panels
I made additional panels for the lid and the lower part of the base, using the Offset feature.

Decorative Loop
I threaded a loop of grosgrain ribbon through a slit cut in the top of the finished lid. The ends were secured on the underside of the lid with strong liquid adhesive.

Gift Tag
I made some gift tags, with black and white baker's twine threaded through the top. The other ends of the twine were threaded through a hole punched in one of the side flaps.  On the rear of the side flap, the ends were knotted and trimmed.

Floral Sprays
I added some small clear pearl floral sprays, secured to the back of the bottle with some Washi tape (so they could later be peeled away without damaging the bottle label).


Here is the file I used to make the bottle boxes. Just click on the photo to visit the page in Simply Crafty SVGs online store.


As you can see, it is an easy job to resize the files to fit whatever bottles you choose to gift. My next challenge is to make boxes for miniature bottles. I'll post the results on Instagram when I do. Follow my account if you'd like to see how I get on.


Janet, DT Member Simply Crafty SVGs

Blog: Crafting Quine 
Instagram: @CraftingQuine


Simply Crafty SVG Files:
Exploding Wine Bottle Box

13 Dec 2017

Santa Express Box Card with Eclipse Lettering from the Train Box Card by Simply Crafty SVGs


Hello, Janet here with a new folding 3D Christmas card. I've used the SVG file for the Train Box Card from Simply Crafty SVGs to make a fun Santa Express card.


My inspiration came from the Santa Special at our local stretch of the restored Royal Deeside Railway (I live in the northeast of Scotland).  I was drawn towards the plaid (tartan) patterns in the Echo Park 'A Perfect Christmas' digital paper pack, and as the Santa in the matching elements pack reminded me of the one on the train, I used them to decorate a Santa Express Box card.

I've also been massively impressed by the lovely examples of eclipse lettering around at present, and so set out to use some eclipse lettering on the side of the box card.


These instructions are for the Silhouette Studio Designer Edition software, but can no doubt be replicated in other cutting software.


Materials Used:
American Crafts textured card in White, Black, Ladybird, and Grass
Pearl cardstock in Silver and Dark Grey
Silver glitter paper
Beacon Zip Dry Adhesive
Black adhesive foam pads
Silhouette Cameo
Colour printer
Black adhesive gems

Files Used:
Simply Crafty SVGs Train Box Card

Other Digital Files:
A Perfect Christmas Paper Pack #2 by Lori Whitlock for Echo Park
A Perfect Christmas Element Pack #2 by Lori Whitlock for Echo Park
LW Bubble Letter Font by Lori Whitlock


Preparing the Patterned Parts

Load the plaid pattern and chalkboard labels papers into the Silhouette Studio software (with the Designer edition the papers can simply be dragged into the patterns folder in the library). Fill the side and back panels with the plaid pattern.


Create a panel by subtracting small circles from the corners of a rectangle. Type the word 'Santa' in LW Bubble Font and centre it in the panel (a clear fill and a line thickness of zero ensures it will cut, but not print). The word 'express' was typed below and filled with cream and green to print, but not cut.


Trace the Tree Panel from the labels paper, and the Santa PNG from the elements pack.

Place all the patterned pieces onto a Print & Cut virtual mat and send to the printer, then cut with the Silhouette.


(Optional) Use markers to carefully add colour to the edges of the cut pieces.


Cutting the Other Pieces

Cut the remainder of the file pieces from coloured cardstock, with copies of the Santa word and a slightly enlarged copy of the new panel from green cardstock.


Card Assembly

Both written (PDF) and video instructions are available for this file and it is very straightforward to put together. Assemble the card base and then decorate the panels, leaving the wheels, lights and Santa eclipse panel until the other panels have been applied to the card base.


The Eclipse Santa Panel


Adhere the plaid Santa panel to the plain green panel together with the centre pieces from the letter 'A's. Stack the letters and adhere each layer using liquid glue. Adhere the stacked letters into the holes in the Santa panel and your eclipse lettering is complete!


Adding Santa

Stick the two Santas back-to-back. Trim off the upright post from all the window pieces. Trim off the lower part of Santa's body and push his head and arm through the window from the back and adhere him behind the window. Trim off the parts of the body which show on the left-hand side.


Bend the Santa's face, hat, and arm gently forward.


Finishing Touches

Add the lights and wheels, giving extra dimension using adhesive foam pads.


There are so many options for decorating this Train Box card, maybe I'll try out Thomas and friends for boy's birthday cards next year!


Bye for now,
Janet, DT Member Simply Crafty SVGS


Blog: Crafting Quine 
Instagram: @CraftingQuine


Simply Crafty SVG Files:
Train Box Card

8 Nov 2017

Snow Lady using Simply Crafty SVGs Snowman Stacking Box Set

Snow Lady Stacking Boxes by Janet Packer (Crafting Quine) using Simply Crafty SVGs Snowman Stacking Box Set. http://craftingquine.blogspot.co.uk


Hello, Janet here with my first 3D Christmas project of the year using the Snowman Stacking Box Set from Simply Crafty SVGs.  I've turned the snowman into a glamorous 'snowLADY' using the Silhouette Cameo's Print & Cut function with digital papers and elements to make new accessories.  I used a Silhouette Cameo® 3, but of course these SVG files can be used with other desktop die cutting machines (details here).
 
My finished Snowlady ended up just under 12" tall, with the largest box at 6.5" across and 4" tall, and the smaller one at 4.5" by 3.75".  The original sizes can be found with the Snowman's listing in the Simply Crafty SVGs shop.


MATERIALS:
White Pearl Card (large sheets)
Black Pearl Card
Red & White Baker's Twine
Down the Road Snow Flurries Digital Elements
Down the Road Snow Flurries Digital Papers
Versafine Embossing Ink
Judikins Iridescent Sparkle embossing powder
Sizzix Embossing Folder & Stamp - Fun Stripes Set by Hero Arts
Small gems
Beacon 3-in-1 Glue
Inkjet Printer
Silhouette Cameo


The Snowman Body
I made the whole snowman a little larger to fit some bigger gifts inside. To do this it is necessary merge all the files that make up the snowman onto one tab, selecting all the pieces and enlarging the biggest piece to fit the largest piece of card. Of course, you also need to check that the largest piece to be cut from smaller card fits too.


The Body Box
The two boxes are cut from white pearl card and constructed using the instructions in the PDF included with the Snowman Stacking Box Set files.  The top of the lid of the larger box is 'filled' with a snowflake design from the set of digital papers and then print and cut with printer and Cameo. The scarf lid edging was filled a plain paper from the same set.


Scarf
The scarf tails come from the digital set, substituting them for the original scarf tails, but using them to gauge the sizing.  All the scarf pieces were stamped with embossing ink and then heat embossed with the iridescent powder to give sparkling stripes.

Snow Lady Stacking Boxes by Janet Packer (Crafting Quine) using Simply Crafty SVGs Snowman Stacking Box Set. http://craftingquine.blogspot.co.uk


Buttons
The buttons were cut from coated black card with just the top piece embossed using the striped embossing folder. Once constructed they were mounted to the base using dimensional foam pads.

Snow Lady Stacking Boxes by Janet Packer (Crafting Quine) using Simply Crafty SVGs Snowman Stacking Box Set. http://craftingquine.blogspot.co.uk


Mittens
The mittens were a new element taken from the digital elements set and sized to match the project.  I print and cut three copies of each glove (one set was a mirror image of another), cutting a slit in one of each. Three copies of the mittens were layered with the slit copy in the middle of the sandwich and with baker's twine trapped inside. The bakers' twine was placed close to the position that the head box will sit on the body lid and then stitched in place using embroidery thread.

Snow Lady Stacking Boxes by Janet Packer (Crafting Quine) using Simply Crafty SVGs Snowman Stacking Box Set. http://craftingquine.blogspot.co.uk


Head
I attempted to substitute some more feminine facial elements, using a berry from the digital elements as a nose. I can't pretend that I didn't have several attempts at this, and I'm not entirely sure I achieved it. Maybe you can do better?

Snow Lady Stacking Boxes by Janet Packer (Crafting Quine) using Simply Crafty SVGs Snowman Stacking Box Set. http://craftingquine.blogspot.co.uk


Hat
This is my favourite part. The hat parts were cut straight from the file and decorated with print and cut digital elements from the elements set. These were enhanced with the addition of some Glossy Accents, extra small shapes, sequins and adhesive gems.


Snow Lady Stacking Boxes by Janet Packer (Crafting Quine) using Simply Crafty SVGs Snowman Stacking Box Set. http://craftingquine.blogspot.co.uk


... And that completes the snowlady.

Snow Lady Stacking Boxes by Janet Packer (Crafting Quine) using Simply Crafty SVGs Snowman Stacking Box Set. http://craftingquine.blogspot.co.uk


It was such fun to combine the SVG file with digital elements to make something unique. I hope you'll try it.


Bye for now,
Janet, DT Member Simply Crafty SVGS

Blog: https://CraftingQuine.blogspot.co.uk
Instagram: https://www.instagram.com/craftingquine


Simply Crafty SVG Files:
Snowman Stacking Box Set


Additional Digital Files:
Down the Road Flurries of Fun Digital Elements
Down the Road Flurries of Fun Digital Papers


12 Feb 2017

New Digital Papers

Hello,

Do you use digital papers and elements in your Silhouette projects? I LOVE them and especially love using the digital papers in the Silhouette Studio® software.  It is great to be able to add papers to the library and to rescale the patterns to suit my projects. 

I was very excited to see that Snap Click Supply Co. had digital files available from a new designer last week; Down This Road - Designs by Angie.


These are some of the digital paper packs that jumped into my shopping basket.


Flurries of Fun Papers


Star Quality Papers


{Phone}omenal Papers


Love You 2 Pieces Papers


Aren't they fabulous? I love that they come with the solid papers too - a ready-made colour pallet.

Here is the first set I've downloaded, sitting in my (pre-cloud) Library.


Here I'm preparing a colour swatch, colour-picking extra colours from one of the pattered papers. I save the swatches in the 'My Own Designs' folder in the library.  I can then open the swatch directly into my project and recolour just about any design to match my digital papers.


I'll be sharing some completed projects that I make with these papers soon. Promise.