Showing posts with label Silhouette Cameo. Show all posts

23 Jan 2019

Year of the Pig - Fortune Cookie Basket - In My Heart Box by Simply Crafty SVGs


Hiya, This week I've had such fun playing with the In My Heart Box SVG File by Simply Crafty SVGs. I converted it into a basket for my homemade paper fortune cookies and added decorations to celebrate the forthcoming Chinese New Year - the year of the pig.

The designer Sandy, has made a fabulous video on how to put the basket together. In this post I've shown the alterations I made. I used my Silhouette Cameo and the Silhouette Studio software, but any changes I made can no doubt be replicated in other cutting software and with other machines.


Materials Used:
American Crafts textured card in Red
Kraft cardstock (heavyweight, 260gsm)
Antique Pearl Gold paper (120gsm)
Beacon 3-in-1 Adhesive
Black adhesive foam pads
Silhouette Cameo
Silhouette Pen Holder
Pentel Hybrid Gold pen

Files Used:
Simply Crafty SVGs In My Heart Box

Other Digital Files:
ZP Chinese Zodiac font by ScrapNfonts (for the pig icon)
Chinese Characters Love, Laugh, Live by Loni Harris


Basic Box/Basket
I cut the basic shape from kraft cardstock and then inked the edges with gold metallic stamping ink. The cutout heart won't show as it will be covered by a the decorative panels on the outside, and a new liner piece on the inside.


Handle
The two existing handle pieces were cut from kraft and red cardstock. I additionally made an internal offset on the red piece and cut that from gold paper.


Decorative Front Panels
In the software, I ungrouped the panel pieces and then released the compound path on the front panels and removed all the elements except the little heart swirl. I then cut these from red cardstock along with the plain side panels.


I inked the edges with gold ink and then adhered them to the box base. It was easier to adhere them while the base was still flat.


Gold Lining Pieces
I made lining pieces by making a slightly smaller version of the outside panels using an internal offset of both. I adhered these before assembling the box, but they would be better adhered after, as they would cover the internal flaps. Next time I'll do it differently!


Embellishments
The embellishments were made using the Sketch function, and a gold gel pen in the Silhouette Pen Holder on the reverse of the red textured card. For the pig an offset was made for the cut line. Then a further offset was made and cut from the gold paper. The pig was then adhered to the offset, and the whole thing mounted onto the box with adhesive foam pads. The Live, Laugh, Love characters were similarly drawn, cut out, and mounted on the front and sides of the box.


Fortune Cookies
The gold paper fortune cookies were simply made from circles of gold paper. To keep this post shorter, the instructions for the fortune cookies can be found in a separate post here.

This is the Simply crafty SVG file I used. Just click on one of the photos to visit the page in Simply Crafty SVGs online store.


Simply Crafty SVG Files:
In My Heart Box


30 Dec 2018

FREE cutting file - Accessory Trays


Hiya, over on the Silhouette UK Blog this weekend I have a project to help organise all those invaluable Silhouette bits and pieces that accumulate when you use your machine. I used the Two Compartment Candy Box by Lori Whitlock, added some custom-designed accessory trays, and decorated the outside with panels cut from Silhouette Wood Effect Vinyl. I included a FREE accessory tray file too to keep blades, penholders and sketch pens all in one place.

You can also download the FREE Accessory Trays cut file here. The file is in .GSD format which can be opened with any edition of the Silhouette Studio software. From the Silhouette program select File > Open, then navigate to the downloaded file and click OK.

There are two versions in the file, one is taller than the other. The taller one is for sketch pens, to bring the coloured tops closer to the top. It also has more holes which are a fraction larger. The shorter one accommodates all the blades and is sized to allow the AutoBlade enough headroom, as it is taller than the others.

You can mix and match the holes, just Ungroup each version (select one, right mouse click, select Ungroup) and duplicate or swap the sets of holes.


You can also adjust the size and spacing of the holes.

To adjust the size, duplicate a set of holes, move it to one side and adjust all the circles simultaneously (hold down Shift, Alt, Cmd on a Mac and move one of the corner sizing handles either in or out). If you increase the size, check that they still fit within the square part of the tray. If not, you can adjust the spacing, as shown below.


To adjust the spacing, duplicate as above and ungroup the set of holes (select, right click, Ungroup, then Ungroup again). Using the Drawing Tools, draw a square over the existing dotted lines and then move it over the duplicate set of ungrouped dots.

If you need to make the holes larger than the above method allows (if they overlap the edges) then select one of the holes, open the Transform panel, and adjust the with and height as required (I chose 1" to accommodate a Stickles bottle).
Delete the remaining holes and using the Replicate panel, select the remaining hole and make a row of three.
Then space them evenly within the square by clicking on the Horizontal Spacing in the Transform panel.


Then group and then duplicate the row using column of three in the Replicate panel.


Then space the holes evenly using the vertical option in the Transform panel.


When you are happy with the spacing delete the square, group holes, and move them back to the tray, deleting or moving the original set.


For the ideal storage of Stickles and similar sized bottles, the legs will need to be shorter (even shorter than the short-legged version). You can adjust the height either up or down by using point editing of the points on the end of each leg. I'll save that explanation for another post. If you are in need of it meantime, let me know and I'll expedite it!


I hope you'll find this useful.


Happy New Year!


Designs used:


2 Sept 2018

Bicycle Pop Up Card


I love making customised cards for folks I know well -  then I can add little details that make the card extra relevant and special to them.

I made this card on the retirement of a friend and colleague who lives in the area shown on the map. Map publishers are not usually happy for you to copy or reproduce their maps particularly the Ordinance Survey organisation in the UK. I love incorporating maps though, so I purchase second-hand maps, atlases and guide books whenever I can to use in my card making and crafting.


Fortunately, I had two copies of this travel guide, and used the map twice, trimming it to fit and inking the edges to help it blend in with the matting layer.


I added a bicycle (with rotating wheels), and some items that I knew were relevant to the recipient. Namely books, coffee, plants, and a spaniel. I also added geotags, tagging music venues, libraries, coffee shops and garden centres.


This picture, in the early stages, shows how the card is constructed, the base card being an SVG/Studio file by Lori Whitlock. I used the Pop Up Bicycle Box Card, added extra bits and pieces to it.


Well, I hope you like the card, and that it might have inspired you to try out using maps in your card making too. I invite you to follow my blog if you haven't already done so, so that you don't miss future cards and projects.

This card has been entered in the following challenges:
Daring Cardmakers - Travelogue Challenge - 31st August 2018
Crafty Creations Challenges - Anything Goes #373 - 22nd August 2018


25 May 2018

Cut your Own Stencils with the Silhouette Cameo


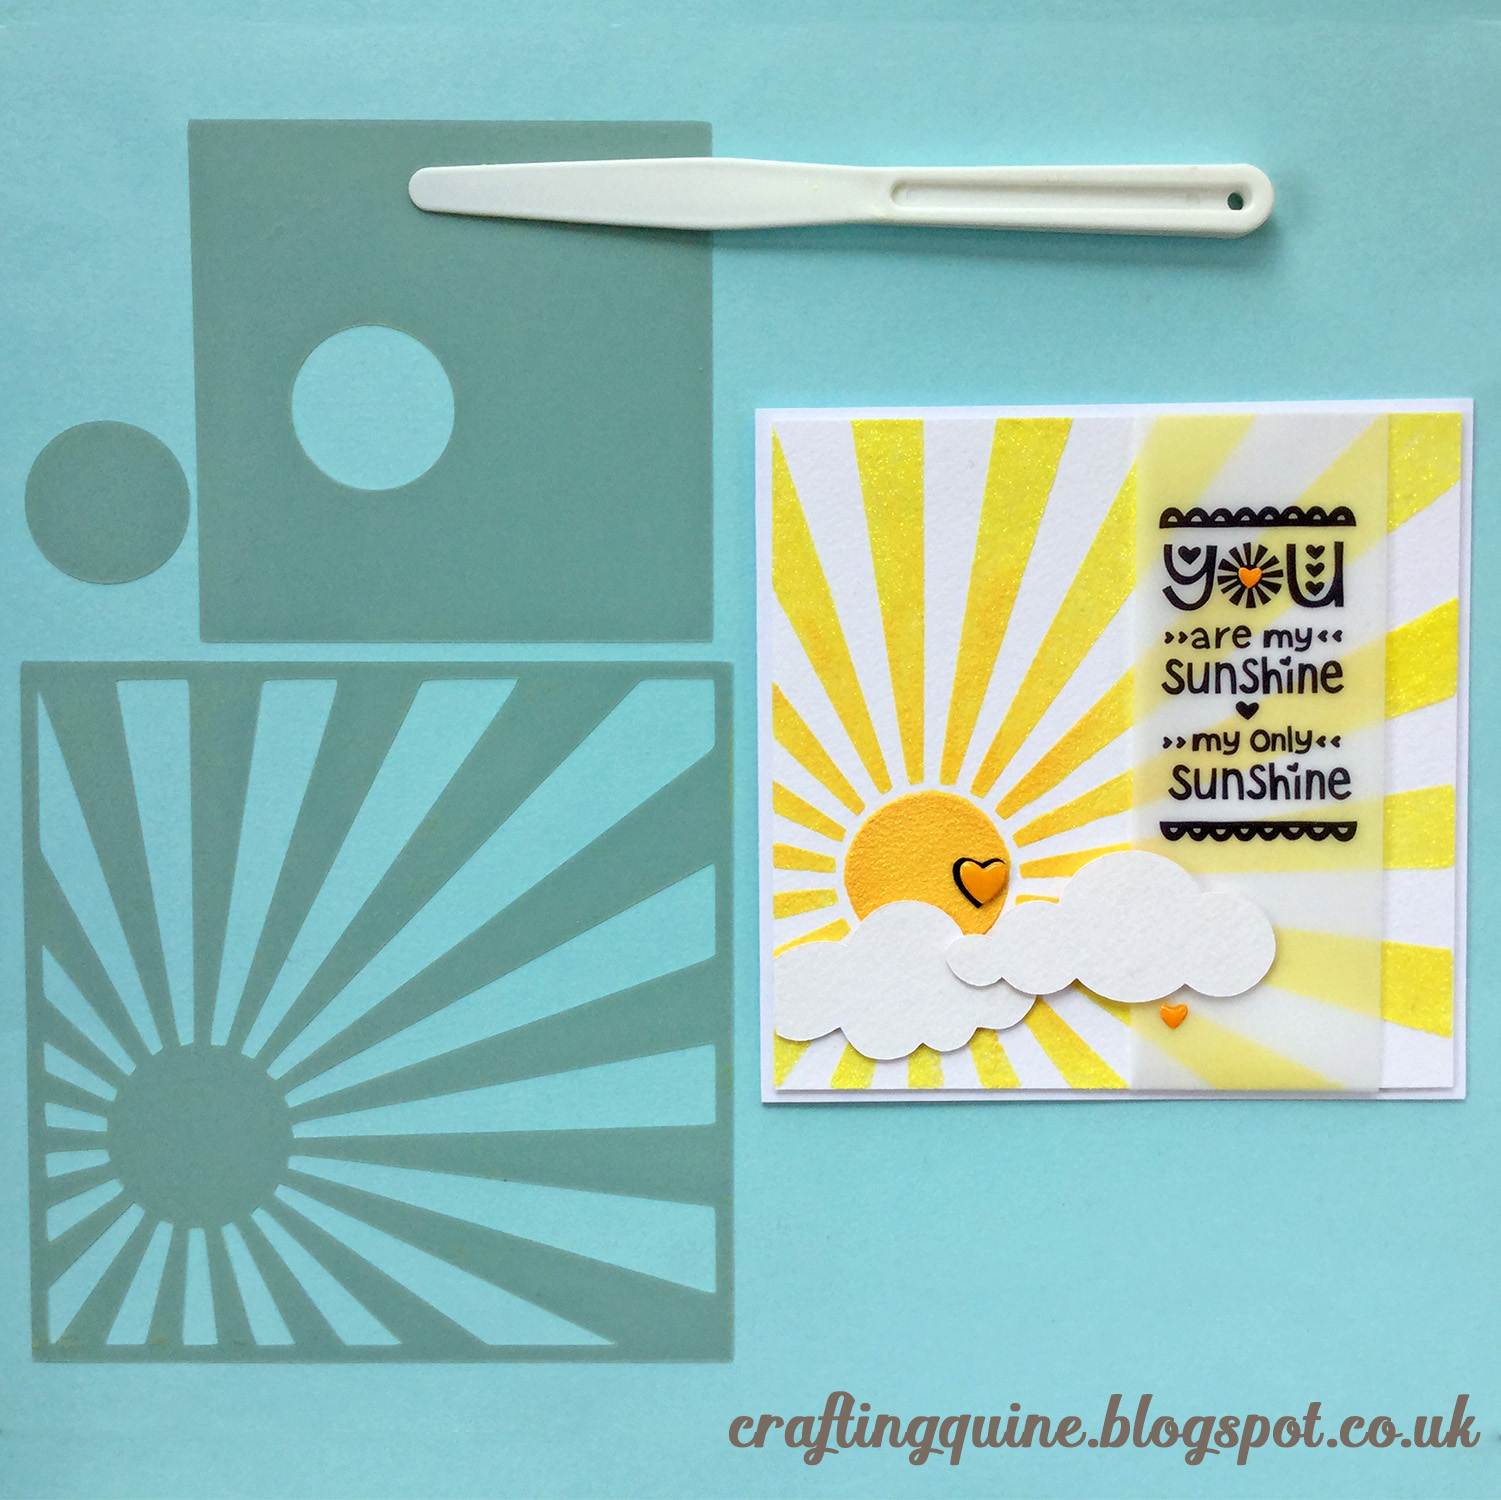
Hello, Janet here with a media I haven't tried before ... Silhouette Stencil Material (the non-adhesive variety). It comes in a pack of six letter-sized, thick, plastic-y sheets. My first thought was that it would be perfect for making stencils to use with a mix of pigment ink and glitter paste. I was impressed with the resulting stencils and mask, so have shared the process of making, and using the stencils, together with the finished card, on the Silhouette UK Blog.

These are the designs that I used:


I loved using the stencil material and have all kinds of projects in mind for this stencil and for others! They can be used with glitter paste, mousse, texture paste, or sprays and mists.  I think I'm going to be busy!


Do you make your own stencils? I'd love to hear your ideas and suggestions.


18 May 2018

Make Duct Tape Flowers with your Silhouette Cameo


Hiya, I'm a real fan of duct tape, and use it for all kinds of jobs around the house and garden.
This week I had the opportunity to try out Silhouette Printable Duct Tape Sheets. I thought that they'd be great to use for the flowers on an outdoor wreath, as they were sure to be more durable than those made from cardstock.

I chose to make the Flower Wreath, Spring from Snapdragon Snippets, as it didn't have too many flower layers. Here is a list of the materials that I used to make the wreath.


Info on how I put the wreath together can be found on the Silhouette UK Blog.


Making Flowers from Duct Tape Sheets

The Silhouette version comes in sheets that can be cut with scissors, or a digital cutting machine. It comes with a backing sheet too - so I managed to not stick my fingers together for once!


The sheets can be used in three ways:

(1) Print - they can be printed with any pattern you choose. Here is a shot of some of the crazy patterns available somewhere in the world (from the book, "Crazy-Cool Duct Tape Projects" by Marisa Pawelko)!


(2) Cut - with scissors, die cutter or Silhouette/Cricut. The flower petals for the wreath were cut from unprinted  sheets. Rather than kiss-cut the sheets, I chose cut settings that would cut through both the tape and it's backing sheet. This gives the petals more 'body' and allows them to be layered without the adhesive side sticking to lower layers of petals or the wreath.


(3) Print & Cut - contour cutting with Silhouette. I did these plain-ish leaves, but cut shapes could be filled with virtually any colour or pattern.


You can see the finished wreath over on the Silhouette UK Blog.

What would YOU make with crazily printed duct tape?

4 May 2018

Foil and Vellum Bows and Boxes

Ways to cut Silhouette Rose Gold Printable Foil - Kiss Cut and Die Cut. Tutorial by Janet Packer (Crafting Quine) for the Silhouette UK Blog. Uses files from the Silhouette Design Store by Nilmara Quintela, Felicity Jane, and Jamie Cripps.


Hiya, I've been making gift boxes this week in my favourite colour combination; Mint, Rose Gold and White. Love 'em!

I have a post over on the Silhouette UK Blog with information on cutting the Rose Gold Printable Sticker Sheets. I have two methods, so pop over if you'd like to read about how to use those techniques in your projects.


Ways to cut Silhouette Rose Gold Printable Foil - Kiss Cut and Die Cut. Tutorial by Janet Packer (Crafting Quine) for the Silhouette UK Blog. Uses files from the Silhouette Design Store by Nilmara Quintela, Felicity Jane, and Jamie Cripps.


I used the foil to decorate these pretty Carousel Horse Box gift boxes by Nilmara Quintela from the Silhouette Design Store.

It is a quick and easy file to put together, great if you are making a number for party favours. The base is designed so that it doesn't need adhesive and the box is held closed with a short length of ribbon.  As I don't have bow-tying superpowers, I adapted the box so that it would stay closed without the ribbon. I also made these foil and vellum bows  to add a little more pizazz!


The bows I used are:
3D Bow file by Felicity Jane.
3D Layered Puckered Bow by Jamie Cripps.

I can't decided which one I like best, can you?


18 Apr 2018

Tiered Ombre Cake Box Card


Hiya.   Today I'm sharing another fun greetings card from Simply Crafty SVGs.  I've used the Tiered Cake Box Card, a 3-dimensional card that folds flat for posting.


I love ombré shading, and have some seen some wonderful real cakes decorated in that style. I decided to give the cake on my card an ombré look, and also used vellum to make the plate look more like a glass cake plate.  I made a few small adjustments to the Tiered Cake Box Card design though, adding more detail to the icing using internal offsets, then adding the recipient's age with a matching offset. I describe how I did these things in a little more detail below using my Silhouette Cameo. I used a Silhouette Cameo® 3, and the Silhouette Studio Designer Edition software. However, the SVG files can be used with other desktop die cutting machines and software (details here).


Materials Used:
Pale Blue Heavyweight Smooth Cardstock
White Mediumweight Textured Cardstock
Pearlescent Vellum
Beacon 3-in-1 Adhesive
Double-sided Adhesive Tape
Tim Holtz Distress Oxide Ink Pads in Salty Ocean & Faded Jeans
Ranger Mini Ink Blending Tool
Lawn Fawn Starry Backdrops Clear Stamp
Versamark Clear Watermark Ink Pad
Wow! Ultra Fine White Embossing Powder
Embossing Heat Tool
Sizzix Tim Holtz Stripes Embossing Folder from the Harlequin & Stripes Set
Alcohol Markers for colouring the candle flames (Optional)
Silhouette Cameo


Files Used:
Simply Crafty SVGs Tiered cake Box Card

Fonts Used:
SW Swirl Dance Font


Heat Embossing the Cake
Once I'd cut out all the pieces, I stamped the two cake front pieces with Versamark ink and applied white embossing powder to provide a resist for the ink blending. It isn't necessary to stamp on the lower part of the taller piece, as only the top part shows once the card is assembled.


Coloring the Ombré Cake
I blended the lighter colour of ink (Salty Ocean) on to the top three quarters, and then blended the darker colour (Faded Jeans) to just the top edge.


Here is the before and after, (actually after, and before) showing what a difference it makes!


Vellum Cake Plate

I cut three plates from vellum as well as from the blue cardstock and then adhered them together using double-sided tape. Yes, I did trim those excess end pieces first!


This is what they look like stuck together. The tape shows through the vellum a little, but as it runs parallel with the stripes it looks like part of the pattern.


Coloring the Candles (optional)

I coloured the candles on cake background (cut from white cardstock) with Copic Markers of various colours. I followed part of this YouTube video for colours choices.  Alternatively, you could use colored card, paper, or add chalks, or colored paper.


Offsetting the Icing

To give a little more detail to the icing I made an internal offset of 0.55". I cut the offsets from the textured side of the card, and the original pieces from the smooth side.


I did the same with the swag parts, but released the path and deleted the inner-most parts, copied the original inner parts, and made a compound path with them and the new offsets (otherwise the pieces would have been too small to handle easily).


This is how the finished icing looked.


Adding an Age

You'll notice that I also added an age. It would also possible to add a small sentiment in the same way. I typed out the number (using SW Swirl Dance font from the Silhouette Design Store) and added an offset to match that of the icing. I cut the offset from white card, and the number itself from a scrap piece of ombré blended card.


I cut the number from different parts of the card and from white, and chose to use the lighter ombré version.


Assembling the Card

The card was assembled following the directions in the pdf document included with the file download. I used panels in the same colour as the card base, shading the edges lightly with the distress inks.


The card fits into a US A7 envelope.  A free envelope file is available on the site that fits perfectly (for cards up to 5" x 7").


    These are the files I used. Just click on the photo to visit the item in Simply Crafty SVGs online store.


    This is a great card for all sorts of occasions and goes together very easily. Wouldn't it be great for Mother's Day? I'm sure I'll be using this one again before too long!


    Janet, DT Member Simply Crafty SVGs

    Blog: Crafting Quine 
    Instagram: @CraftingQuine


    Simply Crafty SVG Files:
    Tiered Cake Box Card
    Basic Envelope Set (Free)