Showing posts with label gifts. Show all posts

6 Oct 2018

Glow in the Dark Bottle Gift Bag for Silhouette UK

Design Tips for Silhouette Studio. Partial Knock Out Text Technique. Designed by Janet Packer Crafting Quine for Graphtec Silhouette UK


Hi, On the Silhouette UK Blog today I've designed the decal for this Halloween bottle bag using heat transfer materials. It is designed in the Silhouette Studio software, and the materials are cut with a Silhouette Cameo, and applied using a heat press (an iron would work too).

Design Tips for Silhouette Studio. Partial Knock Out Text Technique. Designed by Janet Packer for Graphtec Silhouette UK


The magical element is the glow in the dark HTV which glows really brightly when the lights are doused, and contrasts well with orange flocked heat transfer.

To make the decal I used a partial "knock out" design technique on one of the words using a ghost design. The post on the Silhouette UK Blog describes how to do this for yourself.

The Silhouette Glow in the Dark Heat Transfer is a dream to weed and apply and gives a fun effect.


DESIGNS USED:


PRODUCTS USED:


21 Feb 2018

Mini Bottle Boxes using the Exploding Wine Bottle Box by Simply Crafty SVGs


Hello.  Janet here with some unusual and useful gift boxes. I've used the SVG files for the Exploding Wine Bottle Box from Simply Crafty SVGs to make mini bottle boxes. The files are designed for a regular sized wine bottle, but I've reduced them to fit my mini bottles of fizz.

My bottles (bought in the UK) are 200 ml, similar bottles available in the USA, are 187 ml, and are roughly one quarter of the volume of a full size bottle. However, merely reducing the box to one quarter of the size would not fit the smaller bottle. The instructions that follow will show you how to adjust the file to fit almost any size of bottle.

I used the Silhouette Cameo and the Silhouette Studio software, but the file can be made with most cutting machines and software that can use SVG files. Check the FAQs for additional information.


Materials Used:
Black Heavyweight Cardstock
Printable Cardstock
Echo Park Fashionista Digital Papers
Black Grosgrain Ribbon
Beacon 3-in-1 Adhesive
Gift Tag
Baker's Twine
Clear Pearl Floral Sprays
Washi Tape
Silhouette Cameo


Files Used:
Simply Crafty SVGs Exploding Wine Box

Other Digital Files: 
Fashionista Paper Packs by Echo Park (pack #1 & #2)


Step 1: Open the Files
Open all the files in one window. The easiest way to do this is to open one of the files and then select File and Merge from the main menu, then to navigate to each of the other files in turn and click select.  This is a little time consuming, but places all the files in one tab so that they can easily be resized together. Select all the pieces, and group them.


Step 2: Measure your bottle
Measure the height and the diameter of the bottle at it's widest point. This is often the base, but if the bottle flairs out from the bottom then add extra to allow for it as best you can.


Step 3: Represent the Bottle in the Software
Draw a rectangle to represent the size of the bottle. It doesn't need to be bottle shaped, as long as it shows the height and the greatest width.  To easily make the rectangle the correct size, open the Transform panel and the Scale tab, enter the dimensions, and click apply.


Step 4: Adjust the file pieces
Rearrange one or more of the upper and lower side pieces as they would be joined when the box is assembled. Place the 'bottle' inside it. Select all the file pieces except the 'bottle'. Select one of the corner grab handles, and holding down the shift key (to keep the size proportionate) move the handle until the combined side piece is of a size where the bottle fits within it. Leave a little space around the bottle width to allow for the bottle to be added and removed easily. You can see in the diagram that the box is still a little tall. You could align the side flaps and slice off the excess using the Knife tool. I chose to cut them as they are, and to trim the excess with a paper trimmer later.


Step 5: Cut and Assemble
Cut the base pieces from black cardstock. Cut the panels from patterned card (mine were made using Print & Cut and digital pattern fills).  To read more about how to fill pieces with digital patterns, this link will take you to other projects where I've previously used Print & Cut. Follow the assembly instructions on the PDF document supplied with the files, or the YouTube video Sandy has made for this file.


Finishing Touches
If you have read any of my previous posts for Simply Crafty SVGs, you'll know that I like to make  adaptations and adjustments. Aside from the re-sizing, here are the other tweaks that I did to the boxes.


Additional Panels
I made additional panels for the lid and the lower part of the base, using the Offset feature.

Decorative Loop
I threaded a loop of grosgrain ribbon through a slit cut in the top of the finished lid. The ends were secured on the underside of the lid with strong liquid adhesive.

Gift Tag
I made some gift tags, with black and white baker's twine threaded through the top. The other ends of the twine were threaded through a hole punched in one of the side flaps.  On the rear of the side flap, the ends were knotted and trimmed.

Floral Sprays
I added some small clear pearl floral sprays, secured to the back of the bottle with some Washi tape (so they could later be peeled away without damaging the bottle label).


Here is the file I used to make the bottle boxes. Just click on the photo to visit the page in Simply Crafty SVGs online store.


As you can see, it is an easy job to resize the files to fit whatever bottles you choose to gift. My next challenge is to make boxes for miniature bottles. I'll post the results on Instagram when I do. Follow my account if you'd like to see how I get on.


Janet, DT Member Simply Crafty SVGs

Blog: Crafting Quine 
Instagram: @CraftingQuine


Simply Crafty SVG Files:
Exploding Wine Bottle Box

7 Jan 2018

Flip Top Calendar using Silhouette Studio's Move tool

LINK to TUTORIAL : Flip Top Calendar designed by Janet Packer (CraftingQuine) for the Silhouette UK Blog using IKEA Tolsby picture frame.

Hello and Happy New Year.  I had a post on the Silhouette UK Blog a few days ago showing how to make this flip top calendar. It used Silhouette's Print & Cut and Move functions.  It was cheap to make (the frame I used cost just £1 from IKEA), and would look great on a desk, beside a telephone, or even as a small gift.

I used the 2018 Calendar set by Alaa' K (parts 1, 2, 3, 4), resizing them to fit a bought picture frame. I also adjusted the position of the holes using the Move function.

The bright coloured papers are from MFT Graphic Grid 6x6 paper pad. There are twelve different colours - perfect for this project!


LINK to TUTORIAL : Flip Top Calendar designed by Janet Packer (CraftingQuine) for the Silhouette UK Blog using IKEA Tolsby picture frame.


LINK to TUTORIAL : Flip Top Calendar designed by Janet Packer (CraftingQuine) for the Silhouette UK Blog using IKEA Tolsby picture frame.


Hope you have a happy and organised 2018!


9 Dec 2017

Pyjama Bags - layering HTV


Hello,

Today I have a tutorial on how to make these fun, Christmas-themed, pyjama bags over on the Silhouette UK Blog. I took some blank drawer-string bags and transformed them by decorating them with wine and Christmas phrases from the Silhouette Design Store in jewel-like glitter heat transfer material.

This is a great project if you haven't used heat transfer material (aka HTV) before, or if you'd like to try out multi-colour designs and some layering.  A domestic iron is perfectly adequate for this type of decorative project.


Last year I hit on the idea of gifting Christmas Eve PJs in reusable drawer-string bags, with initial letter tags to indicate the recipient's name. The details for making the reusable tags are here.

I used Silhouette Glitter Heat Transfer Material in Mint, Hot Pink and Silver, with some Black Flock Heat Transfer for contrast.


My blog post on the Silhouette UK Blog includes directions on how to prepare the designs, prepare and cut the media, and apply the media using a heat press, or domestic iron.

I used these designs from the Silhouette Design Store:
Ho, Ho, Ho and a bottle of Merlot
Dear Santa, Define Good
Get Mistletoed
Top of the Nice List
Both Naughty & Nice

Can you guess which one is mine?


20 Mar 2017

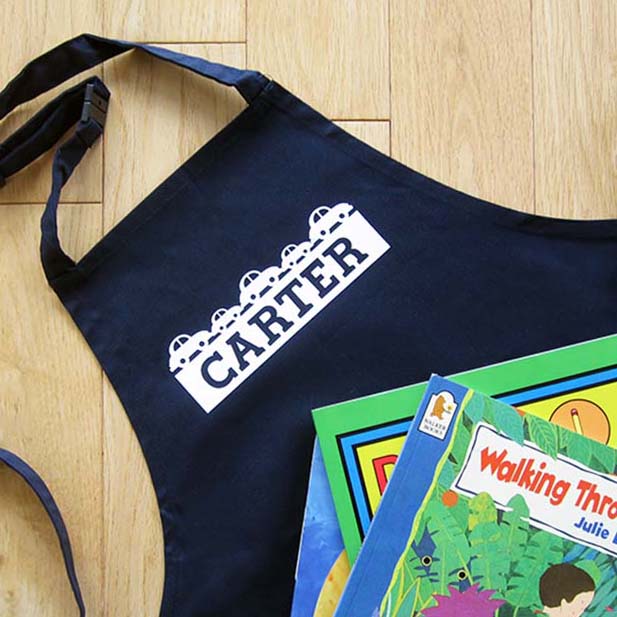
Personalise a Children's Apron - a Quick design Tweak


Personalize a cut design by Janet Packer (CraftingQuine.blogspot.co.uk).  Make a personalised child's apron.


Hiya,

Kids seem to love gifts with their name on them,c  So, needing a gift in a hurry, I decorated this plain apron for a young friend who has a tiny bit of a car obsession, using a design from the Silhouette Design Store. I’m sharing a sep-by-step tutorial for this  quick and easy gift idea over on the Silhouette UK Blog today, using a child’s blank apron and flocked heat transfer material  (HTV) .


Personalize a cut design by Janet Packer (CraftingQuine.blogspot.co.uk).  Make a personalised child's apron.


The design I chose was from a set from the Silhouette Design Store called Baby Toys Borders Set designed by StudioIlustrado. The designer has loads of similarly sized borders with a rectangular base, any of which would work for this purpose. Just search the store for 'Borders set' and filter by 'Studioilustrado' (note, just one 'L') and it will bring up pages of lovely designs - including tractors, seahorses, and even kitchen sets.

I made a few minor adaptations to the file to incorporate the child's name and make a one-piece decal which makes it super easy to weed and align on a garment (or on a flat hard surface if regular vinyl is used). This would be ideal for anyone new to changing files, or to using heat transfer material. do pop over to the Silhouette blog and take a look.
Personalize a cut design by Janet Packer (CraftingQuine.blogspot.co.uk).  Make a personalised child's apron.

Firstly, I show how to edit the design to allow sufficient space for some text
Personalize a cut design by Janet Packer (CraftingQuine.blogspot.co.uk).  Make a personalised child's apron.
Then I type the child’s name in an easy-to-read font - Lori Whitlock’s Super Font


Personalize a cut design by Janet Packer (CraftingQuine.blogspot.co.uk).  Make a personalised child's apron.


Once reversed design is cut out on your digital cutting system (this would fit Silhouette®Cameo, Portrait or Curio) it is a straightforward design to iron or press onto the font of the apron.


Personalize a cut design by Janet Packer (CraftingQuine.blogspot.co.uk).  Make a personalised child's apron.

There you have it - add a matching gift tag and your gift is ready.

Of course, the same personalised design (not reversed) can be used on almost any hard surface too, using regular vinyl, so you could make even more co-ordinating items.

I hope you'll try it!


21 Nov 2016

Painting Uglazed Ceramics


Cut stencils for decorating ceramic blanks with Silhouette Cameo by Janet Packer for Silhouette UK


Hello, I have a tutorial on the Silhouette UK blog today on how to decorate unglazed ceramic items (available in UK craft shops at the moment). I bought a few different blanks including the tea-light set I decorated for today's post.

In the post I show how to use your Silhouette to make a set of stencils to sponge metallic acrylic paints onto the blank tea-light holder set using two Silhouette Design Store files by Nic Squirrell.


I used a repositionable matte vinyl to make my stencil, having found that using a too sticky stencil material removed some of the painted (slip) surface.


What material do you prefer to use for your stencils?


18 Aug 2016

Cameo 3 - a new arrival


Today I have welcomed a new baby into our home. I thought you might like a quick peek at some photos. She's so pretty!


The Cameo 3 is a little wider and a little deeper than the Cameo 1 (I don't have a Cameo 2 to compare it with).


This is what comes in the box, including that self adjusting blade.

I was reminded to follow the set up instructions that have been published online on the Silhouette America website to get your machine up and running. The address is on that big teal label in the first picture. You have the opportunity to register your machine and it takes you through the order in which you should do things.

Installation went smoothly, I won't bore you with details, but this is my first cut on my favourite cutting and printing cardstock (medium weight).


This was cut with that self adjusting blade. I used the recommended settings for cardstock, although I'd have set it deeper and with more pressure on my old machine. However, it cut beautifully - no complaints!  Now I need to go off and play! 


Are you planning to purchase a Cameo 3? Have you got one? What are your first impressions? Do post comments ... I'd love to hear how you get on.

Why not subscribe to my blog to keep up to with the Cameo 3 (links on the right).

Or follow on social media on PinterestTwitter orInstagram 


4 Aug 2015

Quick Personalised gift with the Cameo

Do you need a gift at short notice? 

I made this in the Silhouette Design Software with a mixture of files straight from the Silhouette Design Store. 


FILES
Bottle Tag 
#80567 Balloon bottle tag by Jamie Cripps Studio/PNG/SVG

Labels 
*27841 3 Invitation Card Kit by Lori Whitlock Studio/PNG/SVG

Wine Quotes
#74101 Always time for wine phrase by Kolette Hall Studio/PNG/SVG
#86256 Happiness is wine phrase by Kolette Hall Studio/PNG/SVG and 
#84682 for the wine glass and swirl by Sandi Idleman Studio only at present, hopefully other formats in the future.
 #43819 'I cook with wine' vinyl phrase by Samantha Walker Studio/PNG/SVG


METHOD
I just removed the balloon parts from the bottle tag. Duplicated it three times. Personalised it with some text. Then 'Print and Cut'! 

For the labels I selected the fancy shape from invitation cards  Filled a couple of  internal offsets. Duplicated the label and then pasted in the quotes. With a little recolouring and resizing these were also 'Print and cut'. Then I attached the labels to the tags with dimensional foam pads and folded each one. Finally I slipped them over the bottle necks and the job was done!