21 Dec 2020

Christmas Village slimline card by Simply Crafty SVGs


For my last Christmas Card of the year I used the Christmas Village Slimline Card SVG cutting file from Simply Crafty SVGs. I love making cards in a limited colour palette, and I think that this design works very well using white card in various textures, with a little extra silver and gold glimmer.  

I've cut the card parts as per the cut file with the addition of a local landmark - The Scolty Tower and Hill above Banchory in Royal Deeside, Scotland. It is such fun to adapt card designs in this way!

Materials Used:
White Medium-Weight Textured Cardstock
White Medium-Weight Smooth Cardstock
Silver and Gold Glitter Paper (mine is glitter wallpaper)
Beacon 3-in-1 Adhesive
Dimensional Adhesive Tape
Silhouette Cameo or other digital cutting machine that cuts SVG files

Files Used:
Simply Crafty SVGs  Vintage Christmas Slimline Card
Simply Crafty SVGs (Free) Slimline Envelope

This year, I'm supporting the Cards for Kindness initiative, and I'm sending my extra Christmas cards to care homes where some folks don't have family to send them cards. For those of you in the UK there is a Facebook group with card ideas ideas, hints on Covid card safety, and various call outs for cards. They share a link which gives addresses of Care Homes all over the UK. I'm sure there is something similar in most countries, although there isn't much time left!


This is the file I used. Just click on the photo to visit the page in Simply Crafty SVGs online store.

Christmas Village Slimline Card

Have a wonderful Christmas!
Janet, DT Member Simply Crafty SVGs

Blog: Crafting Quine 
Instagram: @CraftingQuine

18 Nov 2020

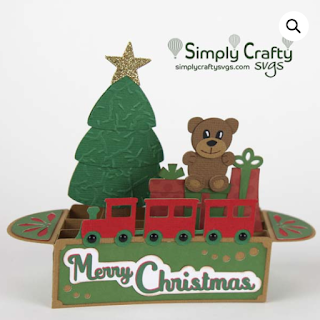
Special Paper-Pieced Christmas Card for a Child using the Christmas Tree with Train Box Card


As a new Grandmother I so enjoyed making this special card for my Grandson's first Christmas. It is the 
Simply Crafty SVGs Christmas Tree with Train Box Card, and by changing out the sentiment could be used for a baby or child of any age for Christmas, or even for a winter birthday. The paper-piecing on this card was such fun to do, and so effective - well worth the effort. 

There is a comprehensive and easy-to-follw video on how to assemble the card linked from the SVG file page in the Simply Crafty SVG shop. SVG cutting files can be used with any electronic cutting machine that will cut SVG files (the Silhouette Cameo requires the Designer Edition of the Silhouette Software to do so).


Materials Used:
Various Colours Medium weight Textured Cardstock
A4/Letter White Medium weight Cardstock (for Print & Cut)
Patterned Paper (I used various plaid papers from Lawn Fawn)
Brown and Bronze Metallic cardstock
Beacon 3-in-1 Adhesive
Dimensional Adhesive Tape
Tim Holtz Distress Oxide Ink in Peacock Feathers
Ink Blending Tool/Brush
Gel/Glaze pens in White and Black
White Decco Foil Flock Transfer Sheets
Silhouette Cameo
Inkjet Printer (for Print & Cut)

Files Used:
Simply Crafty SVGs Christmas Tree with Train Box Card

Other Digital Files: 
Sweet Tea font by Lori Whitlock (Studio Store or LW Store)

I made no changes to the card design, but have outlined a few of the techniques that I used to make this cute card.

Paper Piecing
Cut more than one of each of the piecing elements and have fun mixing up the shades. Use gel or glaze pens to enhance the features like the one on the left.


Adding Dimension
Add dimension by blending onto the edges of the gift boxes, and to the edges of the decorative panels.


Print & Cut Sentiment

Use the pattern piece provided with the file to design your own sentiment, or use the sentiments provided. I always make them in a variety of colours to see which I prefer once they are printed.


Constructing the Layers


Add pieced elements onto the layers. There are full instructions in the designer's construction video.


Attaching the Layers


Attach the back piece to the front at one side, and then attach all the other layers, one by one, on that side only. Ensure that the pieces are all aligned with each other on the bottom edge (marked in red). Then attach the back and the other side of the layers, ensuring that they will lay flat. For this stage I add adhesive to all of them at once. Using wet glue allows for some wiggling to get them all aligned correctly.


Adding Snow

Add some optional 'snow' to the top of the tree. I cut the shape freehand from the flocked transfer sheets (if you can work out a way to cut them with a digital cutter, do let me know)! 


Making a Matching Envelope


A matching envelope completes the card (the pattern is included with the card file). I used one of my duplicate bears to make a closure for my envelope, adding a dimensional foam square to the body of the bear, positioning it so that the ears overlapped a little to hold the envelope closed (I don't advise this if you intend to post the card).


This was such a fun card to make. Let me know if you try it for yourself, or join and post a picture in the Simply Crafty SVGs Creators Facebook Group - we love to see your makes!


This is the file I used. Just click on the photo to visit the page in Simply Crafty SVGs online store.

Christmas Tree with Train Box Card

Janet, DT Member Simply Crafty SVGs

Blog: Crafting Quine 
Instagram: @CraftingQuine

Simply Crafty SVG Files:
Christmas Tree with Train Box Card


14 Oct 2020

Witch Gnome and Cat Gnome - a Halloween Transformation!

Big Witchy Gnome Box and Gnome Cat 3D SVG paper craft models


Hiya! Have you ever combined 3d SVG files together? When you do you can make something completely unique without having to design from scratch and it's a great way to get even more from purchased files. 

For Halloween this year I've combined the Gnome Box file with the Hovering Witch Hat from Simply Crafty SVGs to make a super big Witchy Gnome Box. I also made a cat companion by making changes to the Gnome Box. In this post I've included details of how to make the combinations and changes so that you can do the same or add your own twist to these versatile files.


WITCH


Materials Used:
Black, Purple & Grey Medium-weight Textured Cardstock
Green & Purple Patterned Paper
Glow-in-the-Dark Sticker Paper (Silhouette brand) 
Green Brad
White Embroidery Thread
Beacon 3-in-1 Craft Adhesive
Double-sided Dimensional Tape
Black Glitter
Multi-colour Sparkle Spray
Black Distress Oxide Ink and Ink Blender
Silhouette Cameo or other Digital DieCutting Machine

Main Files Used:
Simply Crafty SVGs Gnome Box
Simply Crafty SVGs Hovering Witch Hat

Other Files Used: 
Halloween Spider Set by Lori Whitlock (spider) SVG/Studio
Bats by Lori Whitlock SVG/Studio

The witch is made with the body of the Gnome file, and the crooked hat mostly from the Hovering Witch Hat plus a few more changes.

Size
The witch is bigger than the original gnome, the finished height being approximately 16". The larger size allows more halloween candies to be stored within, yay! I enlarged all the gnome pieces used by about 185%. This size allows the body sections to fit three to a page on 12" x 12" cardstock. I selected only the body sections and lower hat portion (black), body panels and lower hat panel (purple pattern), gnome feet (purple) and gnome beard (grey) to size up.


Hat Brim
The hat brim is a newly designed piece, made to fit the dimensions of the gnome hat top (pointed piece) only in the software, as the gnome piece was not actually cut. Using the dimension of one lower edge of the enlarged hat top, I drew a 6-sided shape with the drawing tool with sides of that length and centred it within a circle of 8 inches diameter. The new brim then fits at the join of the lower and the upper hat pieces (described in the next section).


Hat
The upper hat part with the bend in it comes from the Hovering Witch Hat file and the lower part is from the gnome file. It is easy to make them fit together as both hats are hexagon shapes. Select the four pieces that make up the top part of the hat, and increase the size of them all together until the bottom edge length matches that of the lower part (same length used for the brim internal octagon). Cut from black cardstock and decorate with glitter spray (mine was old and gloopy, but the drops and blobs made an interesting pattern and texture). Follow the construction directions in the video for the Hovering Hat file, remembering to add the string for a spider once the first two (smallest) pieces are attached. Attach the remaining two pieces then adhere the Gnome Hat base and slide the brim on from the top. It should stop at the point where the two hat pieces join. My brim was a little big so I cut a small circle with a slightly smaller hole and added that on too of the first brim. It barely shows, but looks like a design feature anyway. It is finished by adding a spider to the string.


Nose
The nose, cut from green patterned paper, is cut using the top three of the four pieces re-sized for the hat described in the previous section. Using the lighter weight paper makes construction easier.  A green brad was added to mimic a wart.


Face
The face is the top half of an enlarged body panel, cut from green patterned paper and was trimmed by hand to a point to indicate the witch's chin. I made an attempt to add some contouring by blending on Black Soot Distress Ink. This also toned down the brightness of the white dots somewhat.


Hair
The witch's hair is made from two enlarged beard pieces, shrunk (width-wise only) to about 4.5" at the widest point. The top edge was adjusted using point editing to fit the new hair line and cut from grey card. As the individual strands are narrower than previously, care should be taken when curling them so that they do not break away (no need to ask how I know that)!


Feet 
The feet were cut at the enlarged size from purple cardstock. Assembly directions are on the Gnome YouTube video.


Rather than mounting them flat on the box base, I decided to adhere them together and to mount the box on top the feet. I added a piece of folded scrap card to steady the box weight at the back. 


Assembly
The box base was assembled as per the gnome assembly video and the patterned panels adhered. The box base was then stuck to the feet.


The face is attached to the hat below the brim. The hair was also stuck to the lower edge of the brim and part of the lower hat panel (trimmed down to three sections) was added at the rear.
The nose was then stuck to the face.


Finishing Touches
Your choice, but I added a black bat to her hair and a set of 'boo' buttons made with card circles layered over glow-in-the-dark paper. Then the witch is ready to fill with Halloween treats!


WITCH'S CAT


Materials Used:
Black, grey, pink and purple Medium-weight Textured Cardstock
Green Patterned Cardstock
Glow-in-the-Dark Sticker Paper (Silhouette brand) 
Beacon 3-in-1 Craft Adhesive
Double-sided Dimensional Tape
Black Distress Oxide Ink and Ink Blender
Multi-colour Sparkle Spray
Silhouette Cameo or other Digital DieCutting Machine

Main Files Used:
Simply Crafty SVGs Gnome Box
Simply Crafty SVGs Bunny Easter Basket

Other Files Used: 
Fish and Yarn by Hero arts (fish skeleton & ball of wool) SVG/Studio
3D Classy Cat Luminaire (cat's eyes) SVG/Studio

The cat was made at the original gnome size. The same hat brim as used on the witch (above) was added, at a smaller size, but otherwise construction was similar to that of the gnome (omitting the feet). 


Whiskers were added from the Bunny Easter Basket file, eyes from the luminaire, and the fish skeleton and yard were added to decorate.


The tail and ears were hand cut additions.

These were lots of fun to make. I hope you'll try them, and enjoy them too!

These are the files I used. Just click on the photo to visit the page in Simply Crafty SVGs online store.


I've used the Gnome Box file several times before and I can honestly say that it is one of my all-time favourite files. Details of the previous makes are still available through links at the bottom of this post.Here are some links to my previous makes with the Gnome Box file:


8 Ways to customise your Christmas Gnome

Blog: Crafting Quine 
Instagram: @CraftingQuine

Simply Crafty SVG Files:
Gnome Box 
Hovering Witch Hat


15 Jul 2020

Christmas in July - Folding Cardinal Card


Hiya, It's lovely to have a gentle push to remind us all to get started on our Christmas Cards - that's why I love 'Christmas in July' events! My first Christmas card of the year is the Cardinal Card  from Simply Crafty SVGs. I was able to use one of my favourite craft supplies - glitter paper!  Assembly of this 3D card is very straightforward, and if you need some help you can watch Simply Crafty SVG's Cardinal Card assembly video instructions. I love to craft along with Sandy's videos.


Materials Used:
American Crafts Medium Weight Textured Cardstock (White, Grey)
Lawn Fawn Cardstock (Peacock)
Patterned Paper
Silver Glitter Paper (Red, White, Gold)
Beacon 3-in-1 Adhesive
Silhouette Cameo + Designer Edition Software (or other digital cutter)
Printer (for the Print & Cut sentiment)

File Used:
Simply Crafty SVGs Cardinal Card


DETAILS

Cardinal


This little fella was fun to layer up using the glitter paper. I cut an extra white cardstock bird to act as a base as my glitter paper is a little flimsy. It's a shame that the layers don't show up in the photo
o, as they are so lovely.


Trees

For the birch trees I layered white glitter paper over dark grey card. Birch are some of my favourite trees, and I love using them in my craft projects.


Sentiment


I used one of the included sentiment strips, duplicating it in different colours to have a range of colours to see which one looked best.


I didn't achieve a good match for the peacock card and decided that the black looked good, tying in with the black of the bird's beak nicely.


Assembly


Assembly was very straightforward - these cards will be great to make en masse for sending out to friends this Christmas.


This is the file I used. Just click on the photo to visit the page in Simply Crafty SVGs online store.


Janet, DT Member Simply Crafty SVGs

Blog: Crafting Quine 
Facebook: Janet Packer Crafting Quine
Instagram: @CraftingQuine


17 Jun 2020

Vintage Beer or Soda Truck for Father's Day


Hiya, Are you looking for a fun gift idea for Father's Day? If so you've found it with the Vintage Flatbed Truck  cutting file from Simply Crafty SVGs. I added a couple of extra steps to allow the truck to carry  single can of beer or soda as a special Father's Day treat; a rack (to prevent the can rolling around) and a strengthener (to take some of the extra weight). I'll describe how to do these  together with some extra ideas for personalising the truck.  Assembly of this 3D file takes a little longer than some, but is easily completed by following Simply Crafty SVG's Vintage Flatbed Truck Assembly video instructions, and is definitely time well spent!


Materials Used:
American Crafts Medium Weight Textured Cardstock
Medium-weight Smooth Kraft Cardstock
Silver Metallic Cardstock
Silver Glitter Cardstock
Manual Embossing Machine & Woodgrain Embossing Folder
Walnut Distress Ink Pad and Ink Blending Applicator
Beacon 3-in-1 Adhesive
Silhouette Cameo + Designer Edition Software (or other digital cutter)
Self-Adhesive Embellishments
Dimensional Foam Pads or Tape (Black, if you have it)

File Used:
Simply Crafty SVGs Vintage Flatbed Truck


ADAPTATIONS

Can Rack
I made a simple rack to hold the can on the flat bed of the truck. It consists of two 3d rectangles adhered to a small flat rectangle of cardstock.


The 3d rectangles were made by simply resizing one of the axel pieces. It was lengthened until it was just slightly shorter than the interior length of the flat bed, and the height was reduced to be slightly smaller than the height of the lowest part of the flatbed wall (compare the sizes of the pieces on the virtual mat in your software). Two copies were cut from kraft cardstock to match the flatbed and with a rectangle of the same length and approximately half the width of the flat bed.


Before assembly the pieces were run through a manual embossing machine and then some walnut brown ink was blended onto the edges and folds to give some extra realism.


The 3d pieces were then adhered to the long edges of the rectangle and the whole thing added to the centre of the flatbed. You could adhere it, but I didn't think it was necessary.


Strengthener

I made a simple 3D triangle shape from black cardstock of the same length as the back axel. I cut this with scissors and made the height of each face of the triangle slightly different so I could rotate it for different heights (a bit of trial and error comes in to play). I placed it as close to the back axel as possible. If you look closely you can see it on the picture below.


Dashboard

The dashboard pattern piece can be found in the 'Extra' folder. I cut it from black cardstock. I also  hand cut a very small version to allow the steering wheel (is it called a steering column?) to be mounted proud of the dashboard. I added tabs at either end and when folded down gave a surface for gluing the steering wheel to one end, and for adhering them to the dashboard.


Fender/Bumper and Number Plate

The fender for the front of the vehicle is included with the regular black cutting pieces. I made an extra slightly longer one to go onto the rear of the vehicle. I then made number plates from rounded rectangles drawn in the software, adding text and an interior offset. I used a sketch pen to draw on the details prior to sending them to cut.


The fenders were then mounted to the completed vehicle using dimensional foam pads. I used three stacked on top of each other at either end of each fender to mount it proud of the vehicle. I recommend that you use black dimensional pads if you have them as they are much better disguised than white ones


Adding the Can

A soda or beer can was placed on the custom rack in the flatbed once the vehicle was complete. This makes a fun Father's Day gift, or at any time of the year.  It's fun to match the vehicle to the recipient's favourite brew.


This is the file I used. Just click on the photo to visit the page in Simply Crafty SVGs online store.


Janet, DT Member Simply Crafty SVGs

Blog: Crafting Quine 
Facebook: Janet Packer Crafting Quine
Instagram: @CraftingQuine