31 Jul 2016

American Football Mug


Hello!

Today I decorated a mug with vinyl using a recent SVG release from Sanqunetti Design. This is one of a set of female oriented american football images available as a set of cutting files in SVG format (to use with the Designer Edition of the Silhouette Studio software), a DXF (which can be used with the basic version) and a JPG (for printing).

I used 4 colours of regular vinyl and layered them all onto a single piece of transfer tape, applying them to the mug in a single operation. I included a small triangle on each layer to use to align the pieces, first picking up the white, then dark pink, brown and lastly the light pink.


A thorough burnishing at each stage (rubbing with a plastic straight edge to remove air) ensured that there are no air bubbles to be seen.


The set is available from the Sanqunetti Design store.

Have you tried using vinyl with your cutting machine yet. If not, do try. It's easier than you'd think!


29 Jul 2016

Make Marquee Letters for Weddings or Home Decor


I love marquee letters and made some for my daughter's upcoming wedding: they'll look great in photos and as a decorative element at the wedding reception.  When I looked at the price tag for shop bought letters my first thought was "I can make those for a fraction of the cost", and I did! The results  and instructions on how to make them are over on the Silhouette UK Blog.


The files are designed by Carina Gardner and the alphabet, numbers and a few other shapes are available from the Silhouette Design Store. She has provided a tutorial on how the letters go together, but my post provides some information on the adaptations I made and a few tips which I hope you'll find useful.


DESIGNS USED:


Do check out my social media

   Profile | My Blog | Pinterest | Twitter | Instagram


24 Jul 2016

Cutting Chipboard with the Silhouette Cameo - Wall Decor Arrows


This week I've been playing with the Silhouette chipboard and have shared some tips and a quick tutorial with you over on the Silhouette UK Blog.


Cutting Chipboard on Silhouette UK Blog by Janet Packer #3dcraft #silhouette #cameo #chipboard #3d #tutorial


If you haven't used the silhouette chipboard before you might be surprised! It has a very smooth surface and looks like greyboard but is less fibrous and not as thick. It's very versatile and is fantastic for layering and makes strong and dimensional home decor items.  In the post I show you a quick tutorial on how to make a set of arrows and demonstrate how versatile it is by showing you some alternative finishes.

To make the project I used the Arrows file (#53730) designed by Sweet Afton from the Silhouette Design Store. There are many alternative arrow styles to choose from, visit the store, you'll be spoilt for choice.

The trick to using the Silhouette chipboard is to layer up the identical layers. I adhered six layers with a strong adhesive, Beacon 3-in-1 craft glue.


I finished the front surface with a now discontinued Graphic 45 patterned paper - a tribal pattern that I'd had in my stash for years - perfect for these arrows and gives them an almost wooden carved look. On the reverse I used the Silhouette faux leather for a classy finish  adhered with Beacon Fabri-tac.


Do visit the Silhouette UK Blog. There is a new project or tutorial on the blog EVERY day of the week.

Cutting Chipboard on Silhouette UK Blog by Janet Packer #3dcraft #silhouette #cameo #chipboard #3d #tutorial


Catch up with me on social media:  Profile | My Blog | Pinterest | Twitter | Instagram


22 Jul 2016

Adding photos to cards


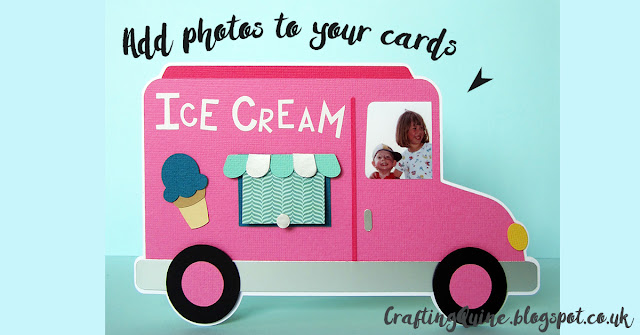
Ice-cream Van Card with Photo by Janet Packer #CraftingQuine #SanqunettiDesign #card making #photos


Hello, today I have a fun new card for you. 

Judy over at Sanqunetti Design has just released this ice-cream van svg file and, once made into a card, the windows are just perfect for a bit of personalisation.  I added a photo in the driver's window and a lift the flap window for a surprise message. It's so nice for relatives to receive a special card combined with a family photo. 


I made these changes to the file to make the card:

Flip the Design
The quickest course of action would be to make this file into a top fold card, However, I find top fold cards usually collapse when they've been on display for a few days, no matter how high the gsm of the card used. A side fold stands up so much better  (literally), so I selected all the file elements and flipped them so that it could have a fold on the left.


Extend the card size 
By increasing the size of the file pieces and by making the card base into 2 pieces, with a flap to join them, the photo is a better size for viewing and it is still possible to fit front and back onto a sheet of A4 or letter size paper. 


Add a Photo
Its easy to use the Silhouette Studio software to isolate the driver's window cut shape and to crop the photograph to the exact size and shape. Add the print and cut marks to the photo paper and the Silhouette will cut out the printed photo.


Add a Flap
Instead of just cutting a rectangular window from the pink van shape I broke the cut path in the top corners and substituted a perforated line. Now it's just perfect for a secret message or a second photo.


Here's the finished card - fun huh?


The file is available to purchase for download from Sanqunetti Design and is available at 50% off for a limited time.


Have you added photos to your cards? How did you do go about it?


SaveSave

15 Jul 2016

Upcycle for Christmas - an easy vinyl project


I have a blog post on the Silhouette UK Blog today. It's an easy vinyl project. If you haven't tried vinyl before this would be a great first project.


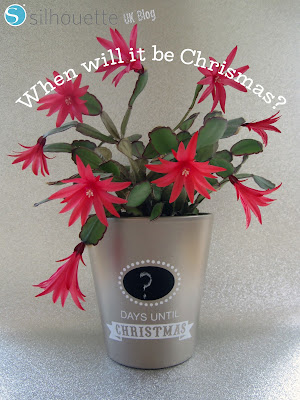
I up-cycled this silvery/gold flowerpot holder discovered in a local charity shop for 50p!

It is an easy vinyl project to do in preparation for Christmas. It involves a TINY bit of designing, but nothing that you can't do with the basic version of the the Silhouette Studio software and the simple instructions on the blog. I used part of a file from the Silhouette Store too - Merry Christmas Word Art by Jamie Koay #70049.


Here's my mockup of the design.


And here is the flowerpot - transformed and ready for the Christmas countdown.


Have you started Christmas preparations yet? What have you made so far?


.................... BREAKING NEWS .......................
There are Christmas in July Silhouette events on Create and Craft TV today at 1:00pm and 7:00pm. Look out for items made by myself and other Silhouette UK Design Team members. Lisa is demonstrating some lovely Christmas projects and there are instruction sheets too!
************


4 Jul 2016

SIL JULY :: Clapperboard Table Decoration and Photo Prop


Hello,
I'm using Chalkboard vinyl over on the Silhouette UK Blog today on a 3d clapperboard box design by Studio Illustrado from the Silhouette Design Store (#121403). I made this one for an important upcoming wedding, but it could be used for a birthday or anniversary, or as the centre-piece for a BAFTA or OSCAR party. In fact, perfect to use at any event which is a 'production'!

I redesigned the grid to better suit my purpose.  The blog post shows you how you can customise the clapperboard to fit your event. I also show my special trick for getting the vinyl on straight and adhering the chalkboard vinyl smoothly and perfectly.


Here is the completed box demonstrating the hinge in action.


Now this REALLY was fun to make! If you make one too, please post a link.


   Profile | My Blog | Pinterest | Twitter | Instagram


DESIGNS USED:


SaveSave