17 Dec 2017

Decorated Christmas Crackers with Silhouette Glitter Sticker Sheets


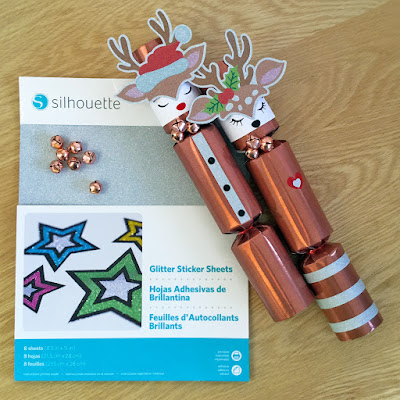
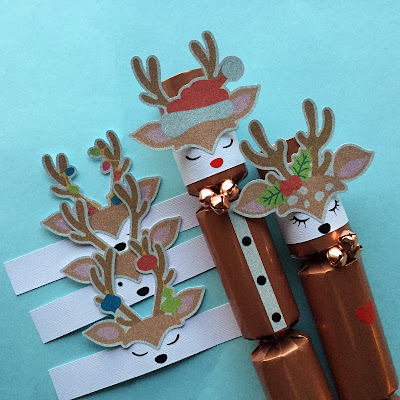
Hiya, today I have a post on the Silhouette UK Blog on the NEW Silhouette® Glitter Sticker Sheets.  It includes a festive project using glitter stickers to decorate some home-made Christmas crackers. I used the Oh Deer heads by Lettering Delights from the Silhouette Store. They are also available as a bundle from Lettering Delights.

Custom Christmas Crackers designed by Janet Packer (CraftingQuine) for the Silhouette UK Blog using Silhouette Adhesive Glitter Sticker Sheets.


The Glitter sticker sheets are new to the UK. There are 8 sheets in a pack, each sheet being 8.5in. x 11in., or 215 mm x 280 mm. The sheets are glittery with a slightly silvery colouration.  They can be printed with any pattern on a home printer. The sheets are adhesive-backed, so no additional adhesive is needed.

My post over on the Silhouette UK blog covers the cut settings for the Silhouette Cameo 3.  I didn't have immediate success with them so I've included lots of tips on using this media specifically.  These tips are useful for using Print & Cut media generally, especially useful for those who haven't let got to grips with this extremely useful function of the Silhouette family of machines.


Custom Christmas Crackers designed by Janet Packer (CraftingQuine) for the Silhouette UK Blog using Silhouette Adhesive Glitter Sticker Sheets.


There are also brief instructions on how to use the Oh Deer heads to make wrappers to decorate homemade Christmas crackers. They could be used for many other projects too; toppers, picks and even napkin holders.


13 Dec 2017

Santa Express Box Card with Eclipse Lettering from the Train Box Card by Simply Crafty SVGs


Hello, Janet here with a new folding 3D Christmas card. I've used the SVG file for the Train Box Card from Simply Crafty SVGs to make a fun Santa Express card.


My inspiration came from the Santa Special at our local stretch of the restored Royal Deeside Railway (I live in the northeast of Scotland).  I was drawn towards the plaid (tartan) patterns in the Echo Park 'A Perfect Christmas' digital paper pack, and as the Santa in the matching elements pack reminded me of the one on the train, I used them to decorate a Santa Express Box card.

I've also been massively impressed by the lovely examples of eclipse lettering around at present, and so set out to use some eclipse lettering on the side of the box card.


These instructions are for the Silhouette Studio Designer Edition software, but can no doubt be replicated in other cutting software.


Materials Used:
American Crafts textured card in White, Black, Ladybird, and Grass
Pearl cardstock in Silver and Dark Grey
Silver glitter paper
Beacon Zip Dry Adhesive
Black adhesive foam pads
Silhouette Cameo
Colour printer
Black adhesive gems

Files Used:
Simply Crafty SVGs Train Box Card

Other Digital Files:
A Perfect Christmas Paper Pack #2 by Lori Whitlock for Echo Park
A Perfect Christmas Element Pack #2 by Lori Whitlock for Echo Park
LW Bubble Letter Font by Lori Whitlock


Preparing the Patterned Parts

Load the plaid pattern and chalkboard labels papers into the Silhouette Studio software (with the Designer edition the papers can simply be dragged into the patterns folder in the library). Fill the side and back panels with the plaid pattern.


Create a panel by subtracting small circles from the corners of a rectangle. Type the word 'Santa' in LW Bubble Font and centre it in the panel (a clear fill and a line thickness of zero ensures it will cut, but not print). The word 'express' was typed below and filled with cream and green to print, but not cut.


Trace the Tree Panel from the labels paper, and the Santa PNG from the elements pack.

Place all the patterned pieces onto a Print & Cut virtual mat and send to the printer, then cut with the Silhouette.


(Optional) Use markers to carefully add colour to the edges of the cut pieces.


Cutting the Other Pieces

Cut the remainder of the file pieces from coloured cardstock, with copies of the Santa word and a slightly enlarged copy of the new panel from green cardstock.


Card Assembly

Both written (PDF) and video instructions are available for this file and it is very straightforward to put together. Assemble the card base and then decorate the panels, leaving the wheels, lights and Santa eclipse panel until the other panels have been applied to the card base.


The Eclipse Santa Panel


Adhere the plaid Santa panel to the plain green panel together with the centre pieces from the letter 'A's. Stack the letters and adhere each layer using liquid glue. Adhere the stacked letters into the holes in the Santa panel and your eclipse lettering is complete!


Adding Santa

Stick the two Santas back-to-back. Trim off the upright post from all the window pieces. Trim off the lower part of Santa's body and push his head and arm through the window from the back and adhere him behind the window. Trim off the parts of the body which show on the left-hand side.


Bend the Santa's face, hat, and arm gently forward.


Finishing Touches

Add the lights and wheels, giving extra dimension using adhesive foam pads.


There are so many options for decorating this Train Box card, maybe I'll try out Thomas and friends for boy's birthday cards next year!


Bye for now,
Janet, DT Member Simply Crafty SVGS


Blog: Crafting Quine 
Instagram: @CraftingQuine


Simply Crafty SVG Files:
Train Box Card

10 Dec 2017

Sketching Christmas Cards with the Silhouette Cameo and Silhouette Portrait


Hello Janet here again with ideas for quick, sketch cards drawn onto Kraft card blanks with a Silhouette Cameo or Portrait.


A quick method, for making a batch of cards, is to sketch from the Silhouette software onto pre-made card blanks. I purchased a Winter Birds set of clipart images by Le Petite Market on Etsy and quickly turned them into a set of Christmas cards with the Business Edition of the Silhouette Studio software.  The bird outlines were resized in the Silhouette software and sketch sentiments from the Silhouette Design Store were added. I made six variations and simply sketched them in Uniball Signo white gel pen.


What You'll Need

Kraft Card Blanks with matching Envelopes

Clipart

White Gel Pen

Silhouette Pen Holder

White coloured pencil


STEP 1: Import Images

Open all the winter birds file in the Silhouette software (simply File > Open, locate file and Open). The Business edition of the Silhouette Studio will open the EPS files which are ready to sketch. If you don't have the Business edition you'll need to open either JPG or PNG images and use the trace function to make your own sketch lines.


STEP 2: Add Sentiments

Open the sentiment files in the same tab, or type your own using the Text tool and a sketch font. I used a couple of sentiments from the Silhouette Design Store.  Add some small circles for full stops (periods) for the snow flakes.


STEP 3: Prepare Card Layout
Measure a card blank and make the page size the same as the open blank.

Draw a rectangle/square equal to the size of the card front and place it in the top left of the virtual mat. Position and resize the sentiments and the bird images.


STEP 4: Sketch Cards


You made need to reorientate the page size and card front to match the physical position of the card blank on the mat.


Remove or hide the square and the card is now ready to sketch.

Sketch several of one card and then change out the bird and sentiment to print variations and you'll have a stack of cards in no time.

I added some simple shading with a white coloured pencil.


Just fold the card blanks and they are ready to write and send.


9 Dec 2017

Pyjama Bags - layering HTV


Hello,

Today I have a tutorial on how to make these fun, Christmas-themed, pyjama bags over on the Silhouette UK Blog. I took some blank drawer-string bags and transformed them by decorating them with wine and Christmas phrases from the Silhouette Design Store in jewel-like glitter heat transfer material.

This is a great project if you haven't used heat transfer material (aka HTV) before, or if you'd like to try out multi-colour designs and some layering.  A domestic iron is perfectly adequate for this type of decorative project.


Last year I hit on the idea of gifting Christmas Eve PJs in reusable drawer-string bags, with initial letter tags to indicate the recipient's name. The details for making the reusable tags are here.

I used Silhouette Glitter Heat Transfer Material in Mint, Hot Pink and Silver, with some Black Flock Heat Transfer for contrast.


My blog post on the Silhouette UK Blog includes directions on how to prepare the designs, prepare and cut the media, and apply the media using a heat press, or domestic iron.

I used these designs from the Silhouette Design Store:
Ho, Ho, Ho and a bottle of Merlot
Dear Santa, Define Good
Get Mistletoed
Top of the Nice List
Both Naughty & Nice

Can you guess which one is mine?


1 Dec 2017

Gingerbread Ornaments made with Silhouette Cork Sheets


Hiya. On the Silhouette UK blog this week I've been making faux gingerbread tree ornaments.  I used the Silhouette Cork Sheets; perfect in colour and texture for faux gingerbread.


I used the Snowy House files (1) and (2) by Hero Arts from the Silhouette Design Store, there is also a church in the same series.  The materials and techniques detailed in the post would work for any snow-sprinkled design, so browse your files and see what would fit your decorating scheme and taste.


What I Used

Silhouette Smooth Heat Transfer Material - White,

Silhouette Glitter Heat Transfer Material - White,

Silhouette Cork Sheets,

Ribbon,

Mini Bells,

Liquid Glue,

Iron or Heat Press


I shall hang mine on my Christmas tree, but as they are flat, they could also be attached to a card for  a lovely card/present combination. Of course, family names, house names, or personal greetings can be added to the reverse, for a personalised gift for friends and family.

27 Nov 2017

Printing Custom Cards in Silhouette Studio


Hiya.

Over on the Silhouette UK Blog today I have a tutorial for making and printing quick, custom cards in the Silhouette Studio® software.

A batch of cards can be made super fast by printing from the Silhouette software onto pre-made card blanks. I've used some hand-painted baubles (painted by my daughter) and quickly turned them into a set of Christmas cards.  I've refined the water-coloured baubles in the Silhouette software and added sentiments from the Silhouette Design Store by Skyla Design. The tutorial shows how to make them for yourself.


Using this method you can be reproduce a whole batch of cards in minutes - perfect for your last minute Christmas cards!


20 Nov 2017

Add a new material type to Silhouette Studio software

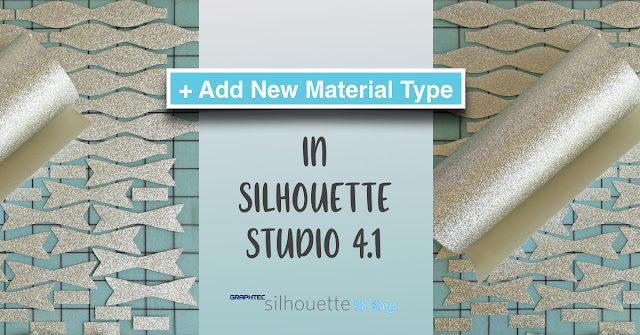
Silhouette Tutorials - add new materials or new media to the Silhouette Studio software. By janet Packer craftingquine.blogspot.co.uk. Full tutorial over on the Silhouette UK Blog.


Hello again, over on the Silhouette UK Blog today I have a post to show how to add custom media to the list of cutting materials in the Silhouette Studio® software. You'll find adding custom settings can be a HUGE time saver.

My post includes a step-by-step guide (using version 4.1 of the Silhouette Studio® software).

The media I added is glitter wallpaper; which cuts beautifully on my Cameo and Curio. I tested it making bows for my Christmas tags and parcels using Lori Whitlock's 3D Bow from the Silhouette Design Store.

Silhouette Tutorials - add new materials or new media to the Silhouette Studio software. By janet Packer craftingquine.blogspot.co.uk. Full tutorial over on the Silhouette UK Blog.


Pop over to the Silhouette UK Blog if you have a Silhouette and haven't mastered this process yet.  If you discover anything extra about adding new cut settings it would be great to add it as a comment and share it with the wider Silhouette community too.


11 Nov 2017

Foil and Acetate Card for Armistice and Remembrance Sunday

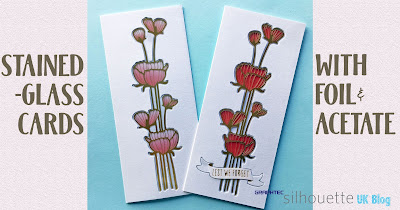
Foil and Acetate Poppy Card by Janet Packer (Crafting Quine). Cutting file details by Hero Arts at http://craftingquine.blogspot.co.uk


Hi, I'm sharing a new cardmaking technique for delicate or detailed cutting files over on the Silhouette UK Blog today.

Foil and Acetate Poppy Card by Janet Packer (Crafting Quine). Cutting file details by Hero Arts at http://craftingquine.blogspot.co.uk


In recognition of Remembrance weekend, I have used a beautiful poppy file by Hero Arts (#27110). This is my grandad who served in WW1 as a teenager.

Foil and Acetate Poppy Card by Janet Packer (Crafting Quine). Cutting file details by Hero Arts at http://craftingquine.blogspot.co.uk


These elegant cards are made with adhesive foil and an acetate, or acrylic window, overlaid on a printed background and mounted within an offset of the shape.  Using the Silhouette Printable Foil gives a fine foiled-effect without the need for heat or messy embossing powders. My photographs really don't do justice to the depth, dimension, and prettiness of the cards in real life.

Foil and Acetate Poppy Card by Janet Packer (Crafting Quine). Cutting file details by Hero Arts at http://craftingquine.blogspot.co.uk

Foil and Acetate Poppy Card by Janet Packer (Crafting Quine). Cutting file details by Hero Arts at http://craftingquine.blogspot.co.uk


I have a full step-by-step tutorial over on the Silhouette UK Blog today. As usual, there are plenty of additional hints and tips on using your Silhouette and the Silhouette Studio software.


8 Nov 2017

Snow Lady using Simply Crafty SVGs Snowman Stacking Box Set

Snow Lady Stacking Boxes by Janet Packer (Crafting Quine) using Simply Crafty SVGs Snowman Stacking Box Set. http://craftingquine.blogspot.co.uk


Hello, Janet here with my first 3D Christmas project of the year using the Snowman Stacking Box Set from Simply Crafty SVGs.  I've turned the snowman into a glamorous 'snowLADY' using the Silhouette Cameo's Print & Cut function with digital papers and elements to make new accessories.  I used a Silhouette Cameo® 3, but of course these SVG files can be used with other desktop die cutting machines (details here).
 
My finished Snowlady ended up just under 12" tall, with the largest box at 6.5" across and 4" tall, and the smaller one at 4.5" by 3.75".  The original sizes can be found with the Snowman's listing in the Simply Crafty SVGs shop.


MATERIALS:
White Pearl Card (large sheets)
Black Pearl Card
Red & White Baker's Twine
Down the Road Snow Flurries Digital Elements
Down the Road Snow Flurries Digital Papers
Versafine Embossing Ink
Judikins Iridescent Sparkle embossing powder
Sizzix Embossing Folder & Stamp - Fun Stripes Set by Hero Arts
Small gems
Beacon 3-in-1 Glue
Inkjet Printer
Silhouette Cameo


The Snowman Body
I made the whole snowman a little larger to fit some bigger gifts inside. To do this it is necessary merge all the files that make up the snowman onto one tab, selecting all the pieces and enlarging the biggest piece to fit the largest piece of card. Of course, you also need to check that the largest piece to be cut from smaller card fits too.


The Body Box
The two boxes are cut from white pearl card and constructed using the instructions in the PDF included with the Snowman Stacking Box Set files.  The top of the lid of the larger box is 'filled' with a snowflake design from the set of digital papers and then print and cut with printer and Cameo. The scarf lid edging was filled a plain paper from the same set.


Scarf
The scarf tails come from the digital set, substituting them for the original scarf tails, but using them to gauge the sizing.  All the scarf pieces were stamped with embossing ink and then heat embossed with the iridescent powder to give sparkling stripes.

Snow Lady Stacking Boxes by Janet Packer (Crafting Quine) using Simply Crafty SVGs Snowman Stacking Box Set. http://craftingquine.blogspot.co.uk


Buttons
The buttons were cut from coated black card with just the top piece embossed using the striped embossing folder. Once constructed they were mounted to the base using dimensional foam pads.

Snow Lady Stacking Boxes by Janet Packer (Crafting Quine) using Simply Crafty SVGs Snowman Stacking Box Set. http://craftingquine.blogspot.co.uk


Mittens
The mittens were a new element taken from the digital elements set and sized to match the project.  I print and cut three copies of each glove (one set was a mirror image of another), cutting a slit in one of each. Three copies of the mittens were layered with the slit copy in the middle of the sandwich and with baker's twine trapped inside. The bakers' twine was placed close to the position that the head box will sit on the body lid and then stitched in place using embroidery thread.

Snow Lady Stacking Boxes by Janet Packer (Crafting Quine) using Simply Crafty SVGs Snowman Stacking Box Set. http://craftingquine.blogspot.co.uk


Head
I attempted to substitute some more feminine facial elements, using a berry from the digital elements as a nose. I can't pretend that I didn't have several attempts at this, and I'm not entirely sure I achieved it. Maybe you can do better?

Snow Lady Stacking Boxes by Janet Packer (Crafting Quine) using Simply Crafty SVGs Snowman Stacking Box Set. http://craftingquine.blogspot.co.uk


Hat
This is my favourite part. The hat parts were cut straight from the file and decorated with print and cut digital elements from the elements set. These were enhanced with the addition of some Glossy Accents, extra small shapes, sequins and adhesive gems.


Snow Lady Stacking Boxes by Janet Packer (Crafting Quine) using Simply Crafty SVGs Snowman Stacking Box Set. http://craftingquine.blogspot.co.uk


... And that completes the snowlady.

Snow Lady Stacking Boxes by Janet Packer (Crafting Quine) using Simply Crafty SVGs Snowman Stacking Box Set. http://craftingquine.blogspot.co.uk


It was such fun to combine the SVG file with digital elements to make something unique. I hope you'll try it.


Bye for now,
Janet, DT Member Simply Crafty SVGS

Blog: https://CraftingQuine.blogspot.co.uk
Instagram: https://www.instagram.com/craftingquine


Simply Crafty SVG Files:
Snowman Stacking Box Set


Additional Digital Files:
Down the Road Flurries of Fun Digital Elements
Down the Road Flurries of Fun Digital Papers


3 Nov 2017

No-Mess Ways to add Glitter - using the Polar Bear Girl by Sanqunetti Design


Do you love using glitter, but hate the mess it leaves behind? Adding regular glitter with wet adhesive can really add wow factor to cards but tends leave a glittery trail behind.  I made this sparkling card with a new SVG release from Sanqunetti Design - the Polar Bear Girl SVG using two no-mess glitter techniques.


 Supplies Used


I used all the above which including patterned papers are from Kaisercraft's Bubblegum Hills, 6 1/2" Paper Pad (recently retired).  For the glittery parts I used regular superfine glitter and also Silhouette's  Glitter Heat Transfer material.


Card Technique

I made a shaped card base in the Silhouette Studio software using an offset of the bear sitting on a present.  The present is simply a rectangle draw in the software, and the ribbons are just thinner rectangles.  I used a 2 mm offset of the two pieces, then made a mirrored copy to the left, overlapped the two, and then welded them together. The small extra shapes generated were then deleted to give just the outline.  I added a few simple tag shapes, trying out a couple of different colours of sketch pens. This is what I cut out from the white frost glimmer card.


It was then simply a matter of cutting the other pieces out of card and paper. I didn't cut the bear feet separately but made a combined grey base welding all the shapes together, and borrowing the right leg cut line from the feet, adding it to the white bear body.  More about the bear body later.


Now, here is my first non-mess glitter method.


METHOD 1. Apply Glitter with Double-Sided Adhesive


Cut the parcel from regular patterned paper (no fancy finish) and apply a matching piece of double-sides adhesive sheet over the top.  Expose the sticky surface of the sheet and sprinkle it with clear super-fine crystal glitter.


Knock off the excess glitter and burnish the newly glittered surface with a paper folder. Use one of the scrap protective layers from the adhesive sheet to cover the glittered surface while rubbing to protect the paper folder and rub firmly to ensure the glitter is firmly adhered to the paper.


After burnishing in this way you'll have a hard time shifting any of the glitter!


METHOD 2: Using Glitter Heat Transfer Material on Card


To make the he glittery bear, I cut the main bear body from white glitter heat transfer material. The material is cut with the shiny side to the mat, and the design should be flipped horizontally before cutting so that the bear is oriented correctly.

This is the design piece that I cut. Do see where the I placed the right leg piece borrowed from the foot?


I used a heat press to activate the adhesive on the heat transfer material, but an iron would work too. Use a lower temperature than you would normally use to attach heat transfer to fabric to avoid distorting the supporting card.  Apply for just a few seconds and then check if it has adhered. Peel off the backing sheet and press for another second or so and the glitter is permanently stuck.


I hope you'll try these methods out; they both give a really neat professional look - so much easier and cleaner than using liquid glue.

The cute Girl Polar Bear SVG file is available now from the Sangunetti Design website and also from the Etsy store.


This card has been entered in the following challenges:
ABC Christmas Challenge - 'W' for White
Craft Rocket Challenges - Christmas Is Coming
Simon Says Stamp - Christmas Gift Tag
Crafty Cats Challenge - ATG Beartastic challenge #391

If you like polar bears - here are a Polar Bear shaker card  and  Polar Bear personalised gift boxes that I made from the Sangunetti Design Christmas Polar Bear SVG.