Showing posts with label greetings cards. Show all posts

24 Nov 2018

A Contemporary Mass-Produced Christmas Card


Hi, I can't believe that November is almost over - where did the month go? Every year I make one or two card designs in multiples, and this year I've picked a contemporary card design by Kristen Magee; the Fa La La Christmas Card (#234355). Over on the Silhouette UK Blog I have a tutorial showing how I simplified this seven-layer card to two-layers with a few additional accents using silver Silhouette Sticker Foil.


In the post I take you through the process of how this card evolved to the point at which I felt I'd made it as easy enough to make in quantity. I reduced the number of layers by bringing in the Print & Cut technique as well as introducing some extra shine with foil sticker paper.


I made a heap of these little accent tags too. I love how teeny tiny I can make them with my Silhouette Cameo.


Materials Used

Silhouette Silver Printable Sticker Foil

Medium-weight White Textured Cardstock

Square Card Blanks

Beacon 3-in1 Advanced Craft Adhesive

Silver Cord

Silhouette CAMEO® 3

Silhouette 12" x 12" Cutting Mat

A3+ Printer (if printing on 12"x12", otherwise an A4 Printer)


DIGITAL DESIGNS USED:


25 May 2018

Cut your Own Stencils with the Silhouette Cameo


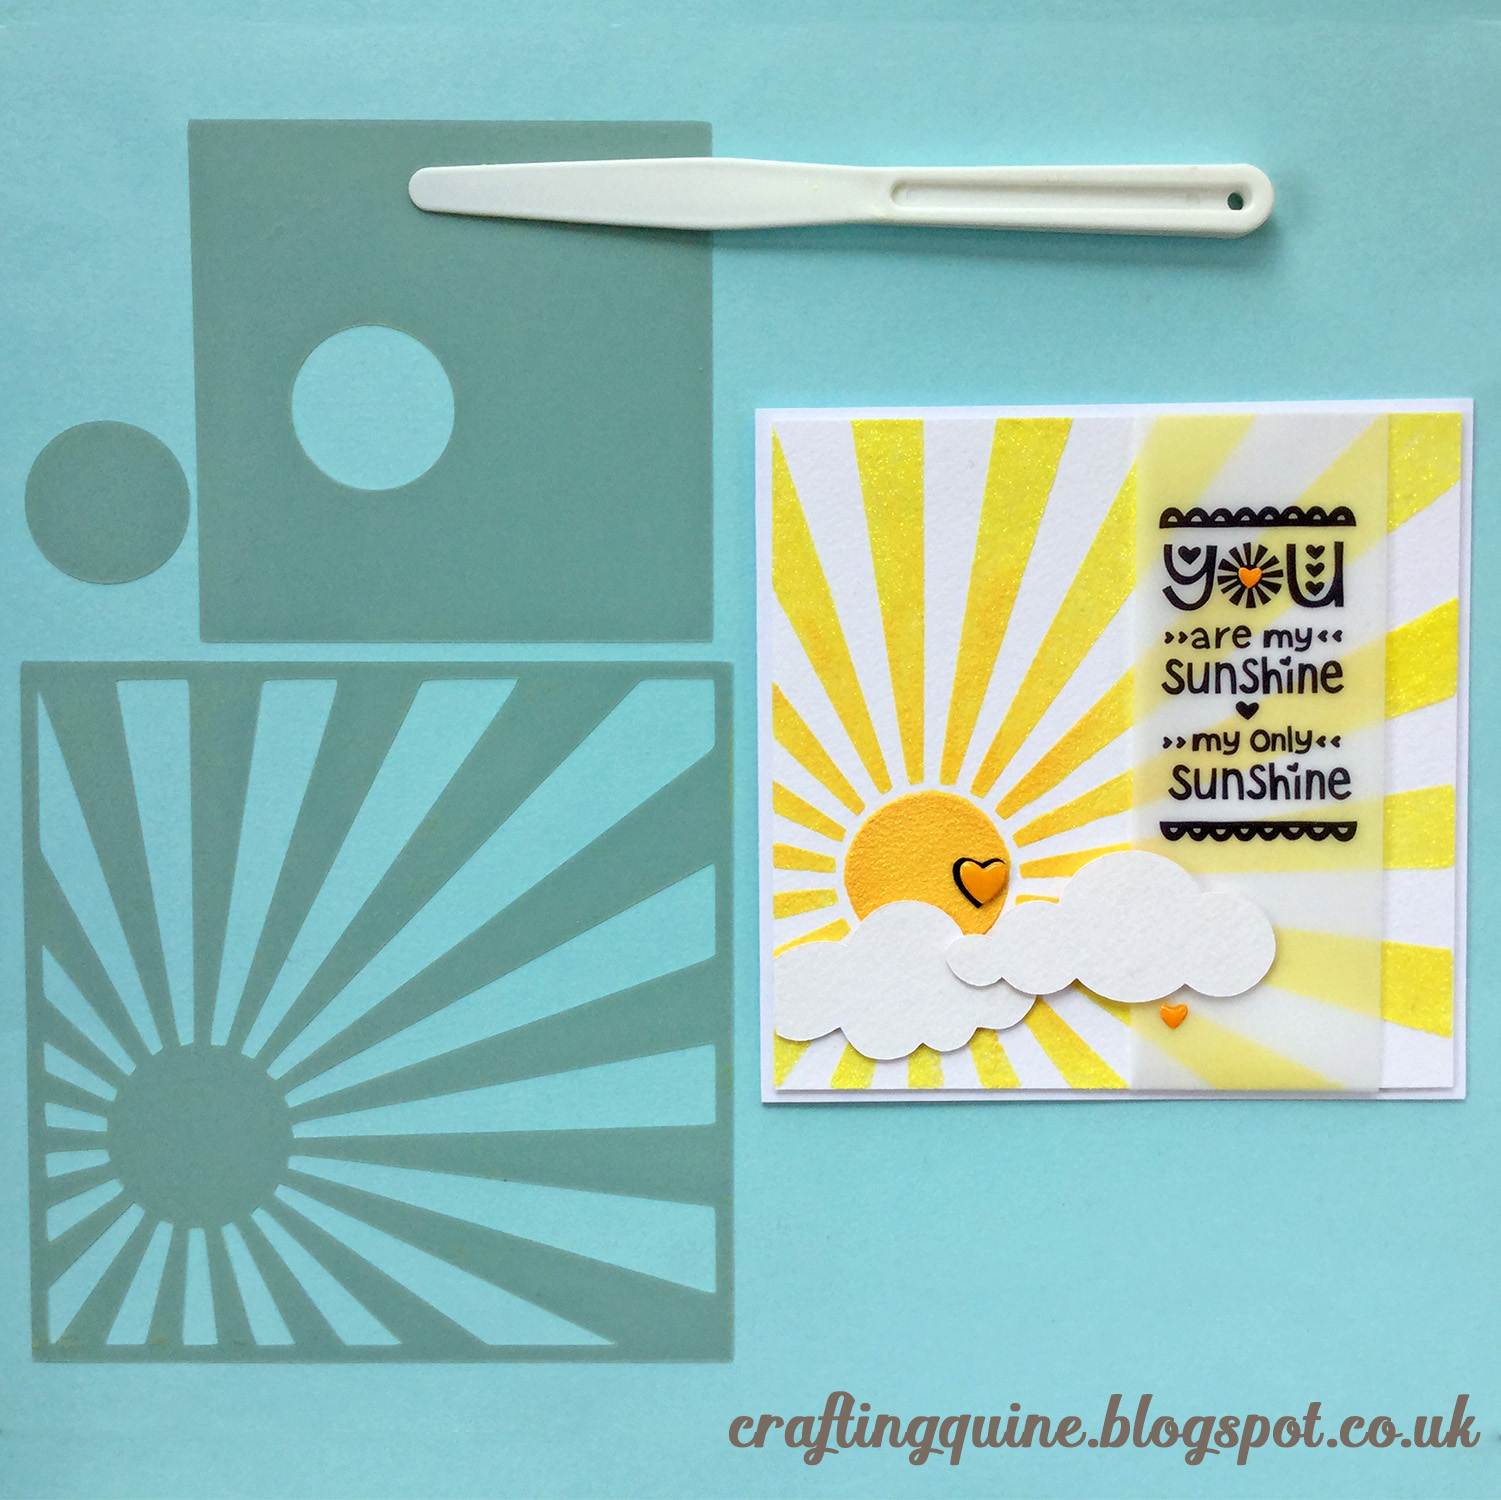
Hello, Janet here with a media I haven't tried before ... Silhouette Stencil Material (the non-adhesive variety). It comes in a pack of six letter-sized, thick, plastic-y sheets. My first thought was that it would be perfect for making stencils to use with a mix of pigment ink and glitter paste. I was impressed with the resulting stencils and mask, so have shared the process of making, and using the stencils, together with the finished card, on the Silhouette UK Blog.

These are the designs that I used:


I loved using the stencil material and have all kinds of projects in mind for this stencil and for others! They can be used with glitter paste, mousse, texture paste, or sprays and mists.  I think I'm going to be busy!


Do you make your own stencils? I'd love to hear your ideas and suggestions.


18 Apr 2018

Tiered Ombre Cake Box Card


Hiya.   Today I'm sharing another fun greetings card from Simply Crafty SVGs.  I've used the Tiered Cake Box Card, a 3-dimensional card that folds flat for posting.


I love ombré shading, and have some seen some wonderful real cakes decorated in that style. I decided to give the cake on my card an ombré look, and also used vellum to make the plate look more like a glass cake plate.  I made a few small adjustments to the Tiered Cake Box Card design though, adding more detail to the icing using internal offsets, then adding the recipient's age with a matching offset. I describe how I did these things in a little more detail below using my Silhouette Cameo. I used a Silhouette Cameo® 3, and the Silhouette Studio Designer Edition software. However, the SVG files can be used with other desktop die cutting machines and software (details here).


Materials Used:
Pale Blue Heavyweight Smooth Cardstock
White Mediumweight Textured Cardstock
Pearlescent Vellum
Beacon 3-in-1 Adhesive
Double-sided Adhesive Tape
Tim Holtz Distress Oxide Ink Pads in Salty Ocean & Faded Jeans
Ranger Mini Ink Blending Tool
Lawn Fawn Starry Backdrops Clear Stamp
Versamark Clear Watermark Ink Pad
Wow! Ultra Fine White Embossing Powder
Embossing Heat Tool
Sizzix Tim Holtz Stripes Embossing Folder from the Harlequin & Stripes Set
Alcohol Markers for colouring the candle flames (Optional)
Silhouette Cameo


Files Used:
Simply Crafty SVGs Tiered cake Box Card

Fonts Used:
SW Swirl Dance Font


Heat Embossing the Cake
Once I'd cut out all the pieces, I stamped the two cake front pieces with Versamark ink and applied white embossing powder to provide a resist for the ink blending. It isn't necessary to stamp on the lower part of the taller piece, as only the top part shows once the card is assembled.


Coloring the Ombré Cake
I blended the lighter colour of ink (Salty Ocean) on to the top three quarters, and then blended the darker colour (Faded Jeans) to just the top edge.


Here is the before and after, (actually after, and before) showing what a difference it makes!


Vellum Cake Plate

I cut three plates from vellum as well as from the blue cardstock and then adhered them together using double-sided tape. Yes, I did trim those excess end pieces first!


This is what they look like stuck together. The tape shows through the vellum a little, but as it runs parallel with the stripes it looks like part of the pattern.


Coloring the Candles (optional)

I coloured the candles on cake background (cut from white cardstock) with Copic Markers of various colours. I followed part of this YouTube video for colours choices.  Alternatively, you could use colored card, paper, or add chalks, or colored paper.


Offsetting the Icing

To give a little more detail to the icing I made an internal offset of 0.55". I cut the offsets from the textured side of the card, and the original pieces from the smooth side.


I did the same with the swag parts, but released the path and deleted the inner-most parts, copied the original inner parts, and made a compound path with them and the new offsets (otherwise the pieces would have been too small to handle easily).


This is how the finished icing looked.


Adding an Age

You'll notice that I also added an age. It would also possible to add a small sentiment in the same way. I typed out the number (using SW Swirl Dance font from the Silhouette Design Store) and added an offset to match that of the icing. I cut the offset from white card, and the number itself from a scrap piece of ombré blended card.


I cut the number from different parts of the card and from white, and chose to use the lighter ombré version.


Assembling the Card

The card was assembled following the directions in the pdf document included with the file download. I used panels in the same colour as the card base, shading the edges lightly with the distress inks.


The card fits into a US A7 envelope.  A free envelope file is available on the site that fits perfectly (for cards up to 5" x 7").


    These are the files I used. Just click on the photo to visit the item in Simply Crafty SVGs online store.


    This is a great card for all sorts of occasions and goes together very easily. Wouldn't it be great for Mother's Day? I'm sure I'll be using this one again before too long!


    Janet, DT Member Simply Crafty SVGs

    Blog: Crafting Quine 
    Instagram: @CraftingQuine


    Simply Crafty SVG Files:
    Tiered Cake Box Card
    Basic Envelope Set (Free)

    2 Feb 2018

    Valentine Cards - Love U Two Pieces


    Love U 2 Pieces - One design, two different Valentine's cards. designed by Janet Packer (Crafting Quine) for the Silhouette UK Blog. Uses Jigsaw puzzle pieces and scratch off sticker paper.


    Hiya, today I have a pair of cards over on the Silhouette UK Blog which feature one design idea, but which use very different techniques and methods.


    Love U 2 Pieces - One design, two different Valentine's cards. designed by Janet Packer (Crafting Quine) for the Silhouette UK Blog. Uses Jigsaw puzzle pieces and scratch off sticker paper.


    Love U 2 Pieces - One design, two different Valentine's cards. designed by Janet Packer (Crafting Quine) for the Silhouette UK Blog. Uses Jigsaw puzzle pieces and scratch off sticker paper.


    My post includes information on using the Silhouette Scratch-Off Sticker paper.  Hop over to read about using this usual crafting medium with your Silhouette Cameo.


    27 Nov 2017

    Printing Custom Cards in Silhouette Studio


    Hiya.

    Over on the Silhouette UK Blog today I have a tutorial for making and printing quick, custom cards in the Silhouette Studio® software.

    A batch of cards can be made super fast by printing from the Silhouette software onto pre-made card blanks. I've used some hand-painted baubles (painted by my daughter) and quickly turned them into a set of Christmas cards.  I've refined the water-coloured baubles in the Silhouette software and added sentiments from the Silhouette Design Store by Skyla Design. The tutorial shows how to make them for yourself.


    Using this method you can be reproduce a whole batch of cards in minutes - perfect for your last minute Christmas cards!


    23 Aug 2017

    Orchid Card using Simply Crafty SVGS Orchid Box Card SVG


    Hello, Janet here with a new folding box card. It was a treat to make this SVG file for the Orchid Box Card from Simply Crafty SVGS.

    This is a quick and easy card to cut and assemble.  Sandy's version is beautiful in purple, but I made just a few little changes to make it more like the lovely white orchids that I have flowing on my window sill today!


    Materials I Used:
    White Extra Heavyweight Parchment Vellum 220 gsm (about 150 lb.)
    Silver Metallic Card
    Heavyweight White Glimmer Card
    Copic /Alcohol Markers
    Geometric Embossing Folder and Embossing Machine
    Beacon 3-in-1 Adhesive
    Dimensional Adhesive Pads
    Tonic Ball Embossing Tools


    Print & Cut

    I used the Print & Cut facility on my Silhouette Cameo to make green coloured stems, leaves and buds, and cut them from thick parchment vellum (less translucent than regular vellum).  The secret to perfect print and cut is to add a non-cut margin of colour around the printed shapes, printer's call this a bleed. You'll find more Print & Cut projects here.


    Adding Dimension to Leaves and Stems

    I shaped the buds with a ball embossing tool and layered them onto the stem using a triangular-shaped piece of dimensional foam between.  I blended some green alcohol marker around the edges of the leaves and added some stripes along the length before attaching to the base with more dimensional foam to open the slit in each leaf.


    Colouring and Shaping Orchid Flowers

    The flower parts were also cut from parchment vellum with no colour added (they fit on the same sheet as the Print & Cut stems and leaves). The orchid flower centres were coloured with the Copic marker colours shown in the photo. A Google image search on orchid flowers will provide a host of colouring guides.


    The petals, sepals and centres were shaped with the ball tools on a soft surface (I used an old fabric mouse mat).


    The individual flowers were assembled from the back forward using strong liquid adhesive. I used the ball tool to hold the parts together until the adhesive had stuck.


    Card Assembly

    The card base pieces were cut from white cardstock and the pot and panels from metallic silver card. The pot and panels were embossed using an embossing folder. The card assembly was very straightforward, following the PDF instructions included with the SVG file.


    The finished card will fold flat to fit into regular envelope. It makes a lovely card suitable for so many different occasions.


    Bye for now,
    Janet, DT Member Simply Crafty SVGS

    Blog: https://craftingquine.blogspot.co.uk 
    Instagram: https://www.instagram.com/craftingquine


    Simply Crafty SVG Files:
    Orchid Box Card


    16 Sept 2016

    Party Animal Card and Stickers


    The new SVG release from Sanqunetti Design this week is this cute Party Llama file.

    I made him (the llama definitely has a male demeanour) into this circular layered card and added the party animal sentiment.  The sentiment was applied using the 'perfect placement' technique that I describe in detail here.

    The entire card is made from paper and card with the exception of the facial features and hooves, which I cut from dark brown vinyl and some additional enamel dots.

    The paper and card used was American Crafts textured cardstock and Lidl paper (a light beige colour can be hard to track down).


    I also made some matching stickers, cut from an A4 sheet of Avery label paper. My settings were a little high and I managed to cut the backing sheet as well as the sticky part. Not a big deal, but bound to happen when I had only ONE sheet of sticker paper left!


    I was pretty pleased with how the stickers turned out.  They are a fun addition for the card recipient or can be used to give out at a party, school class, or to friends.

    The file is available from Sanqunetti Design store and from Etsy, and is reduced in price for a limited time.


    I think I might make more matching stickers with the child-centric cards I make. Do you make stickers to match your cards? What sort of cards do you pair them with?